Table of Contents
Modifying Crew Times and Adding Notes to a Job
Record crew movement times and leave notes on a job directly from the event page
Modifying Crew Times and Adding Notes to a Job from the Event Page
Record crew movement times and add operational notes to a job in real time from the event overview page.
Overview
Each job on the event page has an expandable detail panel. Inside that panel, you'll find time fields for every crew assigned to the job, a crew result selector, and a notes section. You can update times and add notes in real time, and the job's status badge will update automatically as you fill in the time fields.
This is designed for use on the day of the event — quickly logging when a crew was dispatched, when they arrived on scene, when they made patient contact, and so on.
Before You Start
- You must be a member of the team associated with the event. Any team member can update crew times and add notes.
- Crews must already be assigned to the job before their time fields appear. You can assign a crew from the Assign Crew button on the job row before expanding the details.
- The event page polls for updates every 30 seconds, so changes made by other users will appear automatically.
Expanding a Job's Detail Panel
All time editing and note-taking happens inside a job's expanded detail panel.
Open the event you're working on. The event page shows a Jobs section with a table listing all jobs for that event.
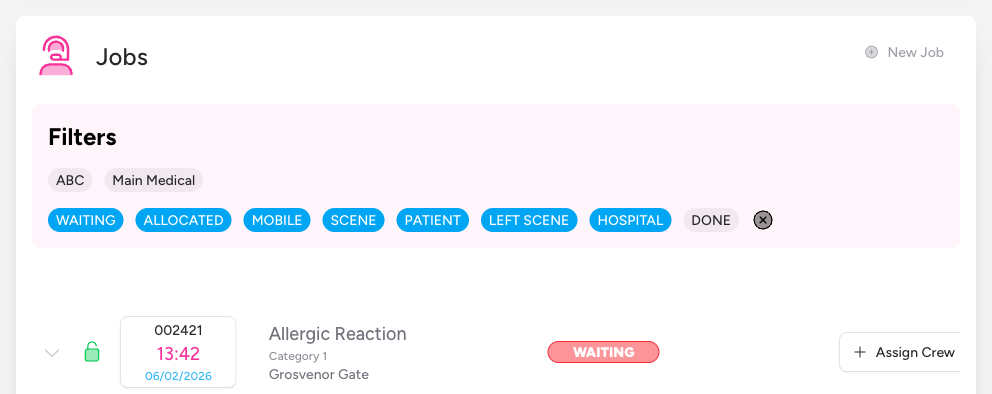
Step 2: Expand the job's detail panel
Each job row has a chevron (>) button on the left side. Click it to expand the detail panel for that job. The chevron rotates to point downwards to show the panel is open. Click it again to collapse it.
Only one job's detail panel can be open at a time. Opening another job will collapse the currently open one.
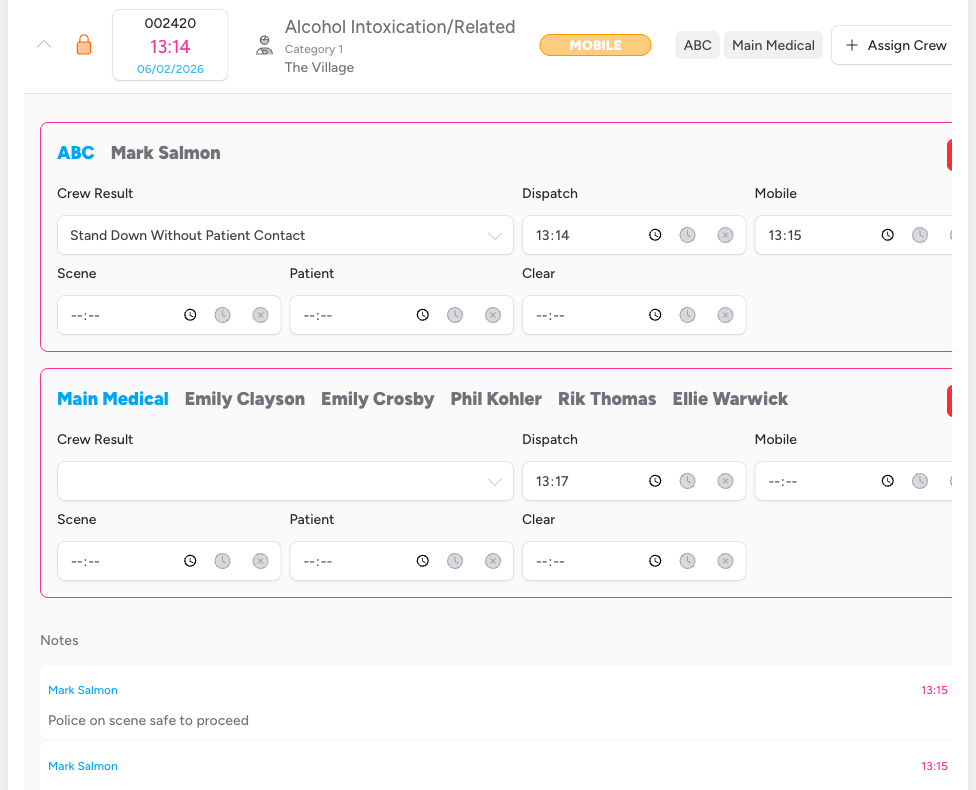
Modifying Crew Times
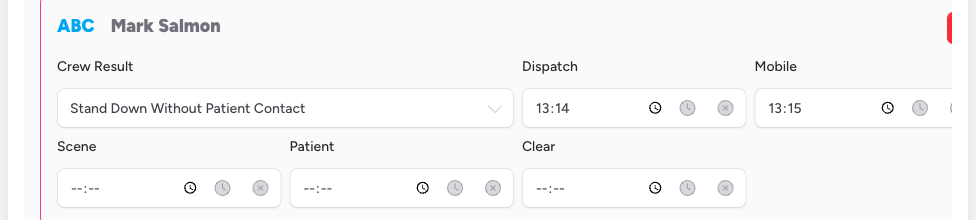
Inside the expanded detail panel, each crew assigned to the job appears in its own bordered card. The card shows the crew's callsign and member names at the top, followed by a Crew Result selector and five time fields.
Understanding the Time Fields
The five time fields represent the key stages of a crew's response to the job. The job's status badge (visible in the main jobs table) updates automatically based on which fields are filled:
| Field | What it records | Effect on job status |
|---|---|---|
| Dispatch | When the crew was dispatched to the job | Sets status to Allocated |
| Mobile | When the crew became mobile (en route) | Sets status to Mobile |
| Scene | When the crew arrived on scene | Sets status to Scene |
| Patient | When the crew made patient contact | Sets status to Patient |
| Clear | When the crew cleared the job | No direct status change — status progresses via the patient record after this |
Times are entered in 24-hour format. All times are interpreted as UK local time (Europe/London), so you don't need to think about UTC during summer time.
If a crew makes it to scene before midnight but clears after midnight, IndieBase handles the date rollover automatically — just enter the time as shown on the clock.
Step 3: Enter a time manually
Click into any time field and type the time in HH:MM format (for example, 14:35). The time is saved automatically when you move focus away from the field (i.e. when the field loses focus).
Step 4: Use the clock shortcut to stamp the current time
If you want to record right now as the time, you have two options:
- Click the clock icon inside the time field. This sets the field to the current time and saves immediately.
- Press N while the time field has focus. This does the same thing via keyboard.
This is the quickest way to record times during a live event — click the field, press N, done.
Step 5: Clear a time
To remove a recorded time, click the X (circle-xmark) button to the right of the time field. The field clears and the change saves immediately.
Clearing a time field will affect the job's status. For example, clearing the Dispatch time when no other times are set will move the job's status back to Waiting.
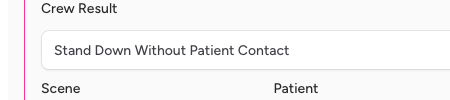
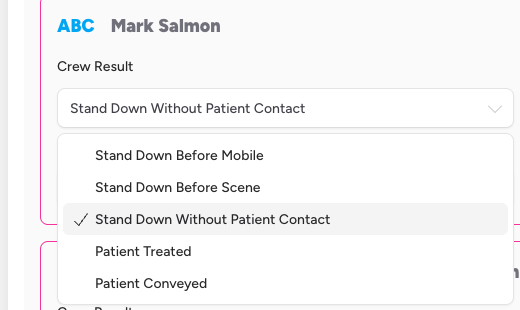
Step 6: Record the crew result
Each crew card also has a Crew Result dropdown. Use this to record the outcome for this crew's attendance at the job. The available options are:
- Stand Down Before Mobile
- Stand Down Before Scene
- Stand Down Without Patient Contact
- Patient Treated
- Patient Conveyed
Select the appropriate result from the dropdown. The selection saves immediately.
Adding Notes to a Job
The Notes section appears below the crew cards in the expanded detail panel. It shows a running list of notes left by any team member, along with the author's name and the time the note was created.
Step 7: Type your note
Click the text input in the Notes section and type your note. Notes can be as long as you need — the field accepts multi-line text.
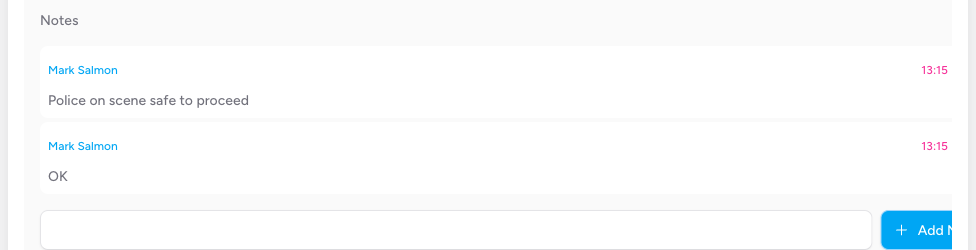
Step 8: Save the note
You can save the note in either of two ways:
- Click the Add Note button.
- Press Cmd + Enter (Mac) or Ctrl + Enter (Windows) while the note field has focus.
The note appears immediately in the list above the input field, showing your name highlighted and the current time.
Step 9: Delete a note
You can only delete notes that you wrote yourself. Your own notes show a red trash icon button to the right of your name. Click it to delete the note — there is no confirmation prompt, so take care.
Other users' notes do not show a delete button.

How Job Status Updates Automatically
You don't need to manually change the job's status. IndieBase derives the status from the time fields you fill in:
- No times filled in any crew field → Waiting
- At least one crew has a Dispatch time → Allocated
- At least one crew has a Mobile time → Mobile
- At least one crew has a Scene time → Scene
- At least one crew has a Patient time → Patient
- The patient record has a departure time → Left Scene
- The patient record has a hospital arrival time → Hospital
- The job has been manually marked as done → Done
Status is re-evaluated each time the page polls (every 30 seconds) or when you make a change.
Tips and Best Practices
- Work quickly with N. During a busy event, the fastest workflow is: click the field, press N, move on. The clock shortcut is there specifically so you don't have to type.
- Expand one job at a time. The detail panel is designed for focused use — expanding a second job collapses the first, so you won't accidentally edit the wrong job's times.
- Notes are permanent records. Only your own notes can be deleted. Use the notes field for anything that needs to travel with the job — handover information, observations, context for the patient record.
- All team members can see all notes. Notes are shared across the team. Don't include information that should be restricted to specific individuals.
- Times inform status, which informs reporting. The accuracy of your crew times directly affects the accuracy of response time KPIs for the event, so it's worth recording them as they happen rather than retrospectively.
Troubleshooting
The time fields aren't showing for a job. The expanded panel only shows time fields for crews that have been assigned to the job. If the panel is empty, no crew has been assigned yet. Use the Assign Crew button on the job row to assign one first.
I entered a time but it didn't save. Times save on blur — that is, when focus leaves the field. Make sure you've clicked away from the field or pressed Tab after entering the time. If the page hasn't updated, check your network connection, as the app requires connectivity to save from the event page.
I can't see the Add Note button or time fields. You need to be a team member for the event's team. If you're viewing the event but belong to a different team, you won't be able to edit anything.
The job status isn't updating after I enter a time. The status is recalculated each time the page polls (every 30 seconds). You can trigger a refresh by collapsing and re-expanding the job's detail panel, or by reloading the page.
I accidentally cleared the wrong time. Re-enter the time manually. If you're not sure what the time was, check the full job record (accessible via the job number button in the job row) for any previously saved values or audit history.
- Assigning a Crew to a Job — Crews must be assigned to a job before their time fields appear. See the Assign Crew guide for how to add a crew to a job from the event page.
- Creating and Managing Crews — The Crews section below the Jobs table lets you create, edit, and manage the crews available for the event.
- The Job Form — For full patient details, clinical notes, and all other job fields, open the job directly via the job number button (visible in each job row), which takes you to the full job view at
/app/job-view/. - Job Status Filters — The filter pills above the jobs table let you filter by crew or by status. Use these to focus on active jobs during a busy event.