Table of Contents
Setting Up a New Event
How to create an event in IndieBase using the two-step wizard.
Setting Up a New Event
Events are the top-level containers in IndieBase. Everything — jobs, patients, crews — lives inside an event. Create one before your team takes to the field.
Overview
An event represents a single operational deployment: a race weekend, a music festival, a sporting fixture. When you create an event, you work through a two-step wizard — first entering the event details, then choosing how shifts are structured across the event's operational days.
Once saved, you can log jobs against the event, assign crews to it, and track everything that happens on the day from a single screen. Events are scoped to your current team, so only your team's members will see what you create.
Before You Start
- You must be logged in and have an active team selected.
- Only team owners and users with the admin role can create events. The New Event button will not appear if you don't have this permission.
- Your team's configuration determines which Event Type options are available. The defaults are: Sport, Motorsport, Music, Equestrian, and Other. Your team administrator can customise these.
- If you want to link the event to a pre-configured venue rather than entering a location manually, the venue must already exist in your team's venue list. See Managing Venues for how to set those up.
-
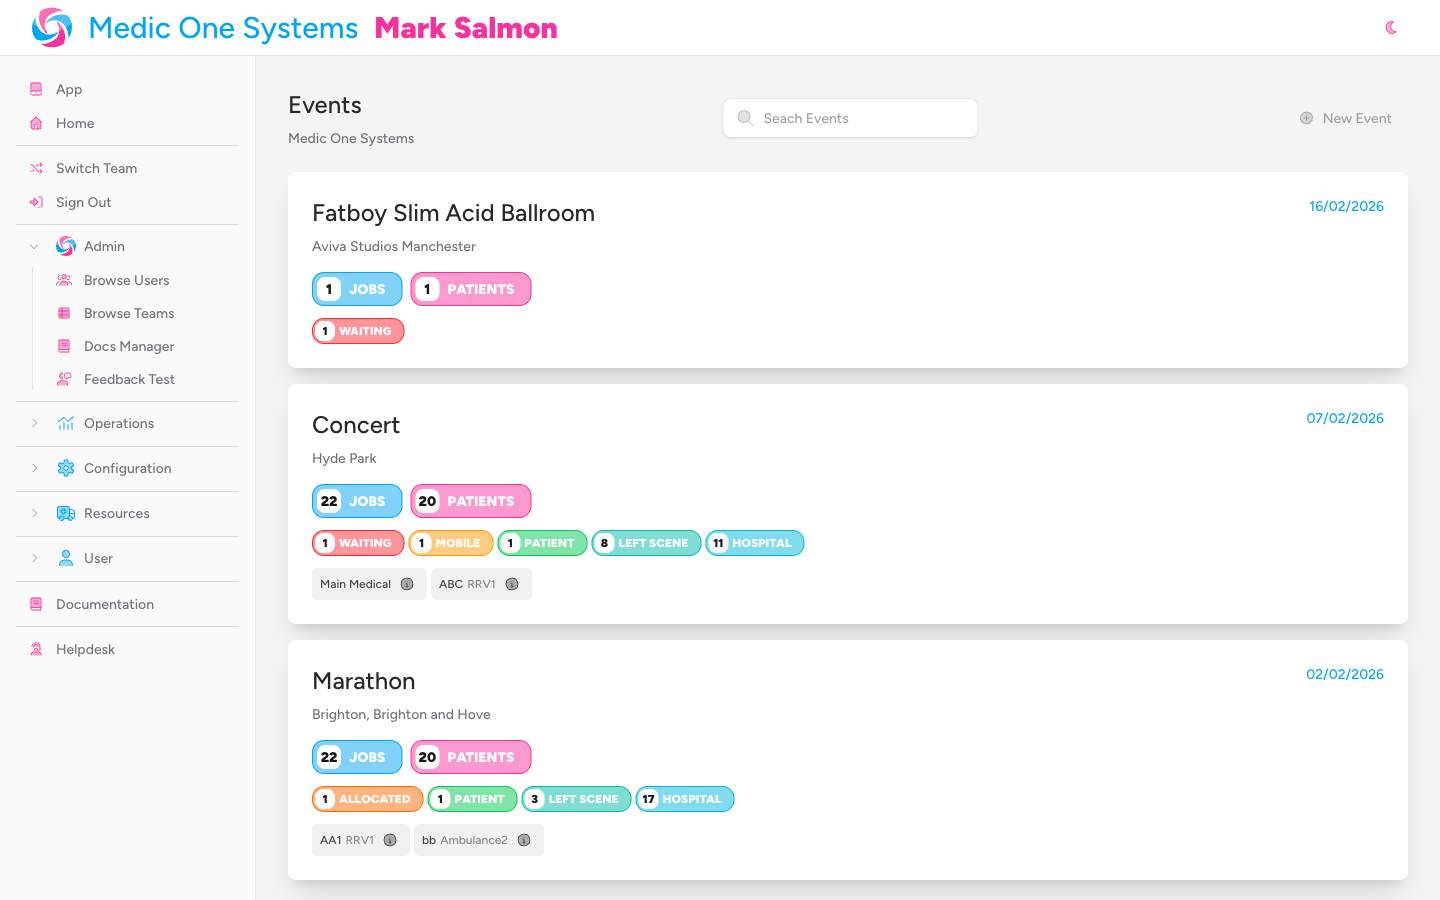
From anywhere in the application, click Events in the main navigation.
You'll land on the Events index page, which lists all events for your current team, most recent first.
-
Click New Event in the top-right corner.
The New Event button is only visible to team owners and admins. If you can't see it, you don't have permission to create events — speak to your team administrator.
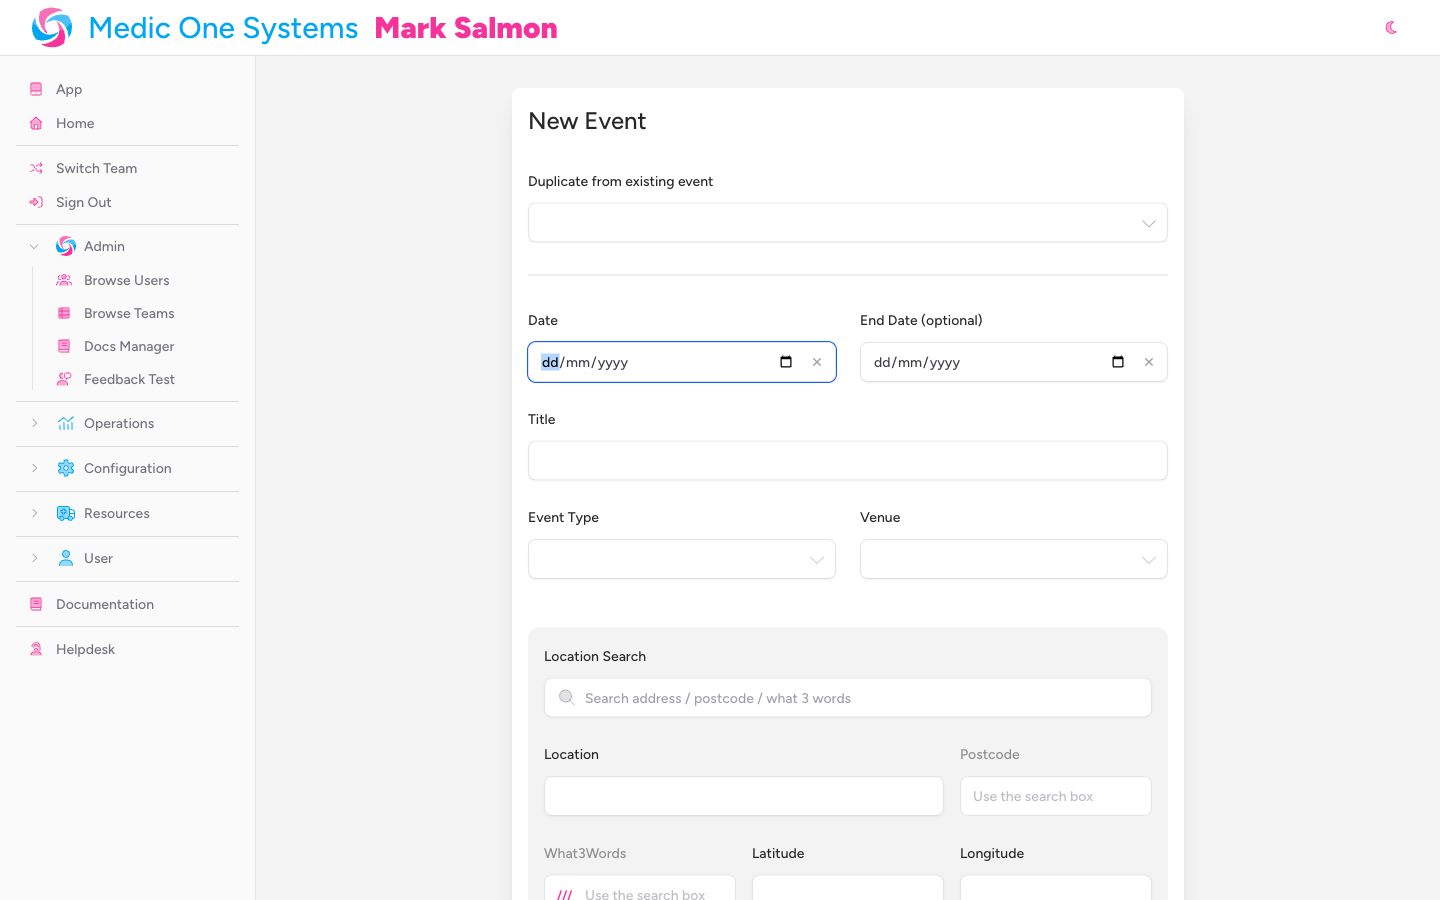
Step 1: Event Details
You'll arrive at the first step of the wizard. A step indicator bar at the top of the form shows your progress: 1 Event Details and 2 Shift Configuration, with Step 1 highlighted as active.

Duplicate from an Existing Event (Optional)
At the top of the form is a Duplicate from existing event dropdown. If you're setting up an event that's similar to one you've run before — same type, same venue — select it here. The form fields will be pre-filled with that event's details, saving you time. The shift pattern for Step 2 will also be inferred automatically from the source event.
You'll still need to set the date(s) and review everything before continuing.
Duplication copies the event's type, venue, location data, and shift structure. It does not copy jobs, crews, or patients.
Set the Date and End Date
The Date and End Date fields appear side by side.
-
Click the Date field and select the date the event starts.
This field is required. The date determines when IndieBase considers the event "live" on the home dashboard — from 6 hours before midnight of the event date to 6 hours after midnight the following day.
-
If your event runs across more than one day, click End Date (optional) and select the final date.
When an end date is set, IndieBase will automatically create shifts for each calendar day between the start and end dates using the shift pattern you choose in Step 2. You don't need to configure daily splits manually.
The end date must be after the start date.
Enter the Title
Type a name for the event in the Title field. This is required and will appear throughout the application wherever the event is referenced.
Keep titles clear and descriptive — include the event name and year if helpful (e.g., "Silverstone Festival 2025" or "Reading Festival Main Stage").
Select the Event Type
Use the Event Type dropdown to categorise the event. The options are set by your team's configuration — the defaults are:
- Sport
- Motorsport
- Music
- Equestrian
- Other
This field is required.
Set the Location
You have two ways to set where the event is taking place.
Option A: Select a Pre-configured Venue
If your team has saved venues set up, a Venue dropdown will appear. Select the venue from the list. This links the event to that venue's record — which can include pre-defined location points useful when logging jobs on the day.
When a venue is selected, the manual location fields are hidden.
Venues are managed by team administrators under Team Settings > Venues. If the venue you need isn't in the list, ask your team admin to add it, or use manual location entry below.
Option B: Enter a Location Manually
If you don't select a venue — or if your team has no saved venues — a Location panel appears with several ways to pin the event:
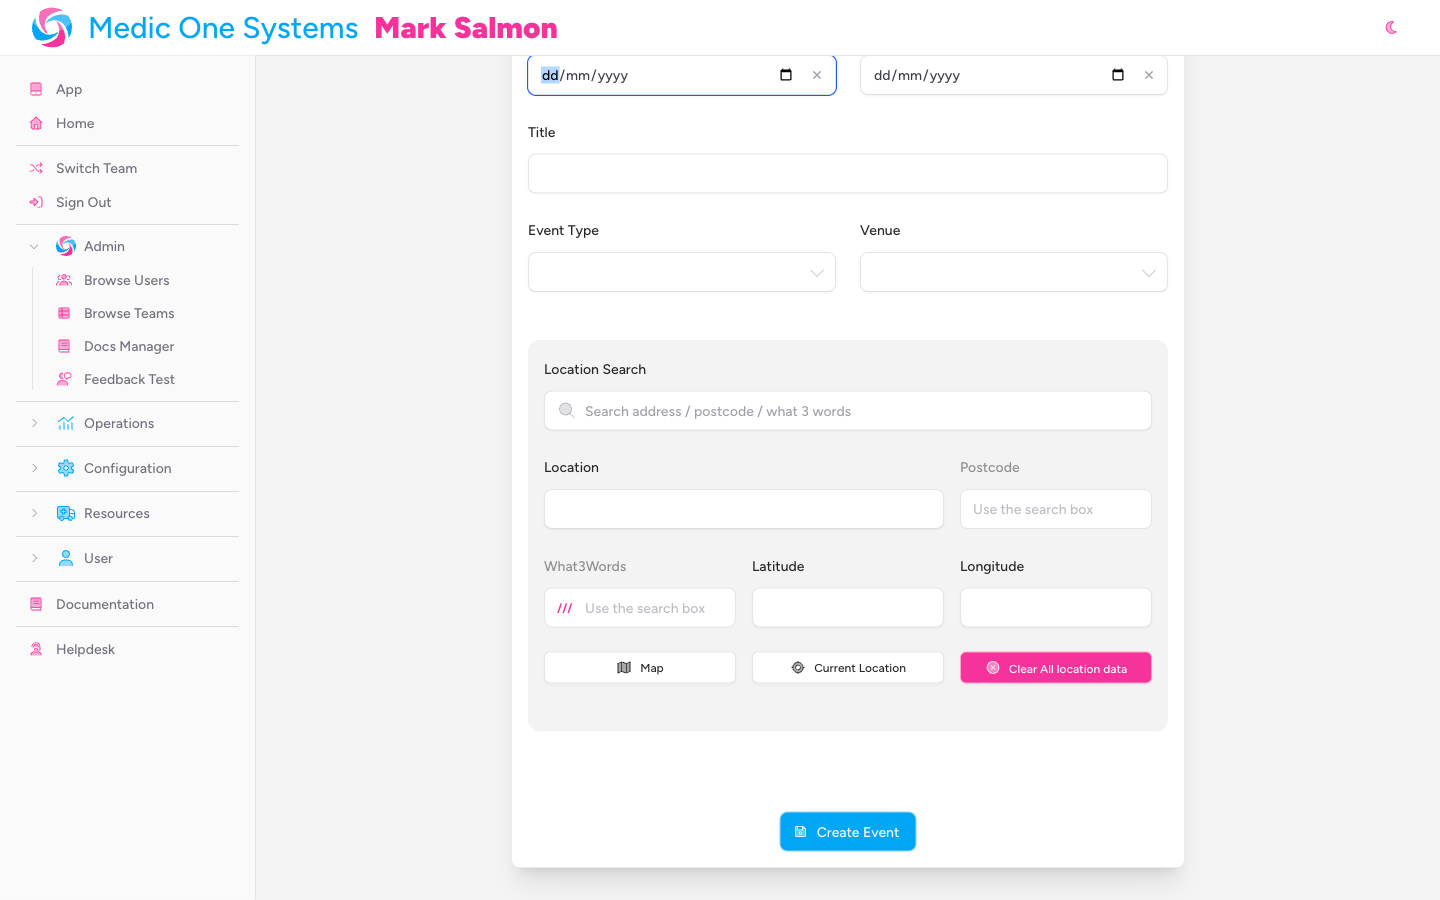
Location Search — type an address, postcode, or what3words address (e.g., ///filled.count.soap) into the search box. IndieBase will suggest matching addresses as you type. Select one to automatically fill in the location, postcode, coordinates, and what3words address.
The following fields are populated automatically when you use the search, but you can review or adjust them:
- Location — a free-text description of the location (e.g., street address, venue name, or nearest town). Required if no venue is selected.
- Postcode — filled automatically from the address search. Use the search box to change it.
- What3Words — the what3words address for the location, filled automatically. Use the search box to change it.
- Latitude / Longitude — GPS coordinates. Filled automatically but can be entered manually if you know them.
Map — click this to toggle an interactive map. Click anywhere on the map to place a pin; a pop-up will show the coordinates and offer a Set Location button to confirm.
Current Location — click this to use your device's GPS to set the location to where you are right now. Useful if you're on-site and want to pin the venue quickly.
Clear All location data — resets all location fields if you need to start again.
Continue to Step 2
Once you've filled in the event details, click Next: Configure Shifts at the bottom of the form.

Step 2: Shift Configuration
The step indicator now shows 2 Shift Configuration as the active step.

Choose a Shift Pattern
Under the Shift Pattern heading, you'll see the prompt: "Choose how shifts are structured for each day of the event." For multi-day events, this also shows how many days the pattern will apply to.
Four options are presented as radio cards in a two-column grid:
| Option | Description | Shifts per day |
|---|---|---|
| Single Shift | One shift covering the full operational day | 1 |
| Day / Night | Two 12-hour shifts (day and night) | 2 |
| Thirds | Three 8-hour shifts | 3 |
| Custom | Define your own shift structure | Variable |

Shift Preview
When you select Single Shift, Day / Night, or Thirds, a preview panel appears below the radio cards. It shows each shift's name and time range, calculated using your team's configured operational day start time.

This gives you a clear picture of what IndieBase will create before you commit.
Custom Shift Editor
If you select Custom, the preview panel is replaced by the Custom Shift Editor. Each row represents one shift and has three fields: Name, Start time, and End time.
- Click Add Shift to add another shift row.
- Click the trash icon on any row to remove it. The trash icon is not shown when only one shift exists.

If a shift's end time is earlier than its start time, IndieBase treats it as an overnight crossing — for example, a shift from 22:00 to 06:00 ends the following morning.
Duplication Behaviour
If you duplicated from an existing event in Step 1, the shift pattern is pre-selected based on the source event. The mapping works as follows:
| Shifts per day in source event | Pattern selected |
|---|---|
| 1 | Single Shift |
| 2 | Day / Night |
| 3 | Thirds |
| Any other number | Custom (with shift times copied from the first day) |
Create the Event
Once you're happy with the shift pattern, click Create Event at the bottom right of the form. A floppy-disk icon accompanies the button; it shows "Creating..." while the event is being saved.
To go back and amend the event details, click Back (the ghost button with a left arrow icon) at the bottom left.

IndieBase will create the event and its shifts, then take you directly to the Event page where you can begin adding crews and logging jobs.
Required Fields Summary
| Field | Required? | Notes |
|---|---|---|
| Date | Yes | Must be a valid date |
| End Date | No | Must be after the start date if provided |
| Title | Yes | |
| Event Type | Yes | Options set by team configuration |
| Venue | No | Only appears if team has saved venues |
| Location | Yes (if no venue) | |
| Postcode | No | Auto-filled via location search |
| What3Words | No | Auto-filled via location search |
| Latitude / Longitude | No | Auto-filled via location search or map |
| Shift Pattern | Yes | Defaults to Single Shift |
| Custom Shifts | Yes (if Custom selected) | At least one shift with a name and times |
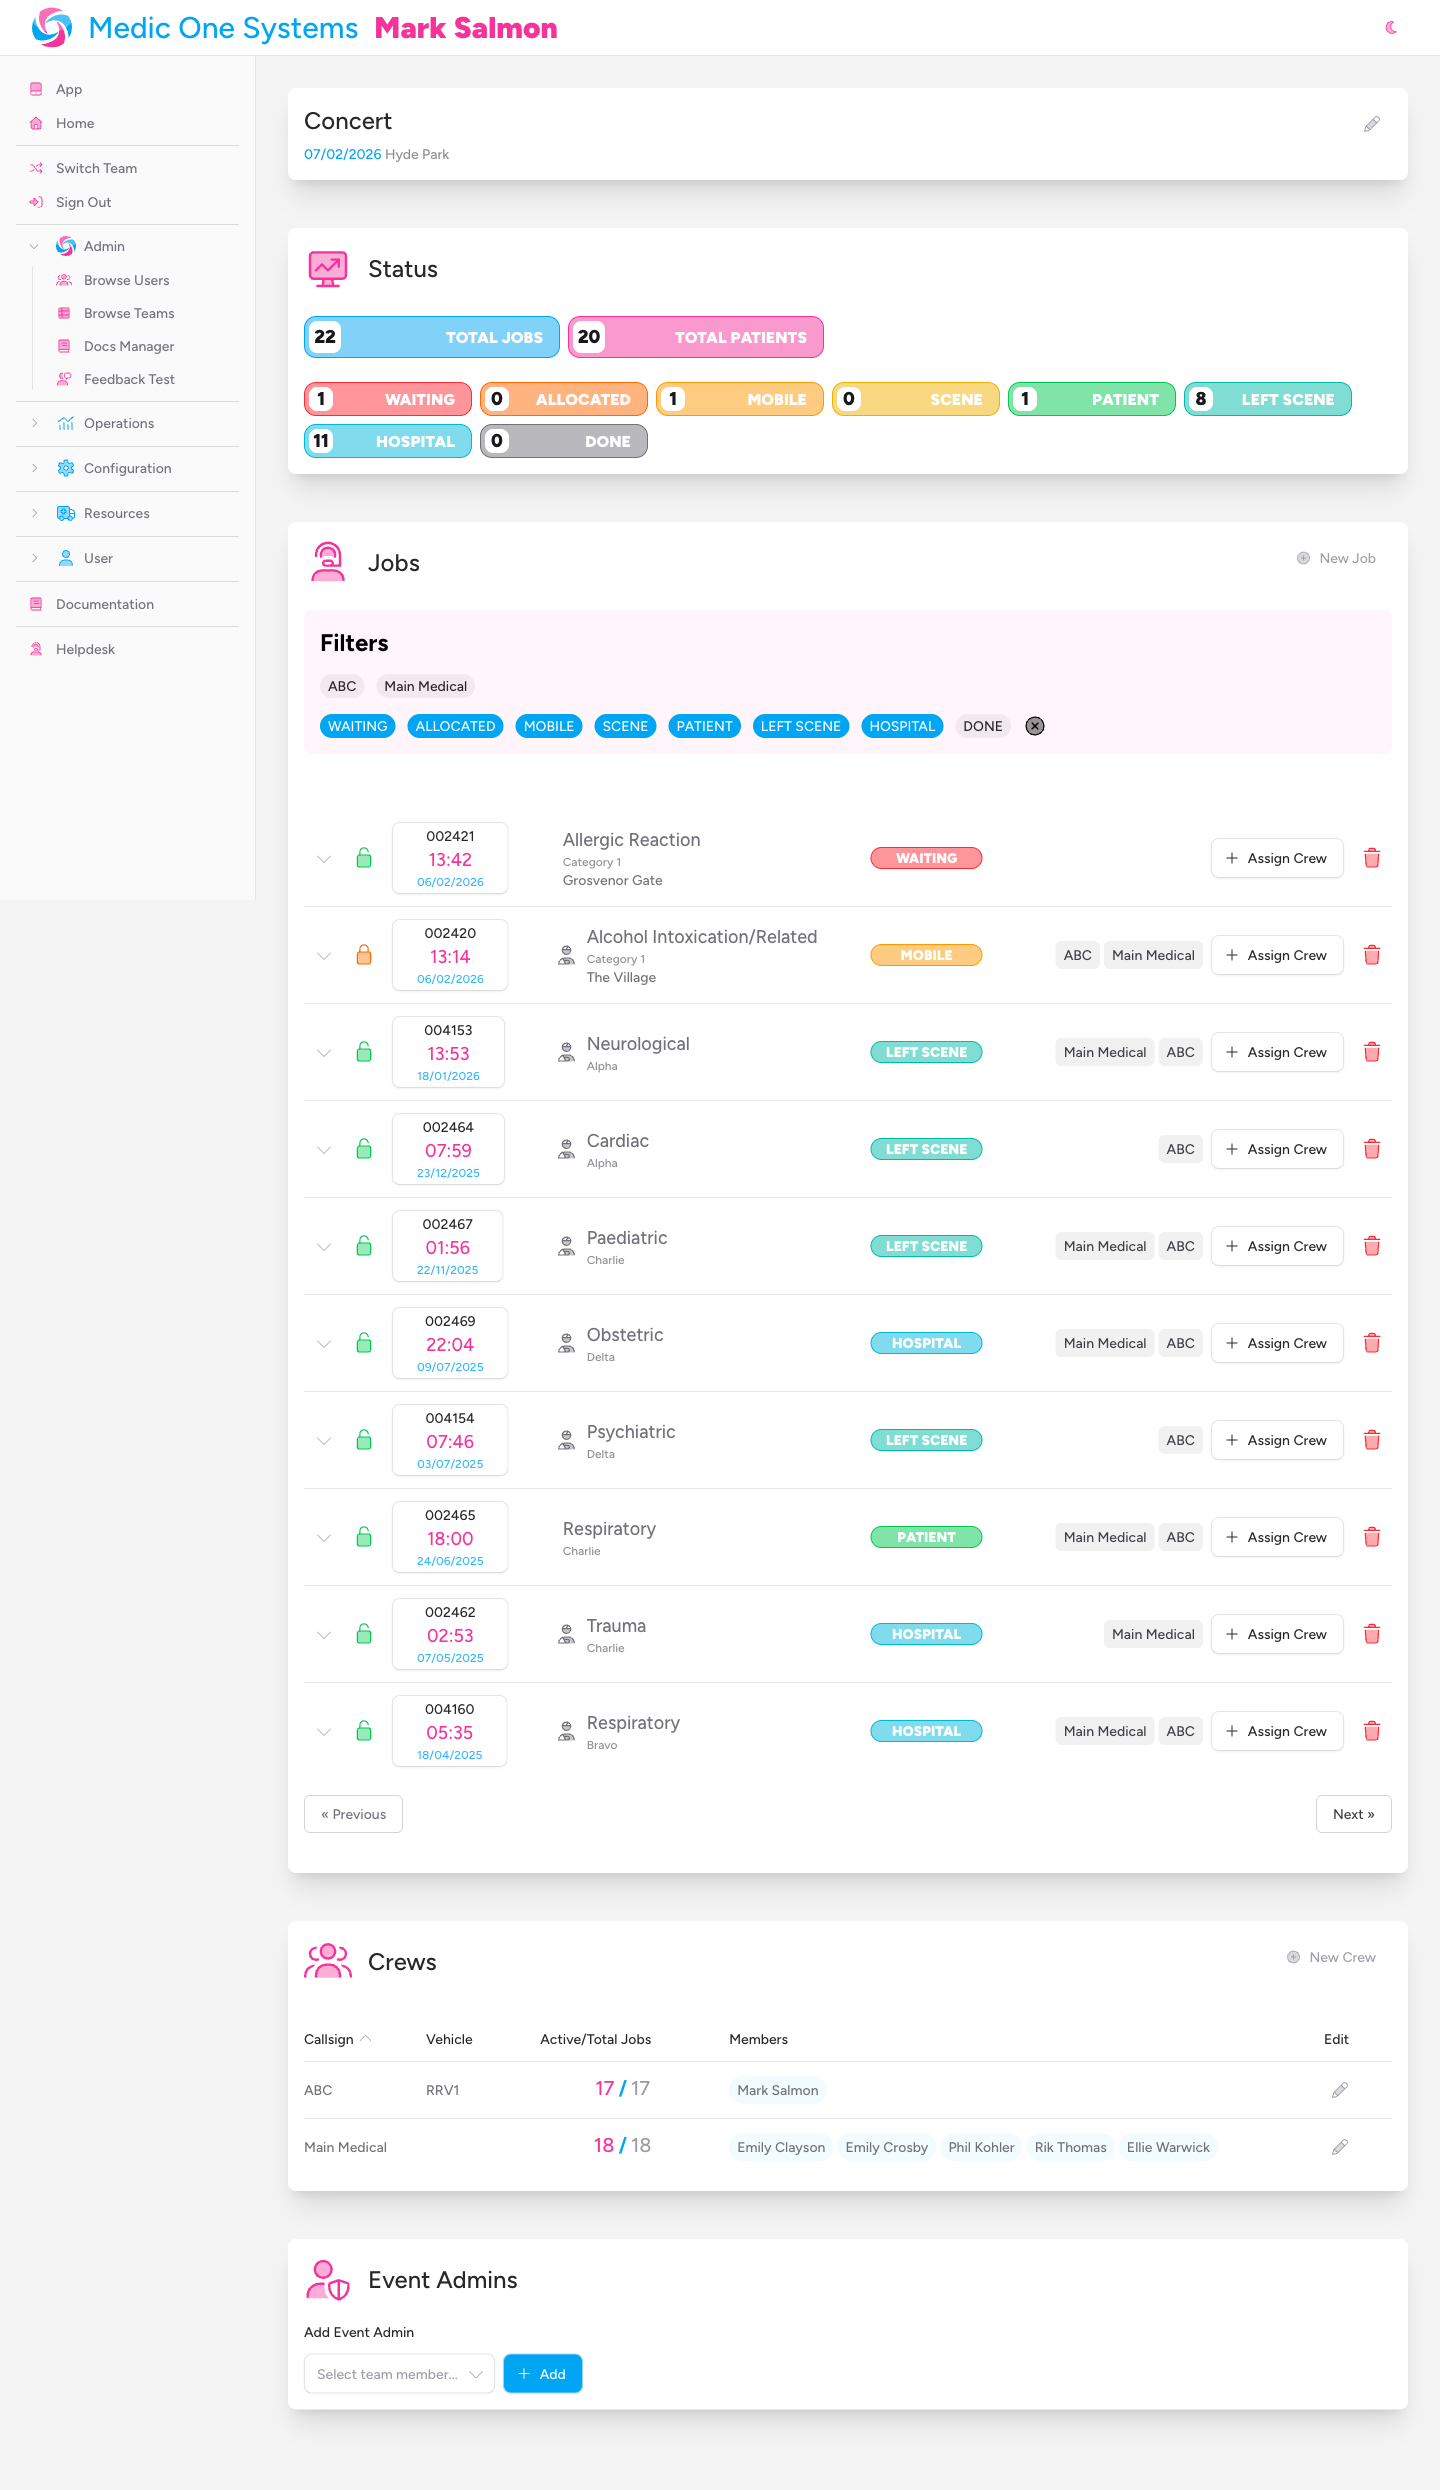
After You've Created the Event
Once saved, you'll land on the Event detail page. From here you can:
- Edit the event details — click the pencil icon to expand the edit panel and update any of the fields above. Only team admins and designated event admins can edit event details.
- Add crews — set up the crews attending the event, assign callsigns, vehicles, and members.
- Log jobs — create job records as incidents come in during the event.
- Assign event admins — team admins can designate specific team members as event admins, giving them permission to edit the event and manage its jobs.
Tips & Best Practices
- Create events in advance. Setting up the event before you arrive on-site means you and other team admins can add crews and pre-populate the venue while you have a reliable connection.
- Use the Duplicate feature for recurring events. If your team covers the same venue or event type regularly, duplicate a past event and just update the date and title. The shift pattern carries over too.
- Match the shift pattern to how you actually work. If your team runs a single operational period from start to finish, Single Shift keeps reporting simple. Day / Night or Thirds are useful when you have defined handover points and want crew hours tracked per shift.
- Use Custom shifts for non-standard patterns. Events with a late start or unusual handover times (e.g., 09:00 to 01:00 the following day) work well with the Custom editor. Name your shifts something meaningful — crews will see these names when selecting their shift.
- You don't need to create events for day-to-day jobs. Jobs logged outside an event are automatically grouped into system-generated
Daily Ops DD/MM/YYevents — one per operational day. These appear automatically and don't need any setup. - Use venue records for well-known venues. If you cover a circuit or stadium regularly, ask your team admin to set it up as a saved venue with pre-defined location points. This speeds up job logging considerably on the day.
- The event goes live automatically. IndieBase treats an event as live (and shows it on the home dashboard) for a window from 6 hours before midnight on the event date to 6 hours after midnight the following day.
Troubleshooting
The "New Event" button isn't visible on the Events page. You don't have permission to create events. Only team owners and users with the admin role can do this. Ask your team owner to update your role.
The Event Type dropdown is empty. Your team's configuration doesn't include any event types. A team administrator needs to add them under Team Settings > Config.
The Venue dropdown doesn't appear. Your team has no saved venues. Either use manual location entry, or ask your team admin to create a venue under Team Settings > Venues.
The location search isn't returning results. Try typing more of the address — suggestions only appear after at least three characters. You can also try entering a postcode directly, or use the Map or Current Location options instead.
I don't see the Shift Configuration step — the form just saved after Step 1. This shouldn't happen unless there was a validation error that caused an unexpected save. Check that all required fields in Step 1 are filled in correctly, then click Next: Configure Shifts rather than pressing Enter.
I can't edit the event after creating it. Editing requires the admin role on the team, or you need to be designated as an event admin. Ask your team admin to either upgrade your role or add you as an event admin from the Event detail page.
The shift times in the preview look wrong. Shift times are calculated from your team's operational day start hour. If the times don't match your working pattern, ask your team admin to adjust the operational day start under Team Settings > Config, or use the Custom shift pattern to set your own times.
- Managing Venues — creating and configuring saved venues with pre-defined location points
- Creating Crews in an Event — assigning callsigns, vehicles, and team members to event crews
- Creating Jobs in an Event — recording incidents and calls against an event
- Adding Admins to an Event — granting specific team members permission to manage an event
- Understanding Shifts — how shifts organise jobs and crews within an event