 IndieBase

Table of Contents
Merging Duplicate Jobs
How to combine two duplicate job records - and all their patient data, crews, and media - into a single clean record, without leaving the Event Control Room.
Merging Duplicate Jobs
When the same call gets logged twice, the merge tool lets you combine both records into one - preserving every piece of clinical data, crew information, and media in the process.
Overview
Duplicate jobs happen. A crew creates a job offline and it syncs just as someone at the control desk is logging the same call. The result is two records that should be one. The merge tool gives you a side-by-side comparison of both jobs, lets you choose which values to keep wherever they differ, and combines all the clinical records, crews, and media from both into a single job. The duplicate is archived automatically once the merge is complete.
The merge runs as a large modal inside the Event Control Room - you never navigate away from the feed. This is a restricted action. The merge cannot be undone, so the tool walks you through a review step before anything is changed.
Before You Start
- You need the Jobs: Merge team permission, or you must be an event administrator for the event the job belongs to, or a MOS user.
- Both jobs must belong to the same team. You cannot merge jobs across teams.
- Event administrators without the Jobs: Merge permission can only merge jobs within their own event. The cross-event search option is locked for these users.
- If another user is currently editing one of the jobs, you can still proceed, but it is worth coordinating with them first. Any unsynced changes they have made to the duplicate will not be automatically applied to the surviving job - they will need to re-check it after the merge.
- Merges are permanent. The secondary job is soft-deleted and cannot be automatically restored. A full audit snapshot is kept, but double-check you have the right two jobs before you proceed.
Step-by-Step Guide
Step 1: Open the merge modal from the job feed
In the Event Control Room, find the duplicate job in the job feed. Click the ⋯ (Job actions) button on the job card to open the actions menu, then choose Merge job.
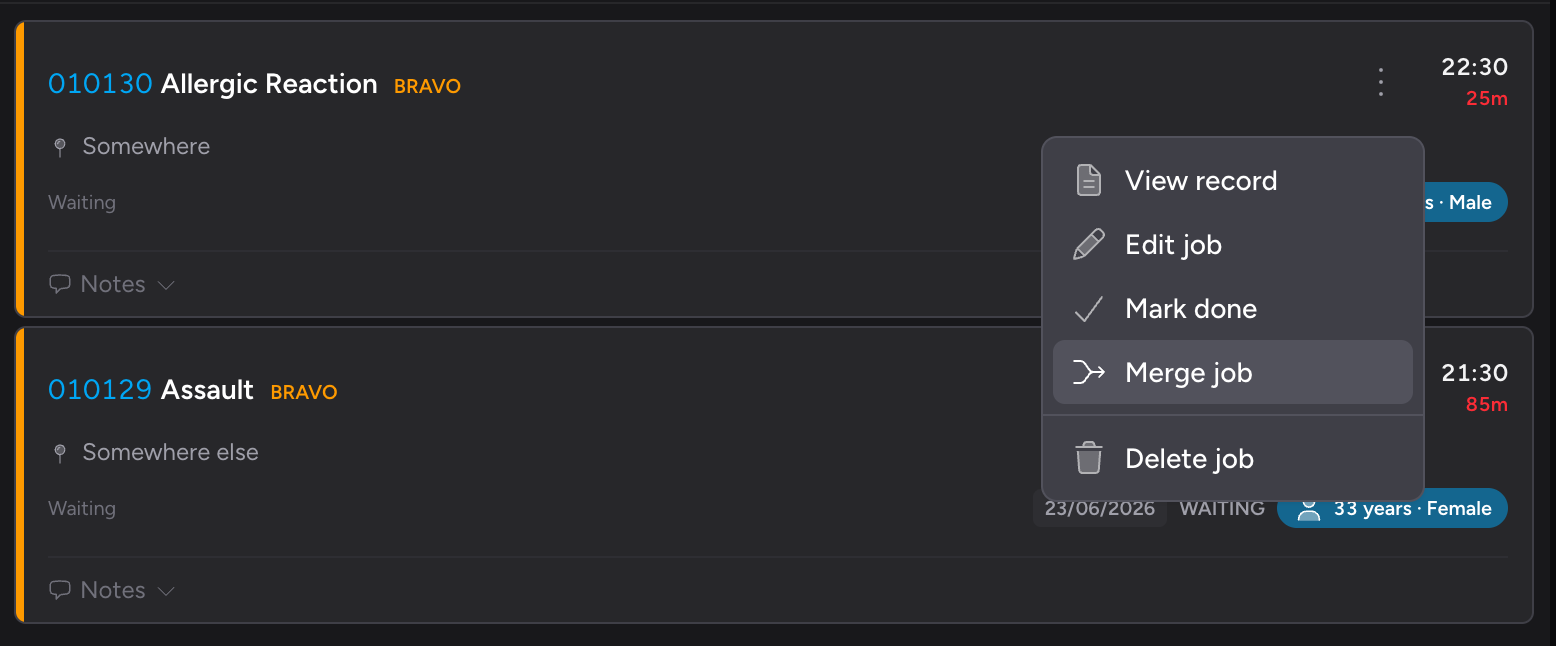
Alternatively, click on the job card to open the job's detail slideover, then click the Merge job button near the top of the slideover.
Merge job only appears if you have permission to merge. If you do not see it, you do not have the required role or permission for this job.
Step 2: Search for the second job
The Merge Job modal opens. At the top, a Source Job card shows the key details of the job you selected - type, priority, location, call time, and patient name (if there is one).
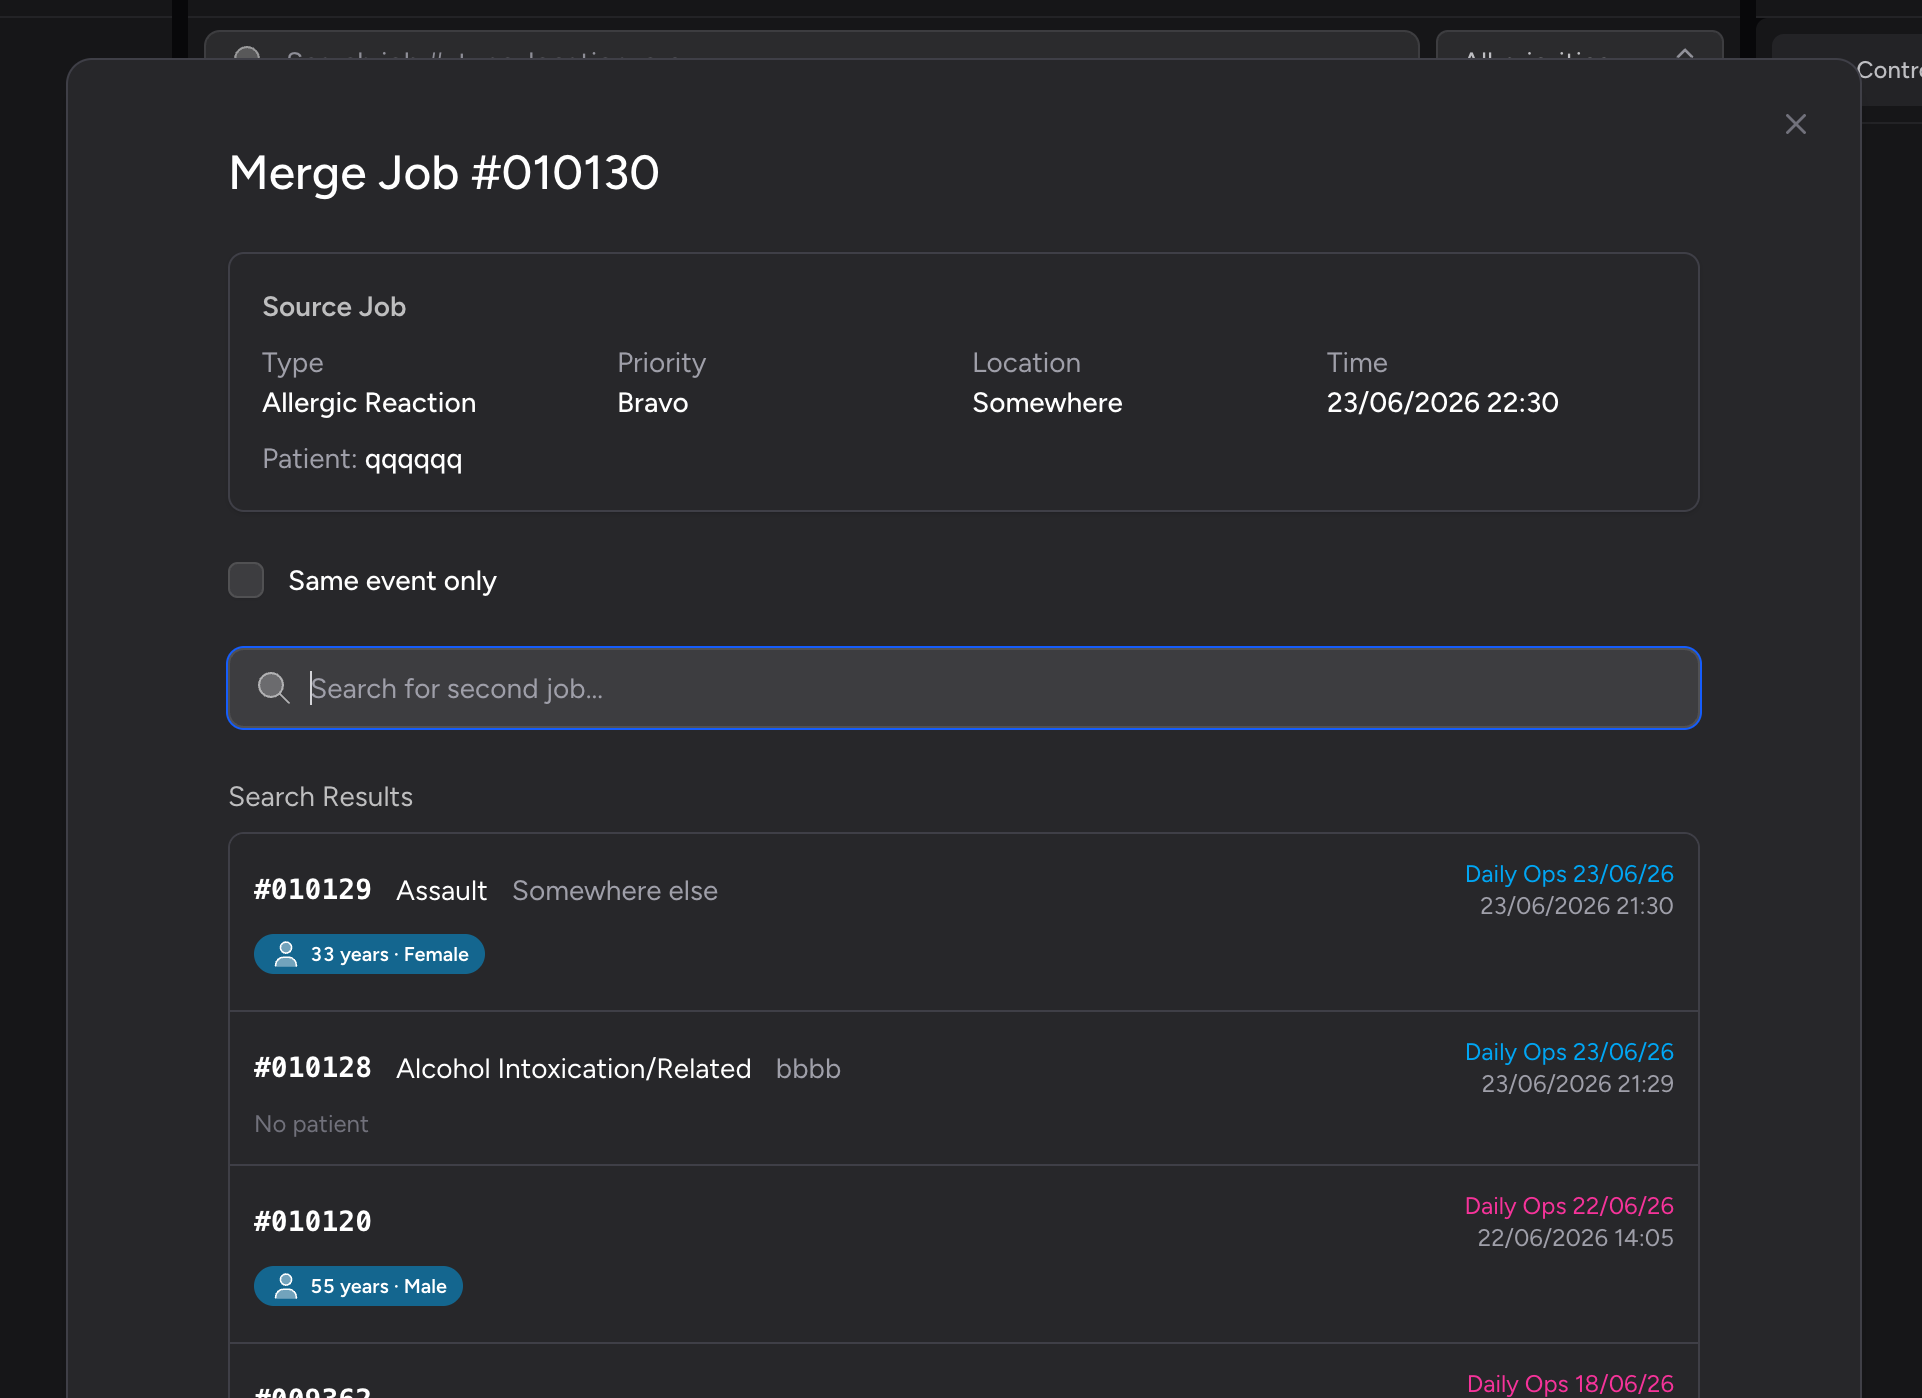
If the job belongs to an event, a Same event only checkbox appears above the search field. It is ticked by default and limits results to jobs in the same event.
- If you have the Jobs: Merge permission, you can untick it to search across all your team's jobs.
- If you are an event administrator without that permission, the checkbox is locked on with the note: "Cross-event merges need event admin permissions."
Use the search field to find the second job. You can search by job ID, location, type, or CAD number. Results appear as you type.
Step 3: Select the second job
Each result in the list shows the job ID, type, location, call time, and patient name if one exists. Click a result to select it - it highlights with a primary-coloured ring.
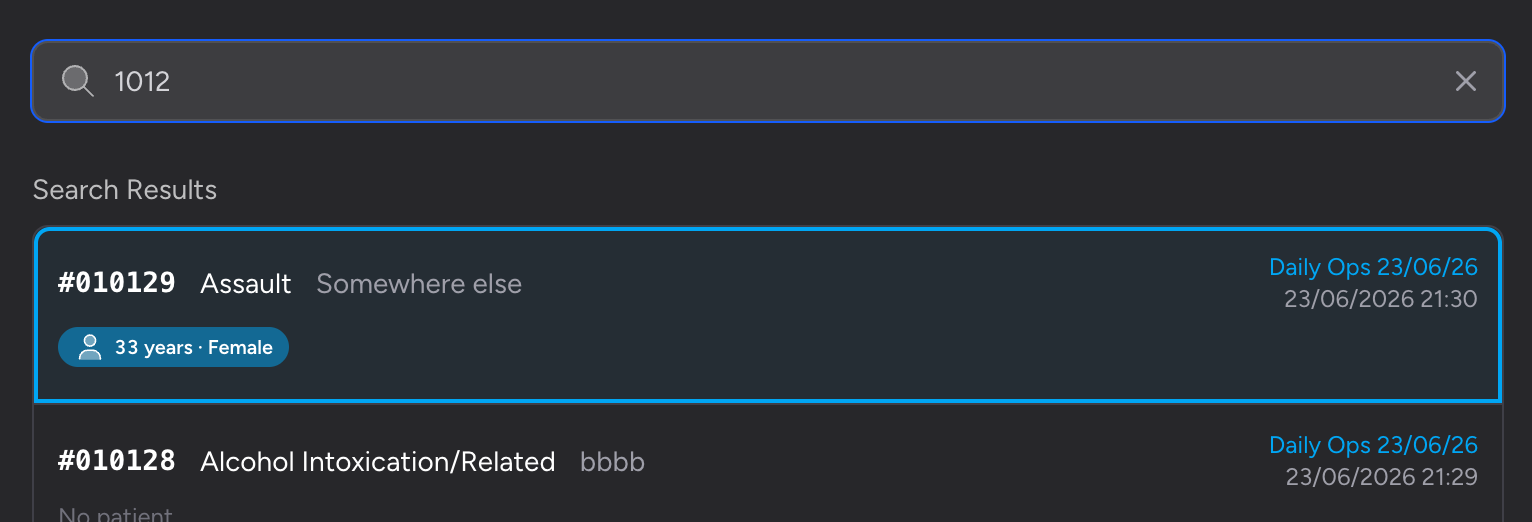
Once a job is selected, the Continue to Merge button becomes active. Click it to proceed to the conflict resolver.
Step 4: Choose which job is the primary
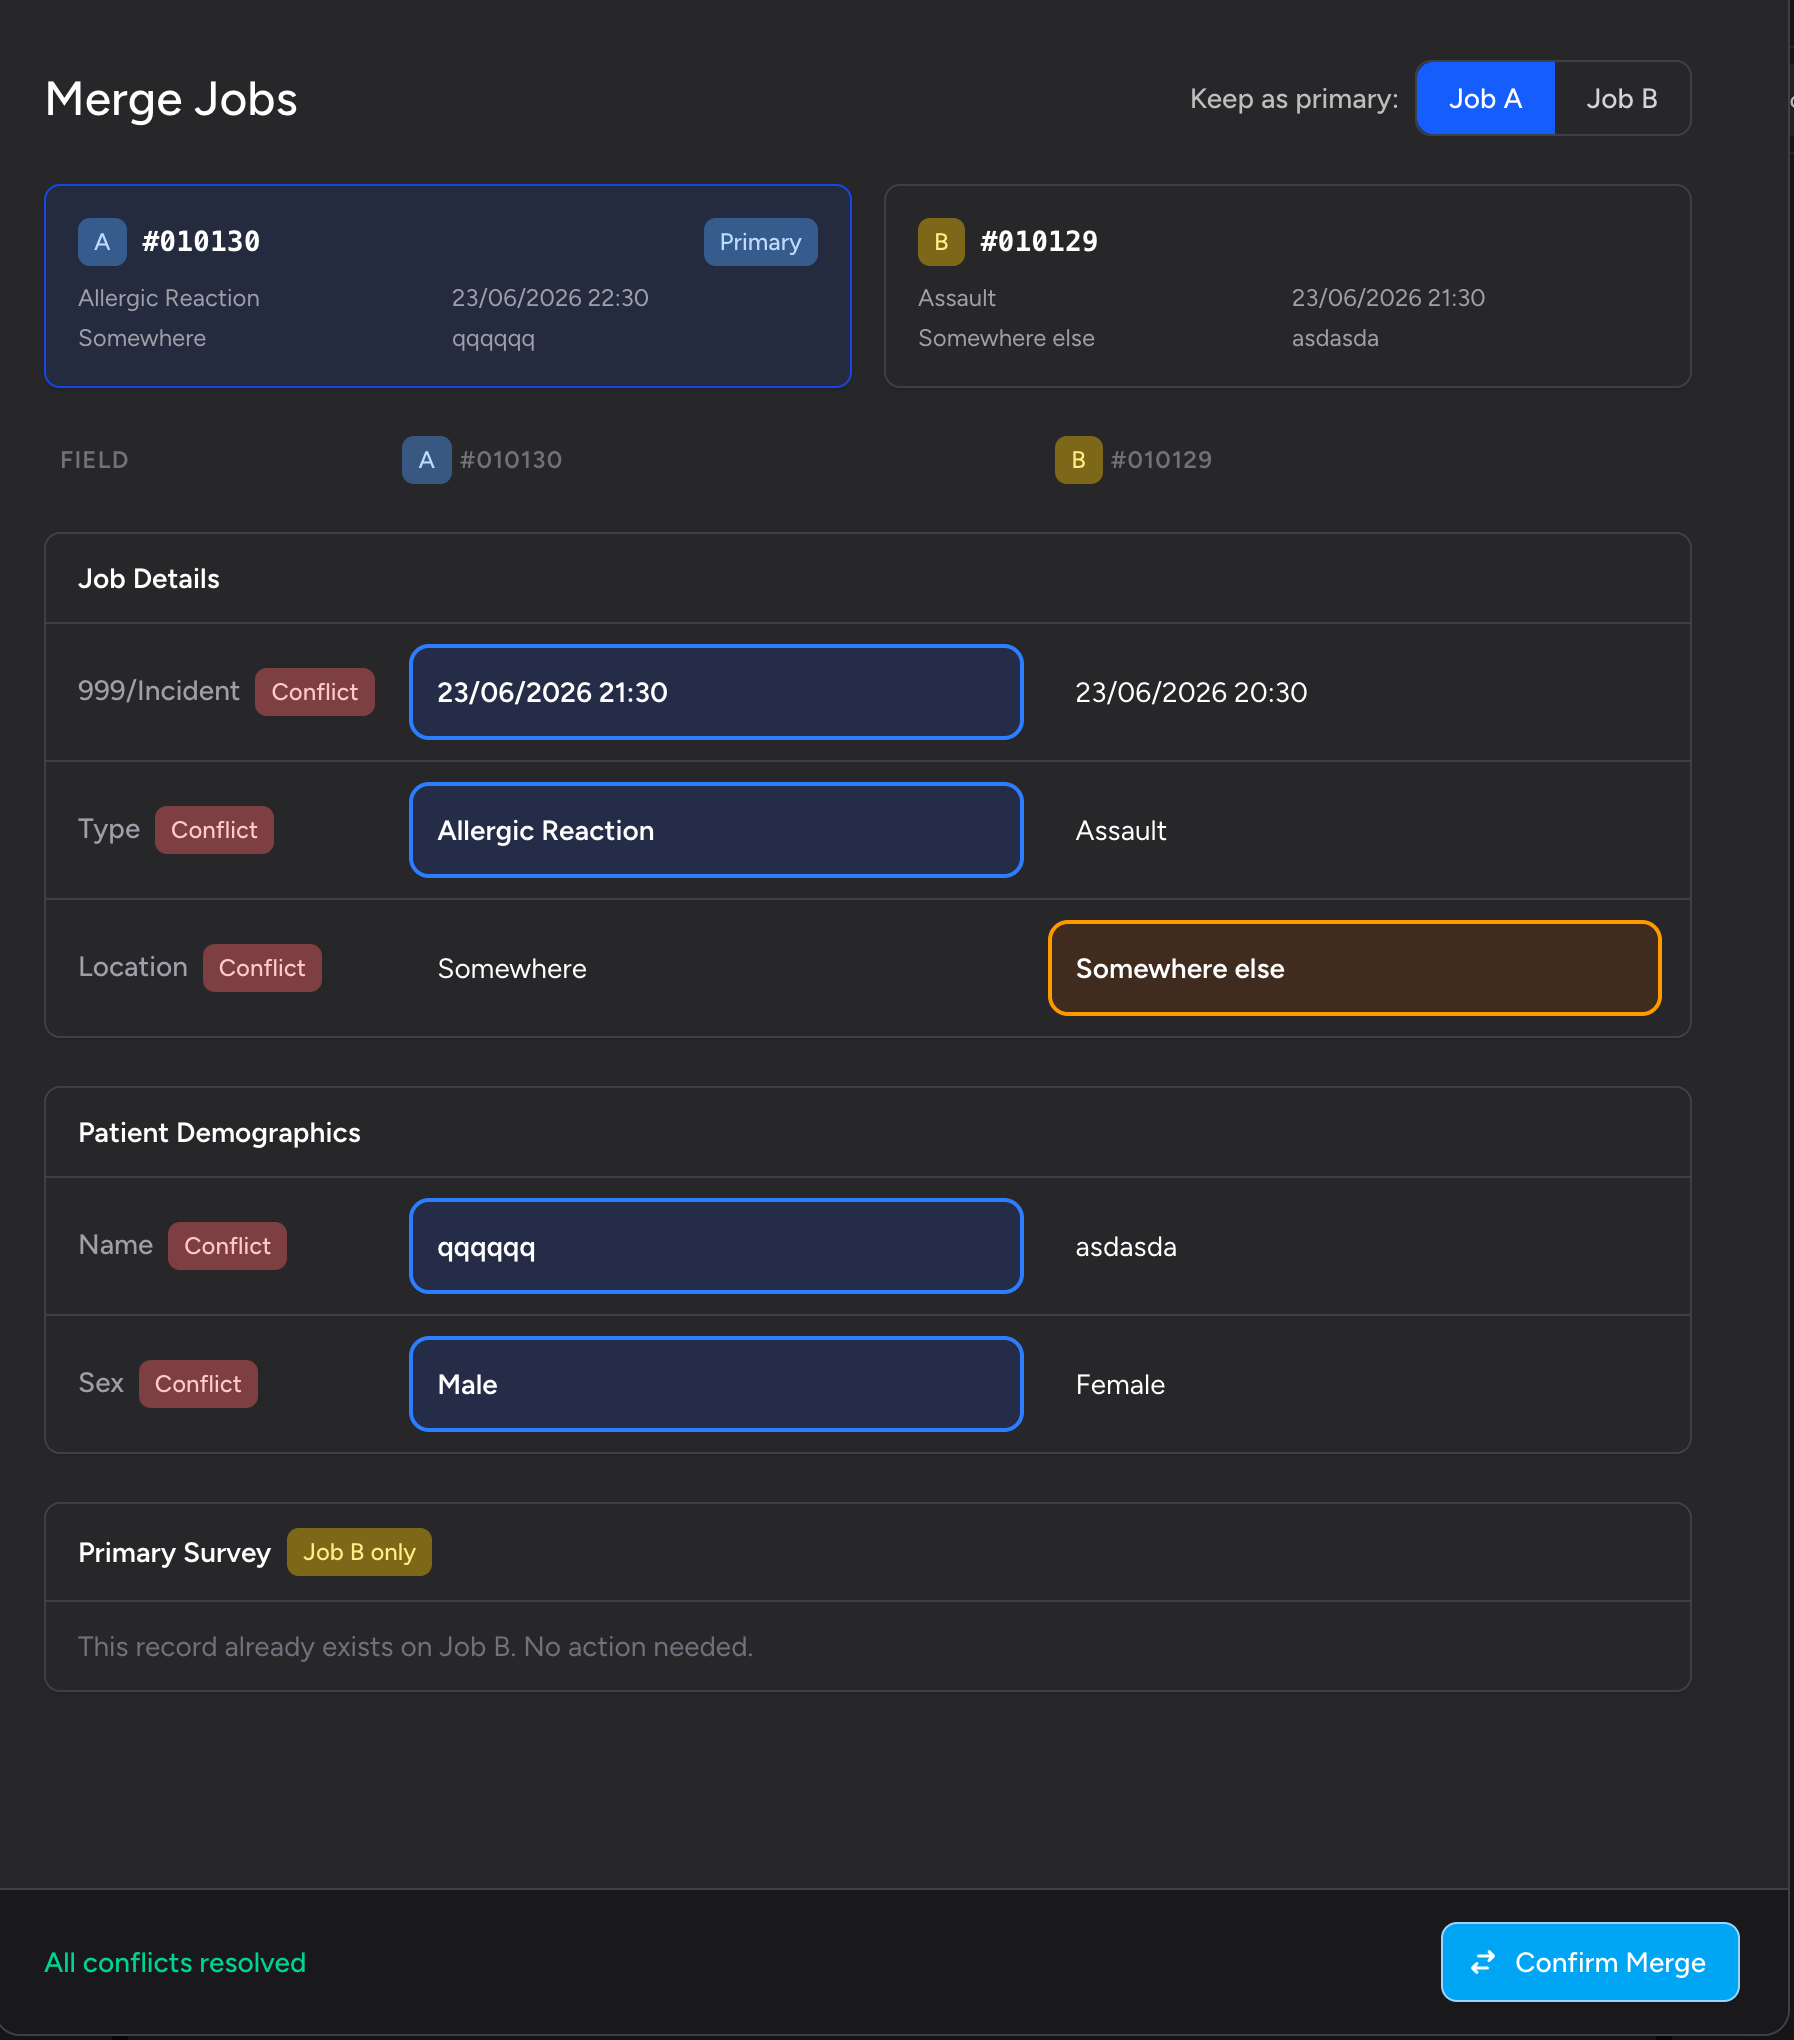
The second step of the modal shows both jobs side by side. The job you opened the modal from is Job A (shown in blue); the job you searched for and selected is Job B (shown in amber).
A Keep as primary toggle at the top lets you choose which job survives the merge. The primary job is the one that remains open after the merge - the other is archived. The selected primary shows a Primary badge on its summary card.
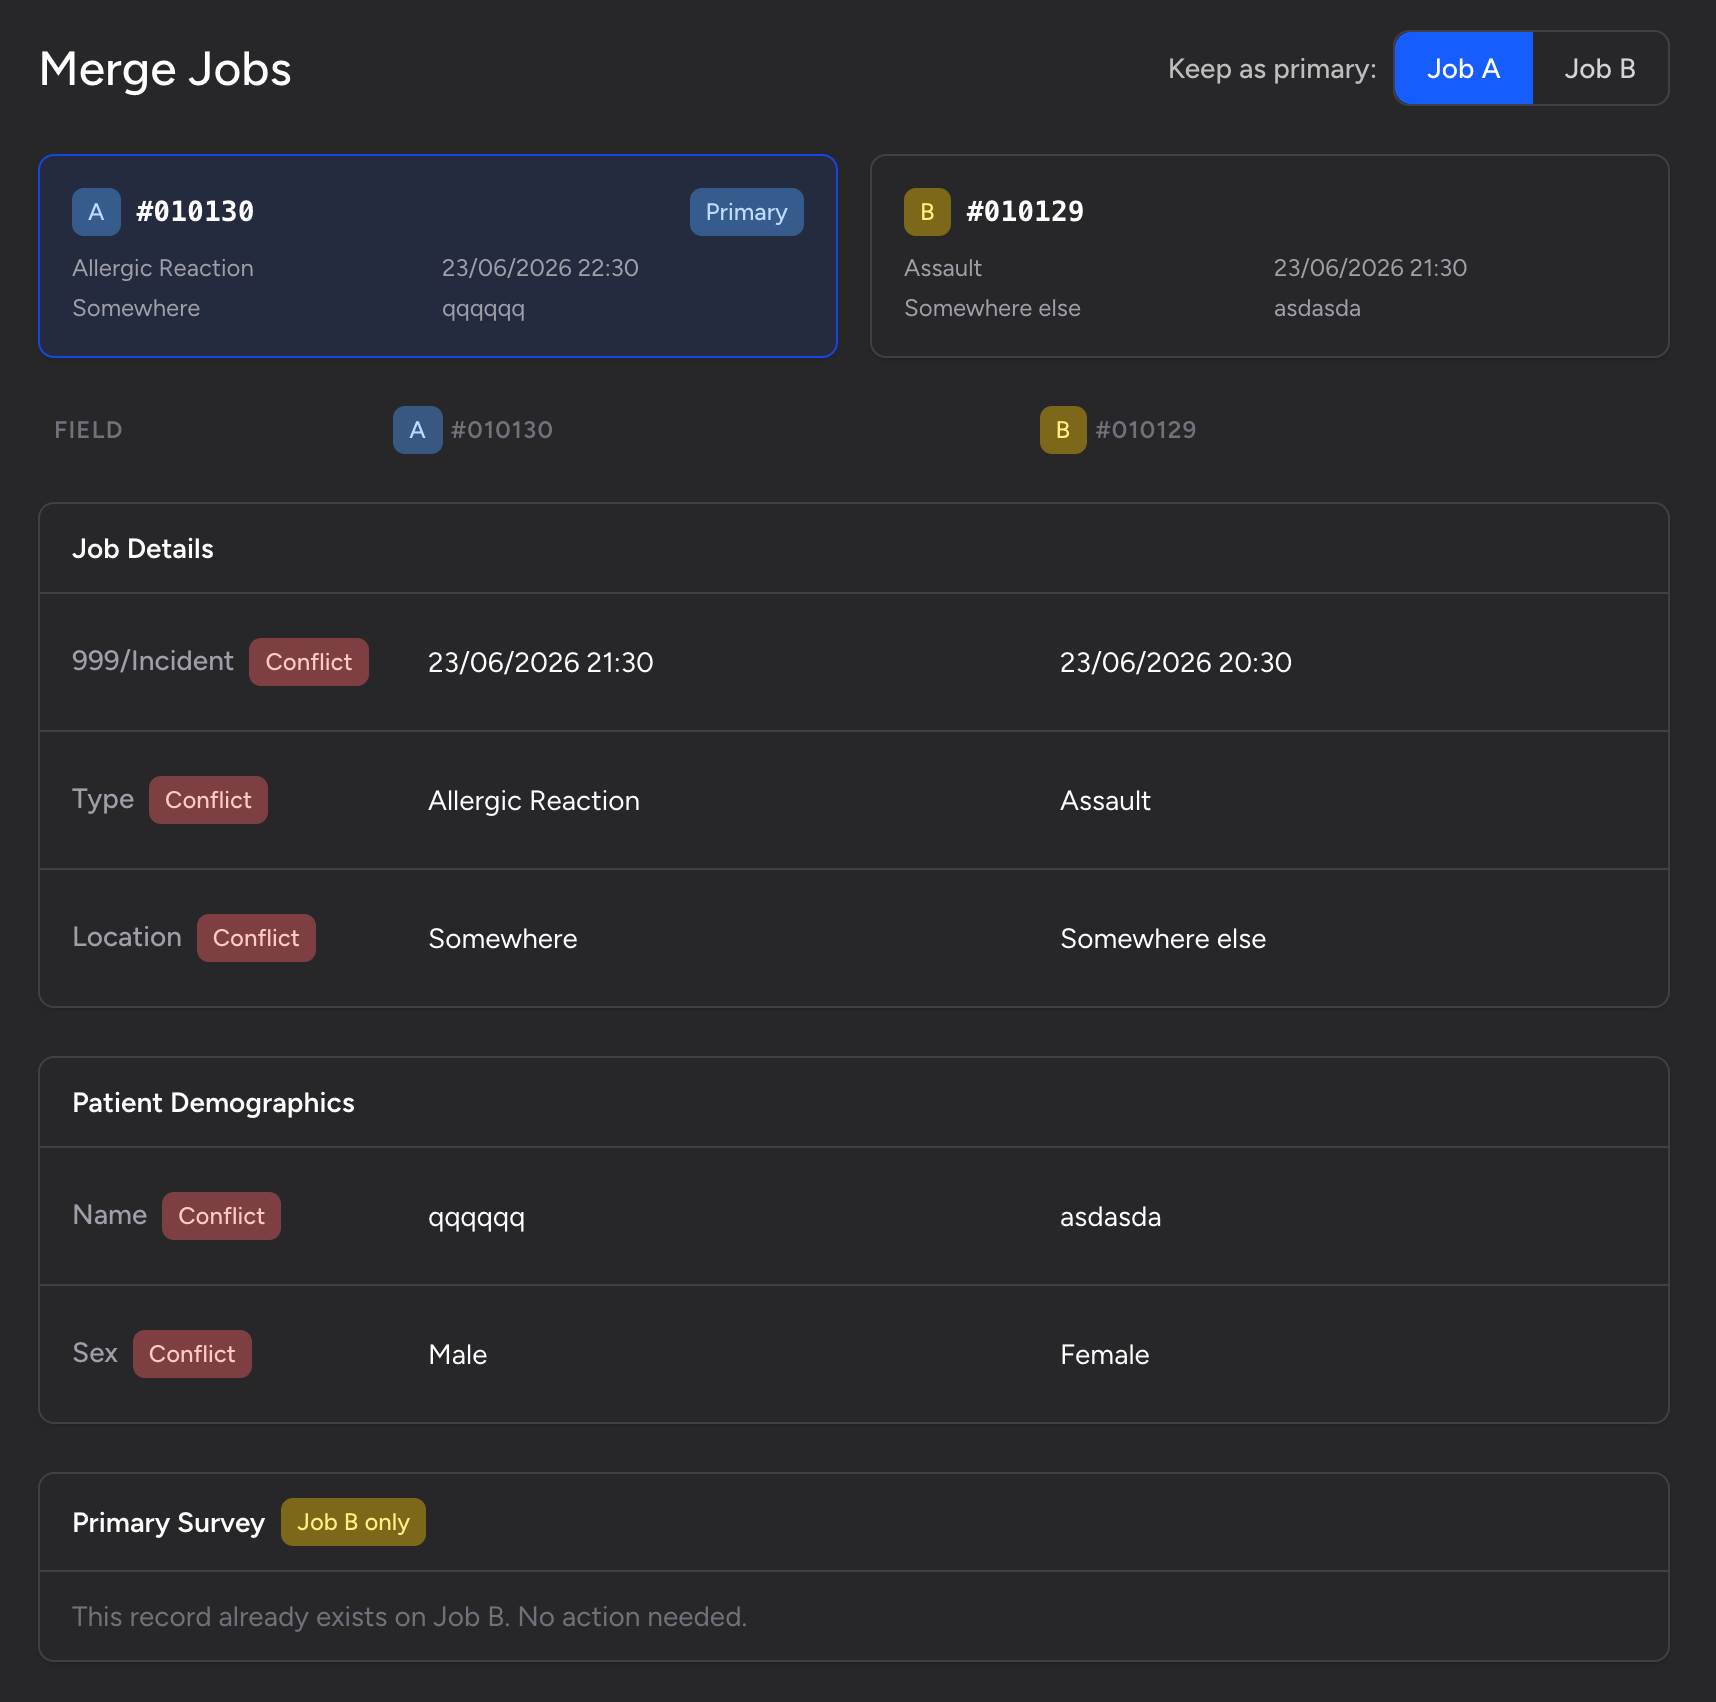
By default, Job A is set as primary. Click Job B on the toggle if you want the other job to survive instead. The page updates immediately.
Choosing the primary job does not affect what gets merged. All clinical records, crews, and media from both jobs are combined regardless. The primary choice only determines which job record survives and which is archived.
If you need to go back and pick a different second job, click Back to Job Selection to return to the search step within the modal.
Step 5: Resolve field conflicts
Below the summary cards, the modal shows each field that differs between the two jobs. Fields are grouped into sections:
- Job Details - call time, type, priority, location, CAD reference, etc.
- Patient Demographics - patient name, date of birth, address, gender, etc.
- Any clinical sub-records that both jobs share (e.g. Primary Survey, Cardiac Arrest)
Fields that differ between the two jobs are flagged with a red Conflict badge. You must resolve every conflict before the merge can proceed.
To resolve a conflict, click the value you want to keep. The chosen value highlights - Job A values highlight blue, Job B values highlight amber. Click the other value to switch your choice at any time.
Fields where only one job has a value are resolved automatically. Fields where both jobs have the same value are not shown, since there is nothing to choose.
Step 6: Review combined clinical records
For clinical records that can have multiple entries (observations, drugs, interventions, injuries, and similar), both sets of records are shown together as a combined list. Records from Job A carry a blue A badge; records from Job B carry an amber B badge.
All records are included by default. Untick any records you do not want to carry into the merged job.
For clinical records that can only have one instance (such as Primary Survey or Cardiac Arrest), the comparison shows fields from both jobs side by side - the same click-to-resolve approach as Job Details. If only one job has that record, a note tells you it will be adopted automatically.
Step 7: Review crews
The Crews section lists all crews from both jobs:
- Crews from Job A only - shown with a blue A badge and a checkbox, ticked by default. Untick a crew to exclude it.
- Crews already on the target - shown with an amber B badge and labelled "already on target". These are already attached to the primary job and need no action.
- Shared crews (attached to both jobs) - shown with a Shared badge. Where pivot data for a shared crew differs between the two jobs (e.g. different dispatch times), you can choose which job's values to keep using the same click-to-select approach.
Step 8: Review media
If either job has photos, ECGs, or PDFs attached, the Media section displays thumbnails for all files from both jobs. All files are included by default with a checkbox against each. Untick any files you do not want to carry across.
Step 9: Confirm and execute the merge
The footer at the bottom of the modal shows a running count of how many conflicts are still unresolved. Once every conflict has been addressed, this changes to a green All conflicts resolved message and the Confirm Merge button becomes active.
Click Confirm Merge to open a final confirmation step showing which job is being kept (green panel) and which is being deleted (red panel), along with a warning that the action cannot be undone.
Click Execute Merge to run the merge. The button changes to Merging... while it processes. Once complete, the modal closes automatically, you remain in the Control Room, and the job feed refreshes - the duplicate is gone.
What Gets Merged
| Data type | What happens |
|---|---|
| Job Details fields | The value you selected during conflict resolution is applied to the primary job |
| Patient Demographics | The values you selected are applied to the primary patient record |
| Observations, Drugs, Interventions, Injuries (and other multi-record clinical data) | All ticked records from both patients are transferred to the primary patient |
| Primary Survey, Cardiac Arrest (and other single clinical records) | Both records are merged field by field. If only one patient has the record, it is adopted wholesale |
| Crews | Ticked Job A-only crews are transferred to the primary job. Shared crew pivot data is resolved per your selections |
| Photos, ECGs, PDFs | All ticked media files are transferred to the primary patient |
| Audit trail | A full before/after snapshot of both jobs is saved. An audit log entry is added to the winning job |
| Secondary job | Soft-deleted (archived). The data is retained for audit purposes but the job no longer appears in normal views |
PWA and Offline Users
If a crew member was editing the duplicate job on a tablet or in offline mode when the merge ran, their device will be notified on the next sync. Their unsynced changes to the duplicate will not be automatically applied to the surviving job - they should check the surviving job and re-enter anything that is missing.
Offline photos taken on the duplicate job are automatically redirected to the surviving patient record during the merge, so no images are lost.
Tips & Best Practices
- Identify the better-quality record before you start. The job with the more complete patient demographics or clinical notes is usually a good candidate for primary.
- The primary choice is separate from field choices. You can set Job B as primary but still choose to keep individual field values from Job A. The two decisions are independent.
- Unresolved conflicts block the merge. The Confirm Merge button stays disabled until every red Conflict badge has been resolved. Scroll up to find any remaining ones.
- You can deselect clinical records you do not want. If the same observation appears in both jobs and you only want one copy, untick the duplicate before confirming.
- The merge creates a full audit trail. Everything that was on both jobs before the merge is captured in a MergeLog record. If questions arise later, this record contains the complete before/after snapshot.
Troubleshooting
The "Merge job" option does not appear in the actions menu. The option is only visible to users with the Jobs: Merge team permission, event administrators, or MOS users. If you do not see it, ask a team admin to check your permissions or to perform the merge for you.
The "Same event only" checkbox is greyed out and locked on. You are an event administrator but do not hold the Jobs: Merge team permission. Cross-event merges require that permission. Ask a team admin to grant it if you need to merge jobs across events.
The "Continue to Merge" button does not become active after I select a job. The button requires a job to be selected from the search results. Click one of the results in the list so it shows the primary-coloured ring, then the button will activate.
The search is not returning the job I expect. Try different search terms - the search covers job ID, location, type, and CAD number. If Same event only is ticked, untick it (if your permissions allow) to search across all your team's jobs.
The "Confirm Merge" button is disabled even though I have reviewed everything. At least one unresolved conflict remains. Scroll back up through the modal and look for any field with a red Conflict badge where neither value is highlighted. Click your preferred value to resolve it.
I merged the wrong jobs. Merges cannot be automatically reversed. Contact your team owner or system administrator. The full data from both jobs before the merge is retained in the audit log, so nothing is lost permanently.
- The Event Control Room - where you access the merge action from the job feed
- Adding a Job - creating new job records from the app