 IndieBase

Table of Contents
Zoll Integration
Enable Zoll Online case imports and the offline XML upload for your team — both controlled from one settings panel.
Zoll Integration
Enable Zoll Online case imports and the offline XML upload for your team — both controlled from one settings panel.
Overview
The Zoll Integration panel in Team Settings gives you two independent switches:
- Enable Zoll integration - connects your team's Zoll Online account so members can import live defibrillator case data directly into patient records over the internet.
- Enable offline file import - shows a separate upload button so crews can load a Zoll case XML file from their device when no internet connection is available.
You can switch either or both on. The offline import has no credential requirement and works completely independently of the online integration.
Before You Start
- You must be the team owner or a Super Admin to access the Zoll Integration panel. Admins and Members cannot see or change these settings.
- To enable Zoll Online, you will also need your team's Zoll Online access key and password. Contact your Zoll account manager if you don't have these.
- To enable offline file import only, no credentials are required.
Configuring the Zoll Integration Panel
Step 1: Open Team Settings
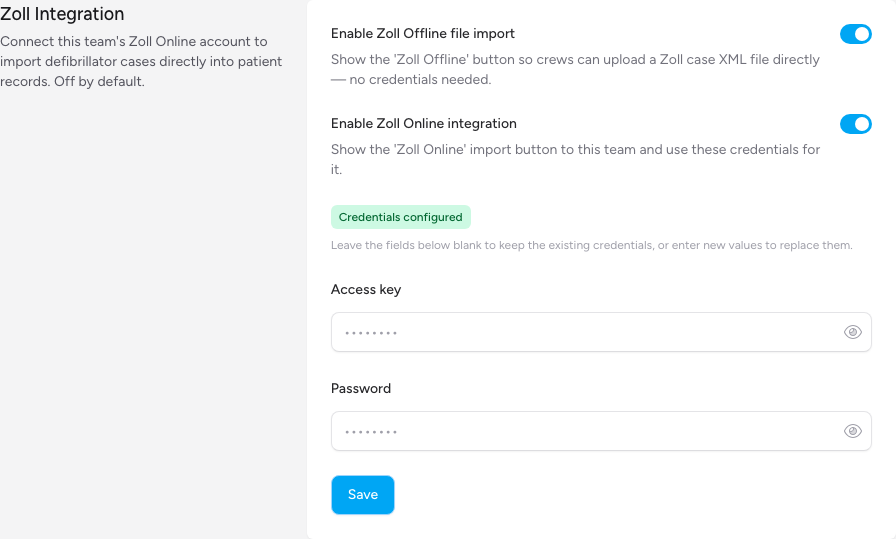
Navigate to Team Settings using the link in the sidebar. Scroll down until you see the Zoll Integration panel. You will see two toggles - Enable Zoll integration and Enable offline file import - followed by the credential fields.
Step 2: Choose what to enable
Switch on whichever import methods your team needs. They are independent - you can enable either or both:
| Toggle | What it does | Credentials needed? |
|---|---|---|
| Enable Zoll integration | Shows the Zoll Online import button in patient records | Yes - access key + password |
| Enable offline file import | Shows the Zoll Offline upload button in patient records | No |
If you only want the offline XML upload (for example, your team does not have a Zoll Online account), switch on Enable offline file import only and click Save — no credentials required.
Step 3: Enter credentials (online only)
If you switched on Enable Zoll integration, enter your Zoll Online Access key and Password in the fields below the toggles.
A few things to know about these fields:
- Both fields are write-only. Once saved, the values are never shown again — the fields display
••••••••as a placeholder. - The access key cannot contain a colon character (
:). - If you leave a field blank when saving, IndieBase keeps the value that was previously saved. This means you can update just the password without re-entering the access key, and vice versa.
If you are only enabling offline file import, you can leave both credential fields blank.
Step 4: Save
Click Save.
- If Enable Zoll integration is on, IndieBase verifies the credentials against Zoll Online before saving. Correct credentials show a confirmation toast and update the panel to display the Credentials configured badge. Rejected credentials show an error on the Access key field - double-check the values and try again.
- If only Enable offline file import is on, the save completes immediately with no Zoll API call.
Understanding "Credentials Configured"
Once online credentials have been saved, the panel shows a green Credentials configured badge alongside the note: "Leave the fields below blank to keep the existing credentials, or enter new values to replace them."
This means:
- To update just the password - leave the Access key field blank, enter the new password, and save.
- To update both - enter new values in both fields and save.
- To keep credentials as-is - leave both fields blank and save (for example, to toggle offline import on without touching the online credentials).
Credentials are encrypted at rest and are never exposed through the interface or API once stored.
Once Enable Zoll integration is on and credentials are configured, a Zoll Online button appears in the Observations panel on every patient record — visible to all team members. If Enable offline file import is also on, both buttons appear side by side.


Importing a case
- Open a patient record and scroll to the Observations panel.
- Click the Zoll Online button. IndieBase fetches the available cases from Zoll using your team's credentials. A loading spinner shows while the request is in progress.
- A panel slides in from the right listing the available Zoll files. Each entry shows the patient identifier, device serial number, case start time, and how long ago the case started (colour-coded green, amber, or red based on age).
- Click the download icon next to the case you want to import. IndieBase pulls the data from Zoll and populates the observations timeline on the patient record.
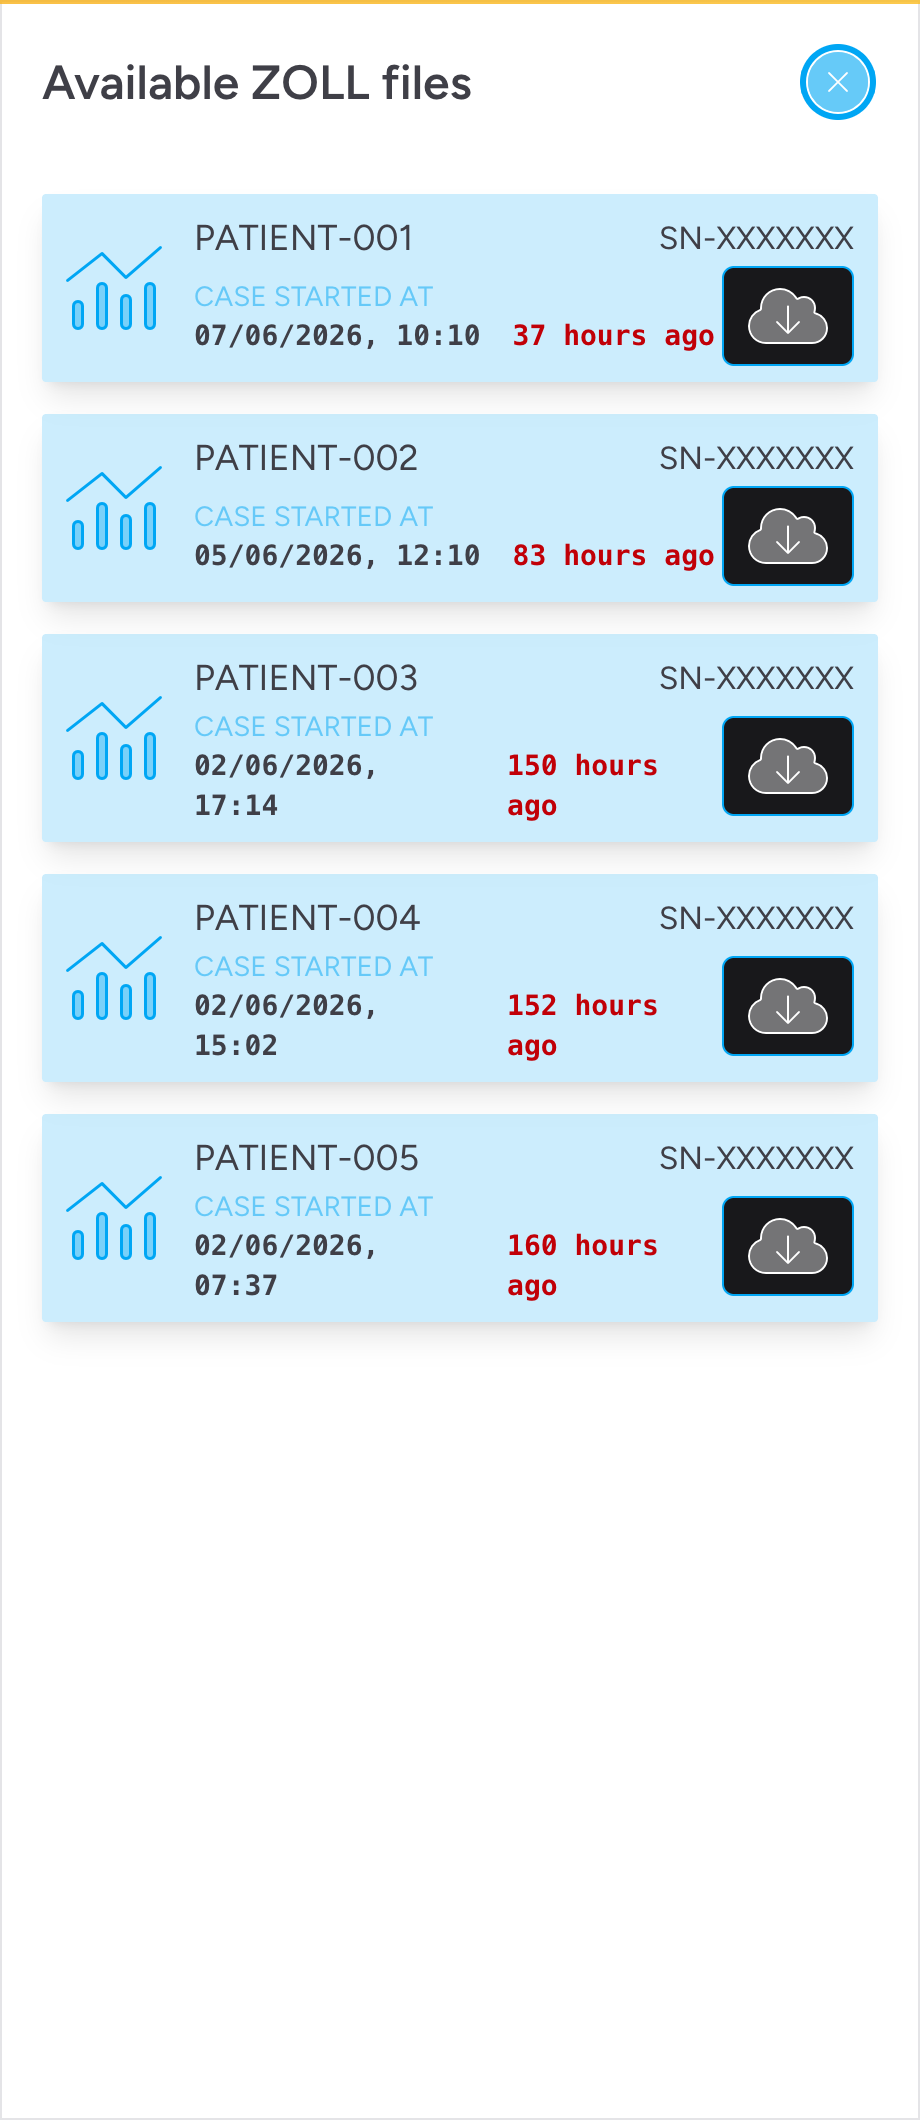
Cases are pulled live from Zoll Online — your device must be connected to the internet to use the Zoll Online button. If you are offline, use the Zoll Offline button instead.
Once Enable offline file import is on, a Zoll Offline button appears in the Observations panel alongside any other Zoll buttons. It is visible to all team members.
The offline import lets a crew member upload a Zoll case XML file saved on their device — useful when the device has no internet access or when the Zoll Online connection is unavailable.
Uploading a Zoll XML file
- Open a patient record and scroll to the Observations panel.
- Click the Zoll Offline button.
- Select the Zoll case XML file from your device when the file picker opens.
- IndieBase parses the file and populates the observations timeline on the patient record.
No internet connection to Zoll is required, and no team credentials are used.
Tips & Best Practices
- Enable offline import as a fallback. Even if your team primarily uses Zoll Online, switching on Enable offline file import as well means crews are never blocked if connectivity drops on scene.
- Verify credentials before an event. The save action tests the credentials live, but it's worth enabling the online integration a day or two in advance so crew members can confirm the button is visible and working before they need it on scene.
- Rotate credentials promptly. If your Zoll access key or password changes, update them in the Zoll Integration panel as soon as possible. The old credentials will be rejected by Zoll, and the online import button will silently fail until they are updated.
- Disabling online does not lose your credentials. Switching off Enable Zoll integration and saving removes the online button from patient records but leaves the stored credentials in place. Re-enabling restores the button immediately - no need to re-enter credentials.
- One set of credentials per team. The integration stores a single access key and password per team. All members who use the import button share these credentials - they do not each need their own Zoll account.
Troubleshooting
The Zoll Integration panel is not visible on the Team Settings page.
This panel is only visible to the team owner and Super Admins. If you are an Admin or Member, you won't see it. Ask your team owner or a Super Admin to make changes on your behalf.
The save action shows "Both an access key and password are required to enable Zoll."
Enable Zoll integration is switched on but one or both credential fields are empty and no credentials have been stored previously. Enter both an access key and a password before saving. If you only want the offline import, switch off Enable Zoll integration and leave the credential fields blank.
The save action shows "Could not authenticate with Zoll using these credentials."
IndieBase tested the credentials against Zoll Online and was rejected. Check that you have copied the access key and password exactly - both are case-sensitive. If you are certain the values are correct, check with your Zoll account manager that the account has API access enabled.
The Zoll Online button is not appearing in the Observations panel.
Check that Enable Zoll integration is on and that credentials are saved (the Credentials configured badge should be visible on the settings panel). If both look correct, try signing out and back in - the team configuration is loaded at sign-in.
The Zoll Offline button is not appearing in the Observations panel.
Check that Enable offline file import is switched on in the Zoll Integration panel and that you have saved. If it is on and saved, try signing out and back in.
The Zoll Online button shows a spinner but no files appear.
IndieBase connected to Zoll Online but found no cases to display. This is expected if there are no cases in your Zoll account at the time, or if the cases are older than Zoll's retention window. If you expect to see cases, confirm with your Zoll account manager that data is present.
A team member gets an error when clicking the Zoll Online button.
The import request uses your team's stored credentials server-side - individual members do not need Zoll accounts. If imports are failing for some members but not others, it is likely a connectivity issue rather than a credentials issue. Ensure the device has a working internet connection.
- Information Governance — manage PID storage, two-factor authentication, and data access windows for your team