Table of Contents
Creating Crews in an Event
How to create and manage crews (response units) within an event in IndieBase
Creating Crews in an Event
Crews are the named response units that get dispatched to jobs. Setting them up on an event before it starts means job dispatch is fast and accurate when it matters most.
Overview
A crew is a group of one or more team members who respond to incidents together, typically associated with a callsign and a vehicle. Crews are created within a specific event and can then be assigned to individual jobs as they come in. The Crews section on an event page is the central place to build and manage your event's response resources before and during operations.
Crews belong to a specific shift within the event, not the event as a whole. The crews you see and create are always for the currently active shift. If your event has multiple shifts, make sure you've selected the correct shift tab before creating crews. See Understanding Shifts for more on how shifts work.
Note: The Crews section is only available on organisation team accounts. It is not shown on personal team accounts.
Before You Start
- You must have the admin role on your team, or have been assigned as an Event Admin for this specific event.
- Team members you want to add to a crew must already have accounts and be members of your team.
- Any vehicles you want to assign must already exist in your team's vehicle list.
- Navigate to the event you want to work with. From the sidebar, expand the Operations section, click Events, then click the event title to open the event detail page.
- If the event has multiple shifts, select the correct shift tab before creating crews - crews are scoped to the active shift. See Understanding Shifts.
The Crews Table
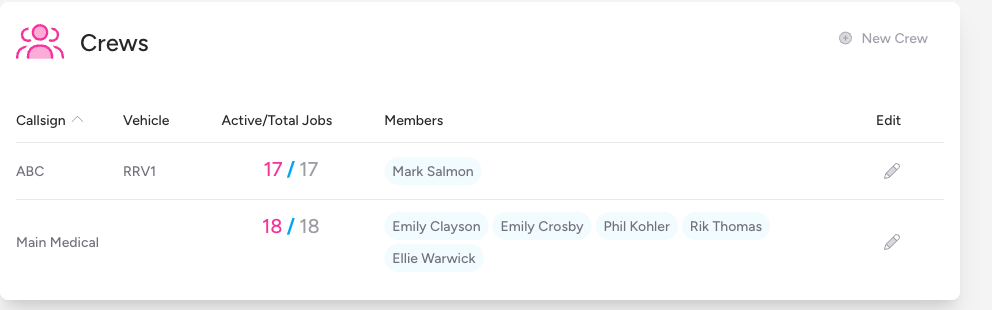
When you open an event, scroll down past the Status and Jobs sections to find the Crews panel. If any crews already exist for the event, they are listed here in a sortable table showing each crew's callsign, assigned vehicle, job counts (active/total), and members.
The table columns are:
| Column | Description |
|---|---|
| Callsign | The crew's radio callsign or identifier |
| Vehicle | The vehicle assigned to this crew, if any |
| Active/Total Jobs | The number of currently active jobs and total jobs this crew has been assigned to during the event |
| Members | All team members assigned to this crew |
| Edit | Opens the crew for editing |
You can click any of the Callsign, Vehicle, or Active/Total Jobs column headers to sort the table by that column. Click the same header again to reverse the sort direction.
Creating a New Crew
-
On the event detail page, scroll to the Crews section.
-
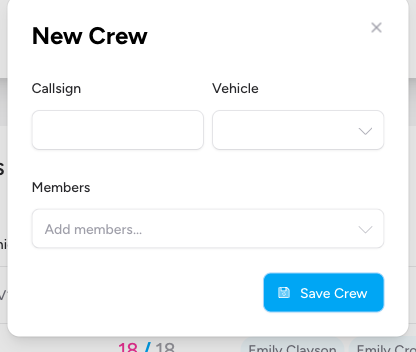
Click the New Crew button in the top-right corner of the Crews panel.

-
A modal dialogue opens with the title New Crew. Fill in the fields as described below.
-
Click Save Crew to create the crew.
Crew Fields
Callsign (required)
The unique identifier for this crew — this is what gets shown in the jobs list and on dispatch. Use whatever callsign convention your team operates with (e.g. ALPHA 1, MED 3, BRAVO).
Vehicle (optional)
Select the vehicle this crew will be operating from. The dropdown lists all vehicles registered to your team. You can leave this blank if the crew is not vehicle-based, or if the vehicle hasn't been confirmed yet. Use the X to clear the selection.
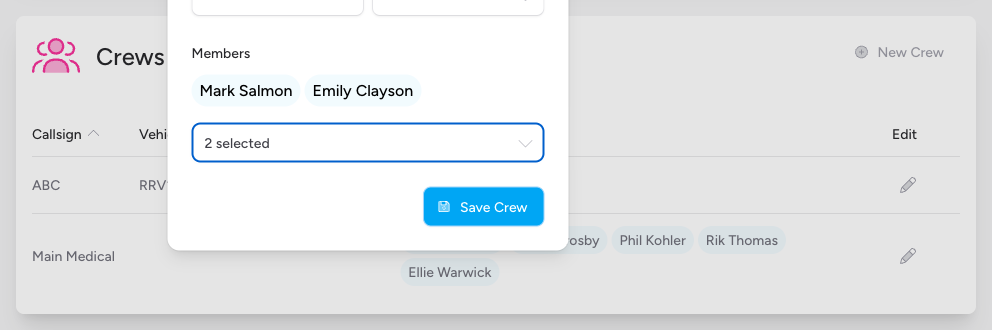
Members (required — at least one member must be selected)
This is where you assign team members to the crew. Start typing a name in the Add members... search box to filter the list, then click to select. You can select multiple members. The selected members are displayed as name tags above the selector as you build the crew.
At least one member is required. You will see a validation error if you try to save without selecting anyone.
Editing an Existing Crew
-
In the Crews table, click the pencil icon in the Edit column for the crew you want to change.
-
The Edit Crew modal opens, pre-populated with the crew's current details.
-
Make your changes to the Callsign, Vehicle, or Members fields.
-
Click Update Crew to save your changes.
Editing a crew updates its members and vehicle going forward. It does not change historical job records that were recorded while the previous crew configuration was active.
Deleting a Crew from the Event View
Crews cannot be deleted directly from the event detail page — you can only edit them here. To remove a crew from a specific job (rather than delete the crew entirely), use the trash icon that appears in the expanded job detail row.
How Crews Appear Elsewhere
Once crews are created, they become available throughout the event:
- Jobs list: Each job row shows the callsigns of any assigned crews as badges. Use the Assign Crew button on any job row to dispatch one of the event's crews.
- Job filters: The Crews filter at the top of the Jobs section lets you filter the jobs list by crew, so you can quickly see only the jobs a particular crew has been involved in.
- Events index: On the main Events list, each event card shows a summary of its crews with callsigns and vehicle names. Hover over a crew badge to see its members and their clinical roles.
- Mobile app: Crews created here are available for selection when your team members set their active crew in the mobile experience.
Tips & Best Practices
- Create crews before the event starts. The more complete your crew list is before operations begin, the faster job dispatch will be on the day.
- Keep callsigns short and unambiguous. Single-word or coded callsigns (e.g.
MED1,ALPHA) are quicker to read on the jobs list than long descriptive names. - You can have more crew members than a typical shift needs. There's no limit to the number of members per crew, so you can define a full roster even if not everyone will be on at the same time.
- Assign a vehicle where possible. Vehicle information appears on the crew badge tooltip on the events index, which is useful for at-a-glance situational awareness.
- You can merge two crews into one. If circumstances change and you need to combine two crews - for example, when a vehicle goes off-road and its crew joins another - use the crew merge feature on the event dashboard. This combines the members, preserves job history from both crews, and lets you choose which callsign and vehicle to keep.
Troubleshooting
The New Crew button is not visible.
You don't have permission to edit this event. You need either the admin team role or the Event Admin designation for this specific event. Contact your team administrator.
The Crews section is not showing at all.
The Crews panel is hidden on personal team accounts. It only appears for organisation teams with multiple members.
A team member I want to add is not in the Members list.
The members list only includes users who belong to your current team. If the person is missing, they need to be invited to the team first before they can be assigned to a crew.
I can't find the vehicle I want to assign.
Only vehicles that have been added to your team's vehicle list will appear in the dropdown. If the vehicle is missing, it needs to be added by a team administrator in the team's vehicle settings.
I'm getting a "Please select at least 1 member" error.
The crew must have at least one member before it can be saved. Select at least one person from the Members dropdown and try again.
- Adding Admins to an Event — grant event-level edit permissions to team members who aren't team admins
- Assigning Crews to a Job — dispatch a crew to a job from the event's Jobs list
- Vehicles — add and manage the vehicles available for crew assignment