Table of Contents
Assigning Crews to a Job
How to assign crews to jobs from the event dashboard or the in-app job editor, and record crew timing and outcomes.
Assigning Crews to a Job
Track exactly who responded to each incident — and when — by assigning crews directly to jobs.
Overview
Crews are pre-configured groups of team members, typically paired with a vehicle and identified by a callsign (e.g. "Alpha 1" or "TL2"). Assigning a crew to a job creates a clear record of who was dispatched to that incident, along with a timeline of key milestones: dispatch, mobile, on scene, patient contact, and clear.
You can assign crews to a job from two places:
- The event dashboard (web) — best for control room and event admin use, where you're managing multiple jobs across an event
- The in-app job editor (PWA) — best for crew members on the ground, working directly inside a job record
Both approaches record the same information; the right one to use depends on where you're working at the time.
Method 1: Assigning a Crew from the Event Dashboard
This is the quickest way to get a crew onto a job, and it's designed for rapid dispatch — the Dispatch Time is set automatically to the current time the moment you assign the crew.
Step 1: Open the Event
Navigate to Events from the main menu and select the relevant event to open the event dashboard.
Step 2: Locate the Job
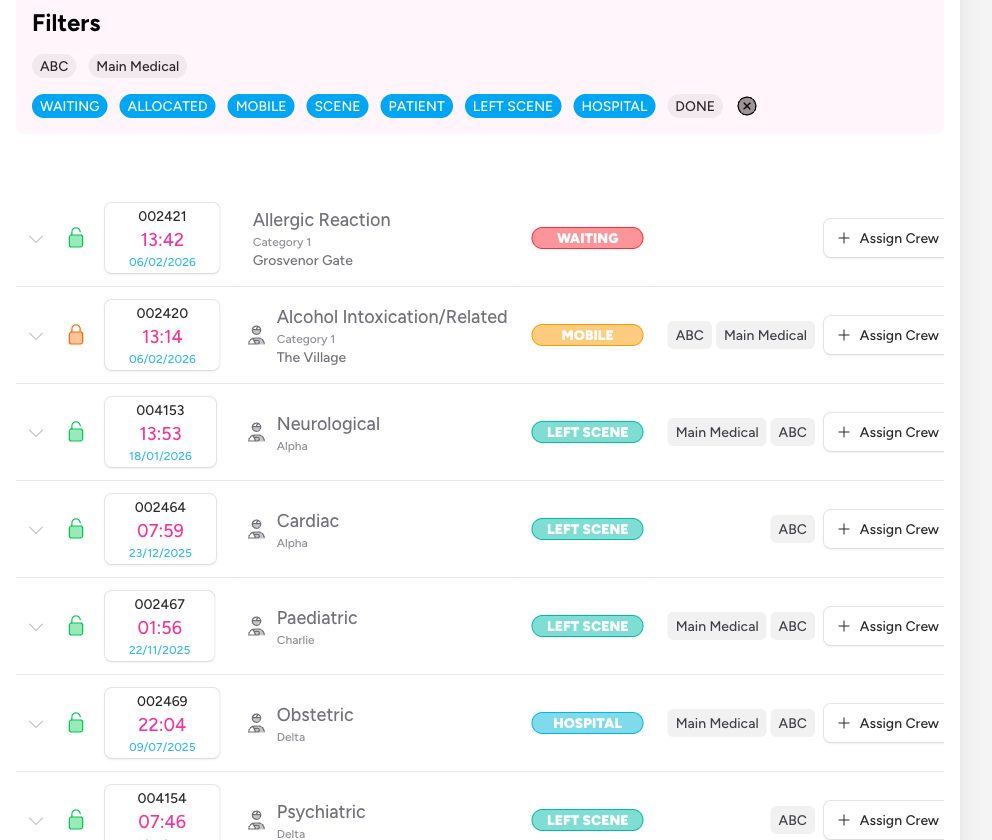
Find the job you want to assign a crew to in the Jobs table. Jobs are listed with their time, type, location, and current status.
If you're managing a busy event, use the crew and status filters above the table to narrow down the list.
Step 3: Click "Assign Crew"
In the rightmost column of the job row, click the Assign Crew button. A dropdown menu appears listing all crews registered for the event.

Each crew in the list shows a person icon (or group icon if the crew has more than one member).
Step 4: Select a Crew
Click the crew you want to assign. The crew's callsign badge immediately appears on the job row, and the crew's Dispatch Time is automatically set to the current time.
![]()
That's it — the assignment is saved instantly. You can assign multiple crews to the same job by clicking Assign Crew again and selecting another.
Viewing and Editing Crew Details on a Job (Event Dashboard)
Once a crew is assigned, you can view and update the timing details and outcome directly on the event dashboard.
Step 1: Expand the Job Row
Click the chevron (expand arrow) to the left of the job's time/ID to reveal the full job details panel beneath the row.
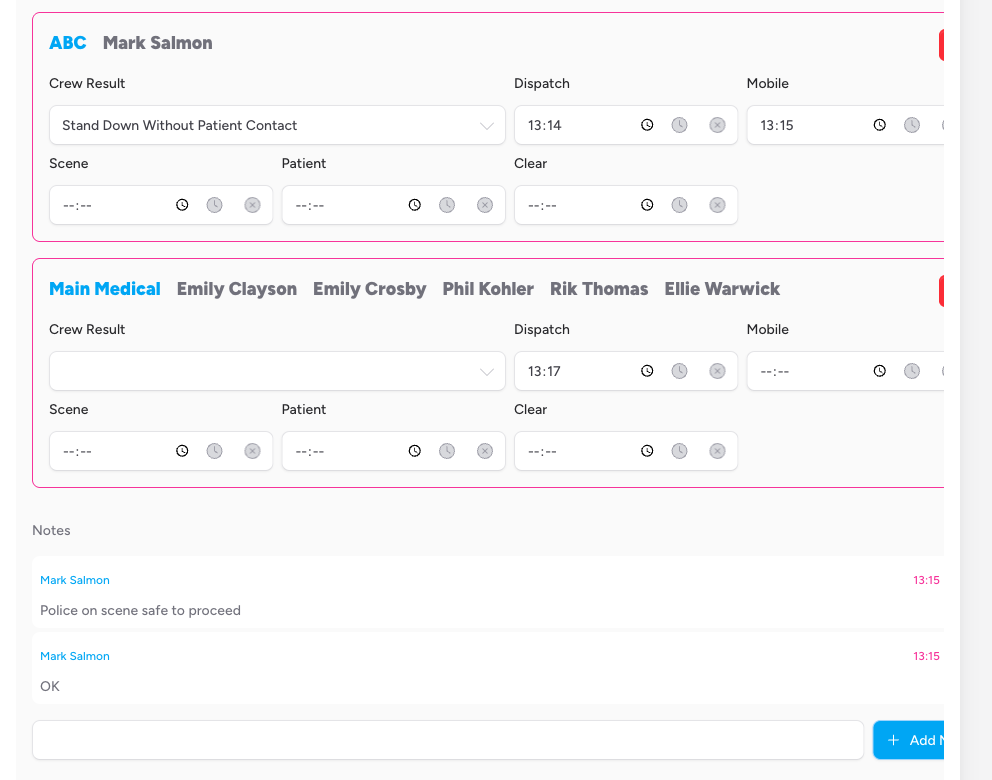
Step 2: Review Assigned Crews
Each assigned crew appears as a card showing the crew's callsign and the names of their members.
Step 3: Update Timing Fields
The following time fields are available for each crew. Enter a time manually or click the clock icon to set it to now. Click the clear icon (×) to remove a time.
| Field | What it records |
|---|---|
| Dispatch | When the crew was tasked to respond |
| Mobile | When the crew began travelling to the scene |
| Scene | When the crew arrived at the scene |
| Patient | When the crew made contact with the patient |
| Clear | When the crew was clear and available again |
Tip: Press N while a time field is focused to set it to the current time — handy when you're entering live updates quickly.
Step 4: Set the Crew Result
Use the Crew Result dropdown to record the outcome for this crew's attendance. The available options are:
- Stand Down Before Mobile
- Stand Down Before Scene
- Stand Down Without Patient Contact
- Patient Treated
- Patient Conveyed
The result is saved as soon as you select it.
Step 5: Remove a Crew (if needed)
To remove a crew from a job, click the red trash icon on the right side of the crew card. This detaches the crew from the job and removes all associated timing data.
Method 2: Managing Crews from the In-App Job Editor
Inside the PWA job editor, the Crews panel lets crew members on the ground add themselves (or other resources) to a job and update their own timing as the job progresses.
Step 1: Open the Job
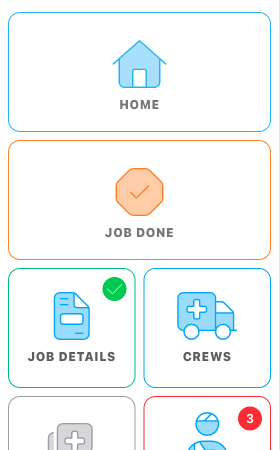
Open the relevant job from the home screen. The job editor opens with a sidebar on the left showing all available panels.
In the left sidebar, tap or click the Crews panel button (ambulance icon).
Step 3: Add a Resource
At the top of the Crews panel, click the Add Resource button. A drawer slides in from the left showing two sections:
Available Crews — pre-configured crews already registered for the event. Each crew card shows the event name, callsign, vehicle, and member names. Tap a crew card to add that crew to the job immediately.
Individual Team Members — a list of all team members. Tap a member's name to add them as a solo crew. The system creates a new crew entry automatically, using the person's initials as the callsign. Buttons are disabled for members already on an assigned crew.
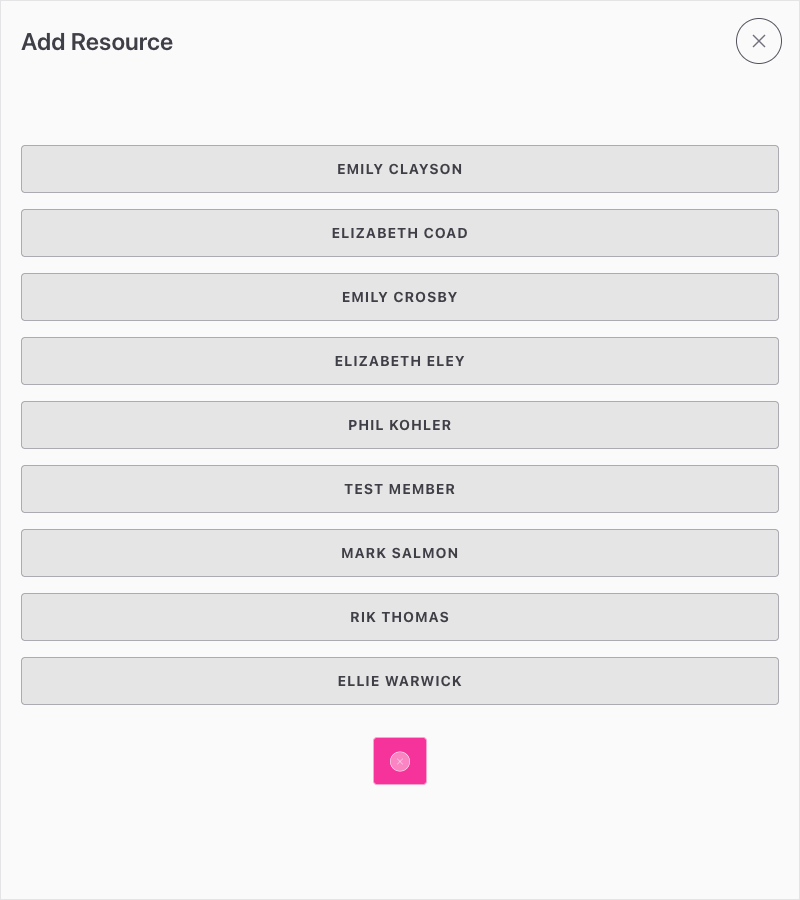
Click the × button at the bottom to close the drawer without making changes.
Step 4: Update Crew Timing
Each assigned crew appears as a panel within the Crews section, showing the crew's callsign, vehicle, and member names.
Use the time fields to record the crew's timeline as events happen. Each field has a clock button (sets to now) and a clear button (removes the time).
The fields shown depend on the crew's current Result selection:
| Result selected | Fields visible |
|---|---|
| (none) | Dispatch, Mobile, Scene, Patient, Clear |
| Stand Down Before Mobile | Dispatch, Clear only |
| Stand Down Before Scene | Dispatch, Clear only |
| Stand Down Without Patient Contact | Dispatch, Mobile, Scene, Clear |
| Patient Treated / Patient Conveyed | All fields |
Changes are saved automatically as you work. There is no separate Save button for the Crews panel.
Step 5: Edit a Crew's Details
If you are a member of a crew assigned to this job, an Edit My Crew button appears on that crew's panel. Click it to open the edit drawer, where you can update:
- Event — which event this crew is linked to
- Callsign — the crew's identifier
- Vehicle — the vehicle assigned to this crew
- Crew Members — add members using the + button; remove them using the × next to each member
At the bottom of the drawer you have two save options:
- Save (for this job only) — updates the crew details on this job without changing the crew's standing configuration
- Save (and set as current crew) — saves the changes to this job and also sets this as your active crew for future jobs
Step 6: Remove a Crew from the Job
Click the red trash icon on the crew's panel to remove it from the job. You'll be asked to confirm before the crew is deleted.
Managing Crews on an Event
Before you can assign a crew to a job, the crew needs to exist on the event. Crew management is done from the event dashboard by team admins and event admins.
Crews are scoped to the currently active shift. If the event has multiple shifts, make sure you've selected the correct shift tab before creating or viewing crews. See Understanding Shifts for more on how shifts work.
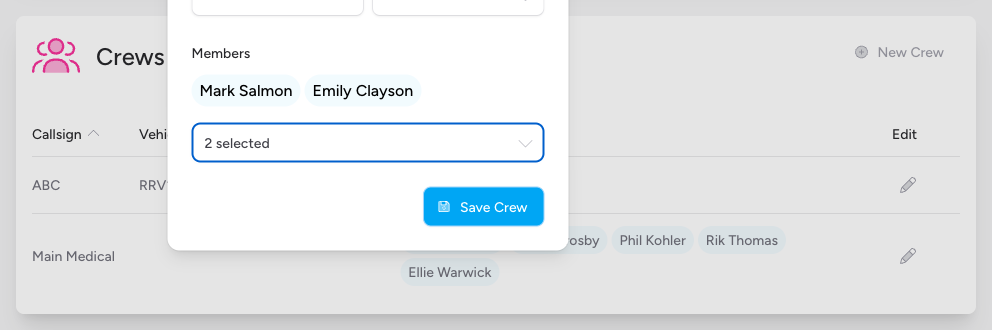
Creating a New Crew
- From the event dashboard, scroll to the Crews section.
- Click New Crew to open the crew creation modal.
- Fill in the fields:
- Callsign (required) — the crew's identifier (e.g. "Alpha 1", "TL2")
- Vehicle (optional) — select from your team's registered vehicles
- Members (at least 1 required) — use the searchable dropdown to select one or more team members
- Click Save Crew.
Editing an Existing Crew
In the Crews table on the event dashboard, click the pencil icon on any crew row to open the edit modal. Update the callsign, vehicle, or members and click Update Crew to save.
The Crews table also shows each crew's Active/Total Jobs count, so you can see at a glance which crews are currently busy.
What Happens When You Mark a Job as Done
When you click Job Done in the in-app editor, any crews assigned to the job that do not yet have a Clear Time will have their clear time automatically set to the current time. This ensures the record is complete even if you forgot to log it during the job.
Troubleshooting
The "Assign Crew" button is greyed out. The job has already been marked as Done. Crew assignments cannot be changed on completed jobs.
No crews appear in the "Assign Crew" dropdown. No crews have been set up for this event yet. A team admin or event admin needs to create at least one crew in the Crews section of the event dashboard.
A team member button is disabled in the "Add Resource" drawer. That person is already assigned to one of the crews currently on the job.
I can only see the Edit My Crew button on one crew, not all of them. The Edit My Crew button only appears on crews that include you as a member. To edit a different crew's details, use the event dashboard.
The crew I assigned has no timing data. When assigning via the Assign Crew button on the event dashboard, the Dispatch Time is set automatically. All other times (Mobile, Scene, Patient, Clear) need to be added manually by expanding the job row and updating the fields.
- Creating Jobs in an Event — create the job before assigning a crew to it
- Creating Crews in an Event — set up the crews available for an event before operations begin
- Modifying Crew Times and Adding Notes to a Job — update crew timestamps and add notes from the event overview
- Vehicles — add vehicles to your team so they can be assigned to crews
- Setting Up Your Crew — how crew members configure their active crew in the mobile app
- Understanding Shifts — how shifts organise jobs and crews within an event