Table of Contents
Managing Team Config
How to manage your team configuration settings and customise IndieBase for your team
Managing Team Config
Team configuration is how you shape IndieBase to match your team's clinical protocols, documentation standards, and operational requirements. Every patient record your team creates is driven by your configuration.
Overview
IndieBase uses a template-based configuration system. Each template defines which panels appear in a patient record, what options are available in dropdown fields, which fields are required, and what custom data your team collects. Your team can have multiple templates — useful if different events or roles need different documentation setups.
Configuration is split into two areas: Configuration Templates (which control how standard IndieBase panels behave) and Custom Panels (which add entirely new data collection sections to patient records). Both areas live under your team's settings and require team administrator permissions.
Subscription note: The number of templates and custom panels you can create depends on your subscription plan. Free plans include one template and no custom panels. Plans on a trial have access to five templates and three custom panels.
Before You Start
- You must be a team administrator (or team owner) to manage configuration templates and custom panels.
- Configuration templates and custom panels are behind the team-active middleware — they're only accessible if your team has an active subscription (paid plan, trial, or custom billing).
- Changes to a template take effect the next time the app syncs — including for team members working on mobile devices.
How Templates Work: The Merge System
It's worth understanding this before you start editing, because it shapes everything you see in the editor.
IndieBase ships with a comprehensive set of default settings for every panel (job details, patient details, observations, outcome, and so on). When you create a template, you're not starting from scratch — you're storing only the differences from those defaults. When the app loads your template, it merges your customisations on top of the defaults to produce the final configuration.
In practice this means:
- If you haven't changed a setting, it inherits the system default automatically.
- If you clear a label or options list back to empty, the system reverts to the default value for that field.
- Restoring defaults on any panel or field removes your overrides and falls back to IndieBase's built-in values.
- Open the sidebar and go to Template Config in the Configuration section.
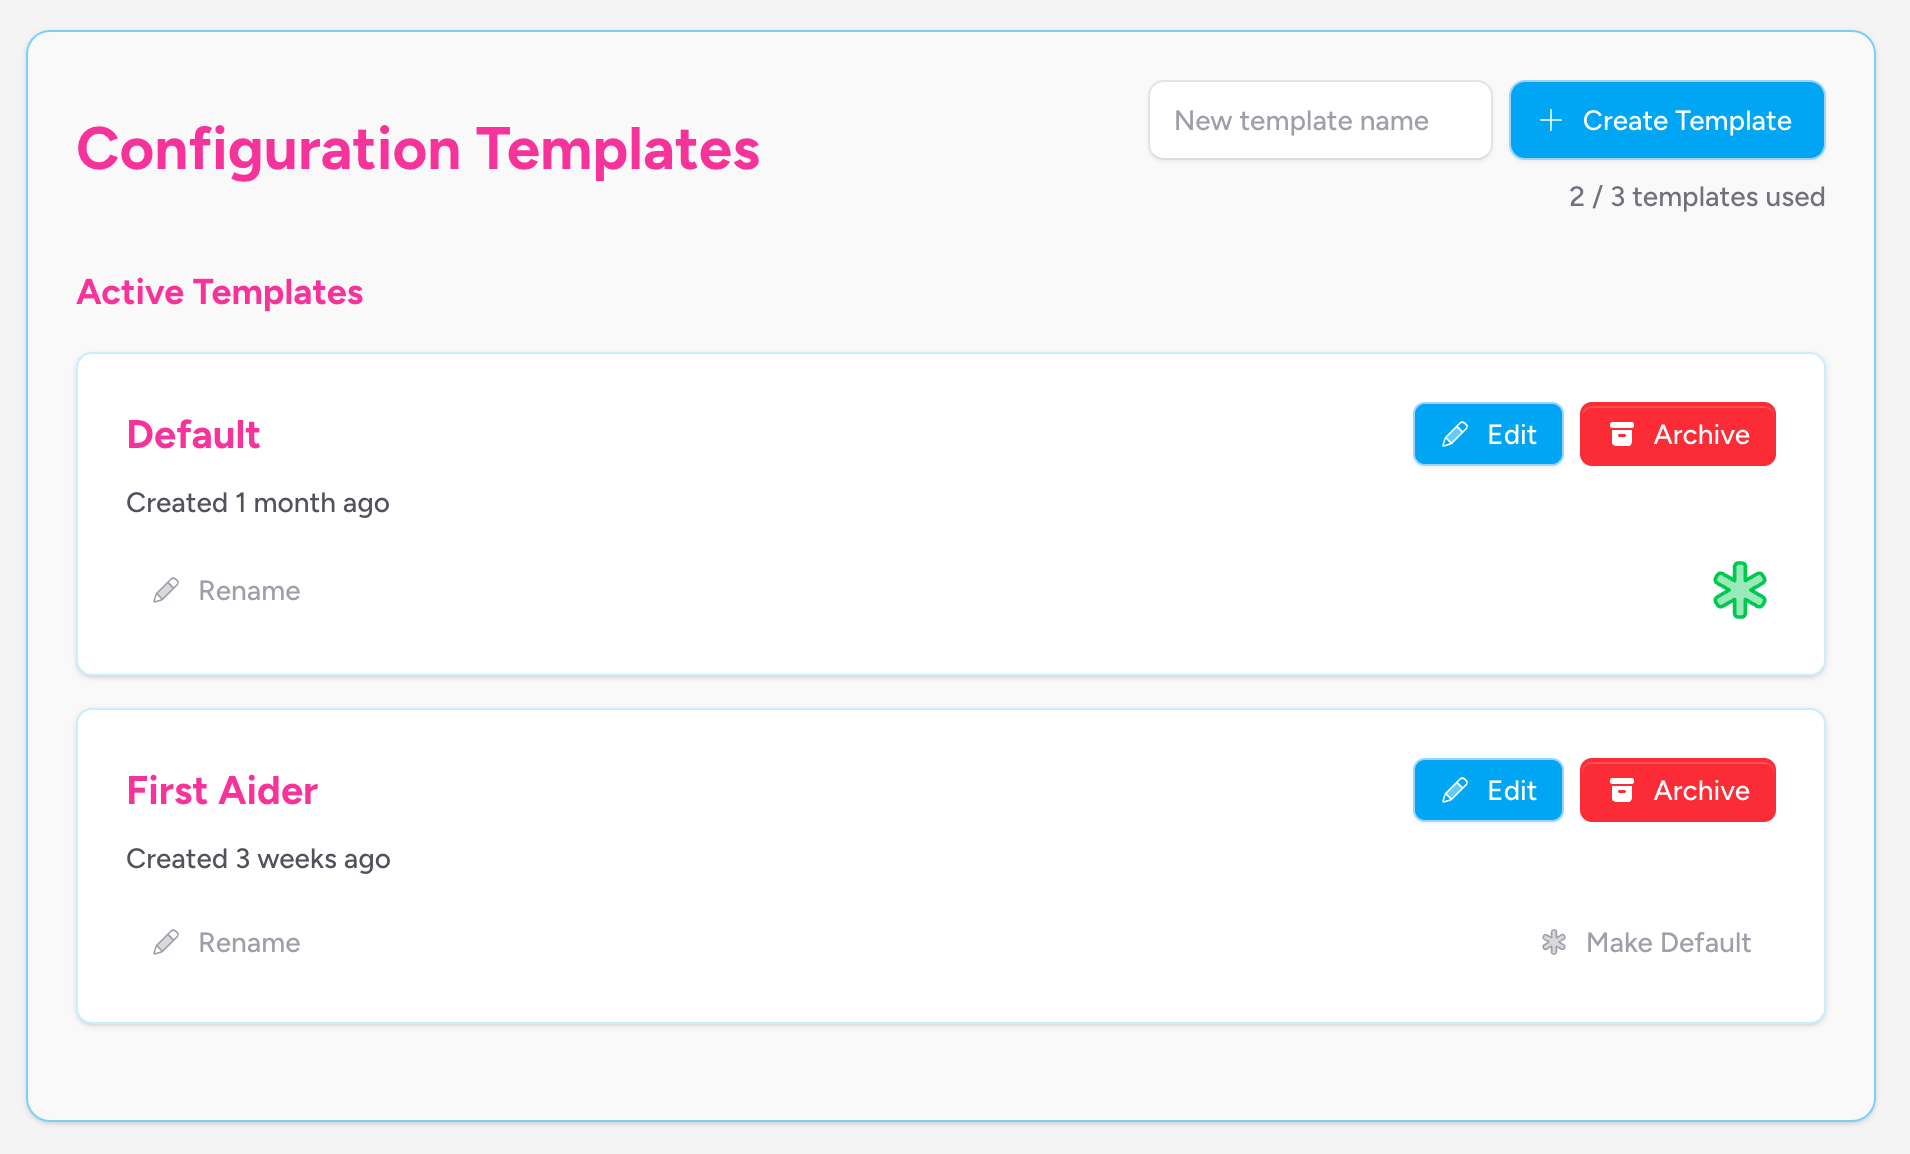
You'll land on the Configuration Templates page, which lists all your active and archived templates.
Managing Configuration Templates
Creating a New Template
- In the New template name field (top right of the templates list), type a name for your new template.
- Click Create Template.
The new template is created as a copy of your team's current first template's merged config. It appears immediately in the Active Templates list.
If the Create Template button isn't visible, you've reached the maximum number of templates for your plan. The current count is shown next to the button (e.g. 2 / 3 templates used).
Renaming a Template
- On the template card, click Rename.
- A text input appears in place of the rename button. Edit the name.
- Click Save to confirm, or Cancel to discard.
Template names must be unique within your team. If you try to save a name that already exists, an error message appears below the templates list.
Setting a Default Template
One template is marked as the default — this is the template used when creating new patient records unless a different one is selected at the event level. The default template is indicated by a star icon on its card.
To change the default:
- On the template card you want to make the default, click Make Default.
The star icon moves to the newly selected template automatically.
Editing a Template
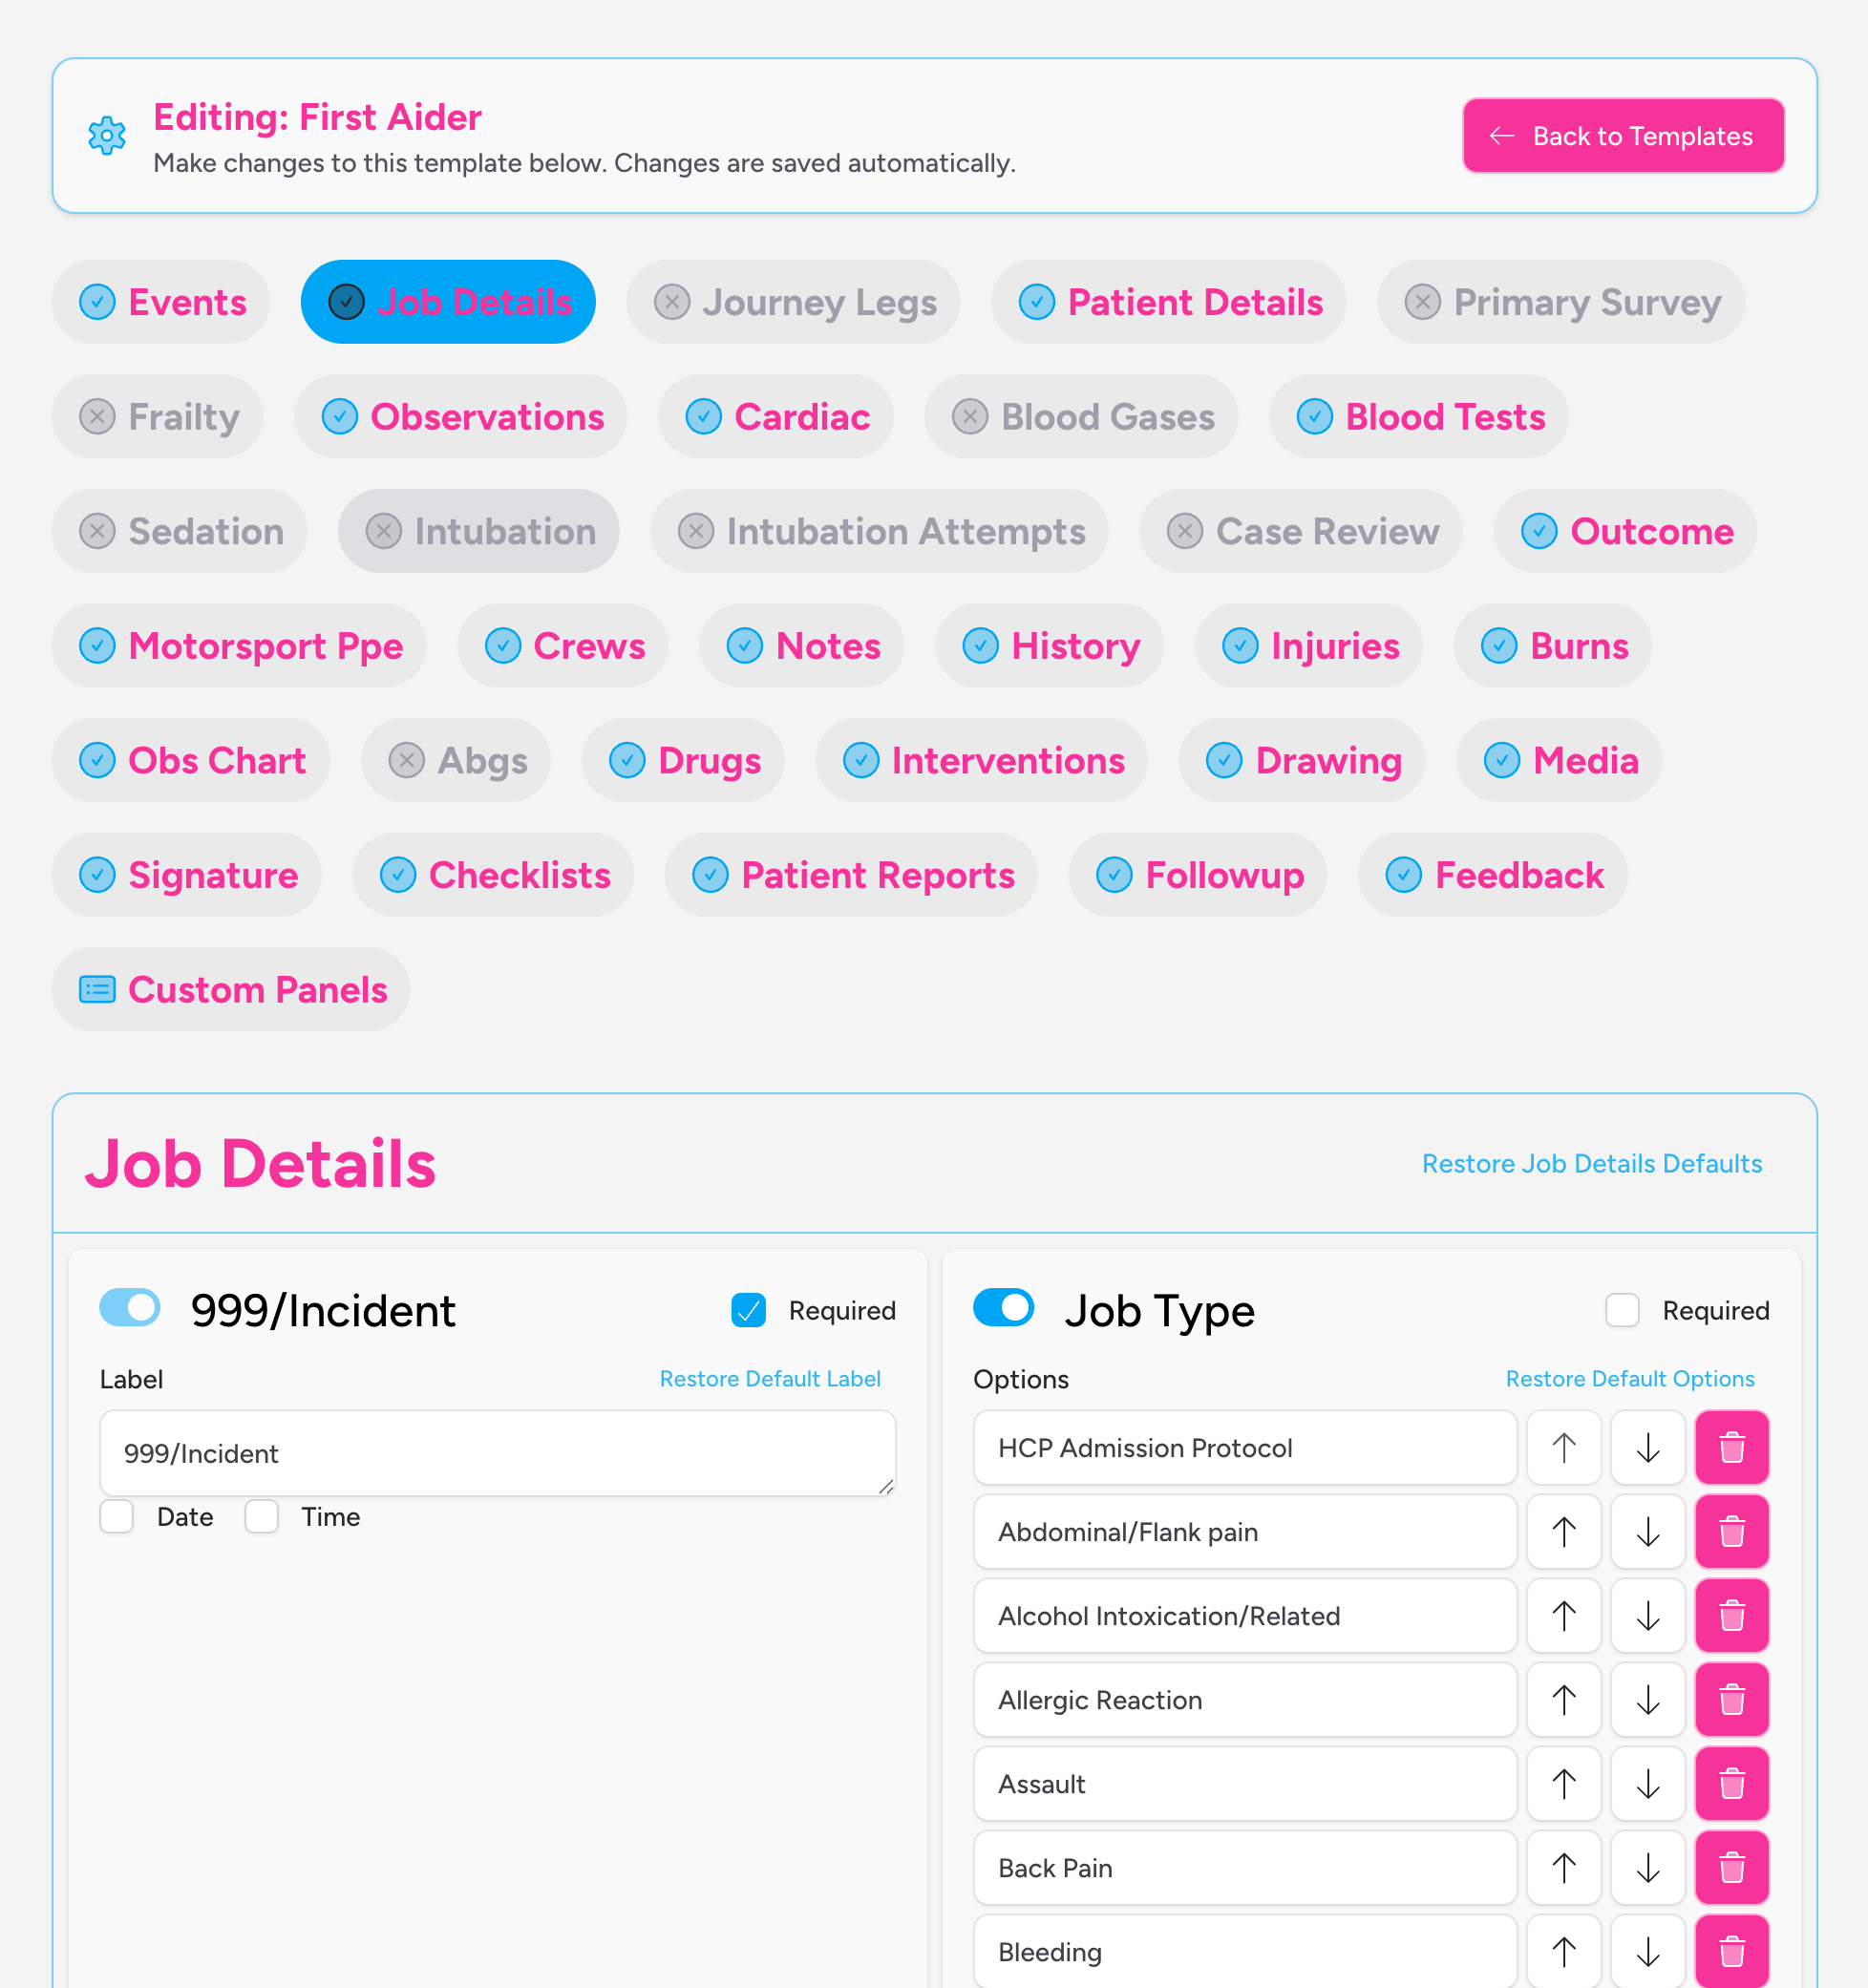
Click Edit on any active template card. This takes you into the template editor, where you configure everything for that template.
Changes in the template editor are saved automatically — there's no separate save button. Each change is persisted as you make it.
Archiving a Template
- On the template card, click Archive.
- A confirmation prompt appears — click OK to confirm.
Archived templates are soft-deleted: they're removed from the active list but preserved so you can restore them later. Archived templates appear in a separate Archived Templates section at the bottom of the templates page.
You cannot edit an archived template. Restore it first if you need to make changes.
Restoring an Archived Template
In the Archived Templates section, click Restore on the template you want to reinstate.
If restoring would exceed your plan's template limit, the restore will fail and an error message will appear.
The Template Editor
When you click Edit on a template, you enter the template editor. The editor is organised as a set of tabs, one per panel. Each tab's label shows whether that panel is currently visible (a green circle-check icon) or hidden (a grey circle-cross icon).
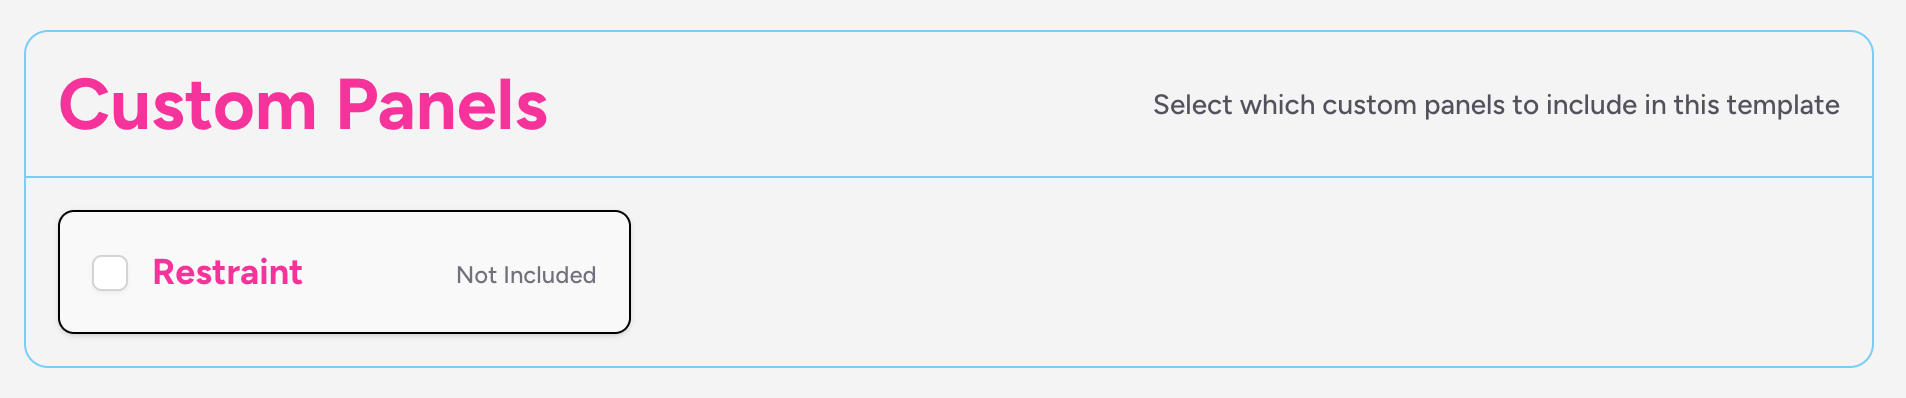
There's also a Custom Panels tab at the end of the tab bar, used to select which custom panels to include in this template.
Panel-Level Controls
At the top of each panel tab, you'll find:
- Visibility toggle — a switch that shows or hides the entire panel in patient records. Panels marked as
mandatoryin the system defaults (such as Job Details) cannot be hidden. - Restore [Panel Name] Defaults — resets the entire panel's configuration back to IndieBase system defaults, discarding any customisations.
Some panels also have a Position dropdown (Top or Bottom), which controls where the panel appears relative to others in the patient record — this applies to custom-type panels within a template.
Configuring Individual Fields
Within each panel, every available field is shown as a card. Fields that are hidden by default (such as custom fields and optional extras) start in a collapsed state.
For each field you can:
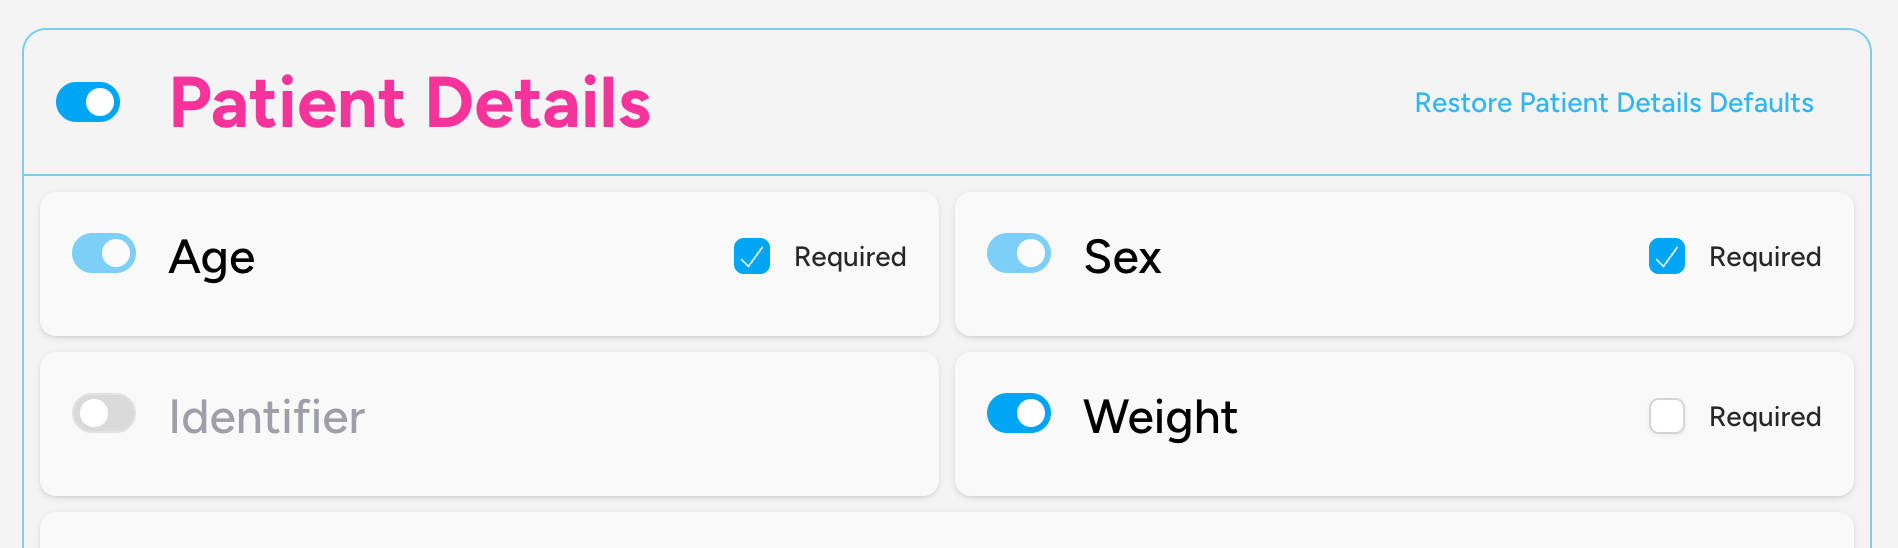
Show or hide the field Use the toggle switch on the left of the field card. Mandatory fields (required by IndieBase for reporting) show a disabled toggle — you can't hide them.
Mark a field as required Tick the Required checkbox to force team members to complete the field before saving a record.
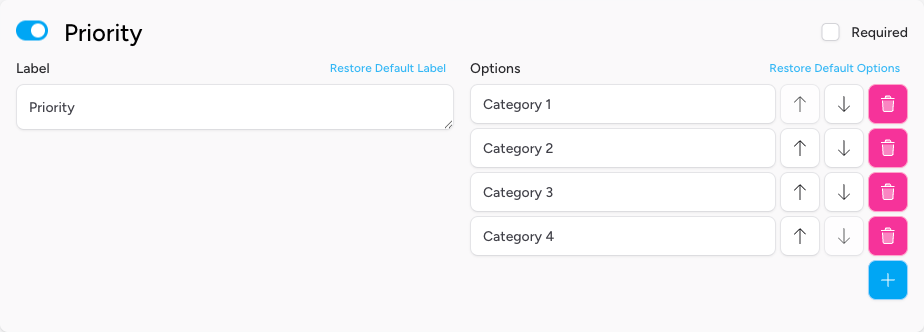
Customise the field label For fields that support it, you can edit the text in the Label input. If you clear the label entirely, it reverts to the IndieBase default. Click Restore Default Label to do this explicitly.
Edit the dropdown options For fields with a list of options, you can:
- Edit individual option values directly in their input boxes.
- Reorder options using the up and down arrow buttons.
- Add new options with the + button at the bottom of the options list.
- Remove options using the trash button (disabled if only one option remains, or if the option is protected).
Some options are protected — they're locked and cannot be edited or removed. Protected options are shown with a disabled input field. These exist where IndieBase relies on the option value to calculate outcomes or statuses (for example, the top-level Patient Result options such as Conveyed to Hospital and Deceased).
Click Restore Default Options to reset a field's options list back to the IndieBase defaults.
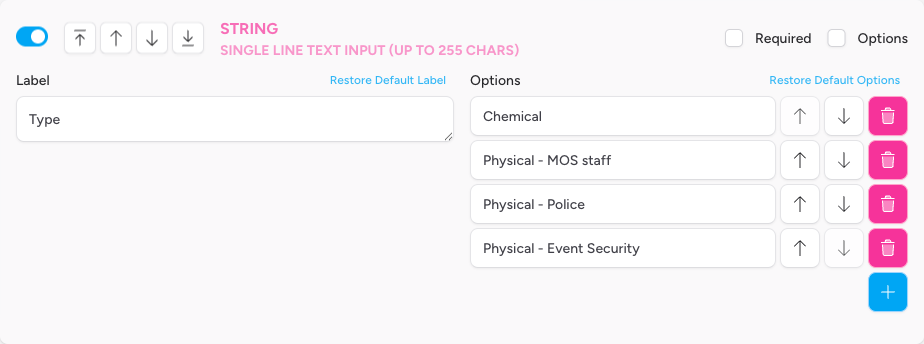
Enable options on string fields
For custom string fields (such as custom_string_1), an Options checkbox is available. Ticking it converts the field from a free-text input into a dropdown, and an options list appears for you to populate.
Configure datetime fields Datetime custom fields show Date and Time checkboxes. Use these to control whether the field captures a date, a time, or both.
Configure integer fields Integer custom fields support Min and Max inputs to constrain the range of acceptable values.
Configuring Toggleable Features
Some panels include toggleable integrations — features that can be switched on or off without affecting individual fields. For example, the Observations panel includes toggles for third-party device imports:
- Zoll Cloud Import
- Corsium Suite Import
- Tempus Import
These appear as checkboxes at the bottom of the panel's fields list. Tick or untick them to enable or disable the feature for this template.
Selecting Custom Panels
The Custom Panels tab shows all the custom panels your team has created. For each panel, you can tick or untick a checkbox to include or exclude it from this template.
- Included — the custom panel appears in patient records when this template is in use.
- Not Included — the panel is hidden for this template.
Custom panels must be created before they can be selected here. If no custom panels exist, the tab shows a prompt with a link to Manage Custom Panels.
Panel Reference
The following panels are available in every template. This table summarises what each panel controls.
| Panel | What it covers |
|---|---|
| Job Details | Incident/call time, job type, priority, CAD number, other resources on scene, and custom job fields |
| Patient Details | Age, sex, weight, patient category, alternate identifier, and custom patient fields |
| Primary Survey | Haemorrhage, airway, breathing, circulation, GCS, AVPU |
| Frailty | Frailty assessment (no sub-fields configurable) |
| Observations | Heart rate, NIBP, IBP, SpO2, FiO2, respiratory rate, EtCO2, GCS, AVPU, temperature, pain score, annotation, and third-party device import toggles |
| Cardiac | Full cardiac arrest dataset including rhythm, ROSC times, aetiology, defibrillation, and crew role |
| Blood Gases | Arterial/venous/capillary blood gas fields including pH, pCO2, lactate, electrolytes, and haemoglobin |
| Blood Tests | Point-of-care blood test types and units |
| Sedation | Sedation indication, regime, complications, pre-oxygenation, monitoring, and sedation scale toggles (SAT, RASS) |
| Intubation | RSI indication, location, timing, initial CO2 |
| Intubation Attempts | Per-attempt data: blade type, APOX/MILS/cricoid/BURP, view grade, soiling, bougie, tube, and success |
| Case Review | Post-incident review type, rating, and comments |
| Outcome | Patient result (protected options), sub-result, and departure time |
| Motorsport PPE | Helmet, chest plate, leather suit, airbag suit, gloves, and boots condition — hidden by default |
| Journey Legs | Transport leg types (Road, Air, Sea, Layover, Other — protected) |
| Crews | Crew assignment panel visibility |
| Notes | Clinical notes panel visibility |
| History | Medical history panel visibility |
| Injuries | Injury documentation panel visibility |
| Burns | Burns assessment panel (requires an active subscription) |
| Obs Chart | Observations chart panel visibility |
| ABGs | Blood gases chart panel visibility |
| Drugs | Drug administration panel visibility |
| Interventions | Interventions panel visibility |
| Drawing | Body diagram drawing panel visibility |
| Media | Photo/media panel visibility |
| Signature | Patient signature panel — configurable signature text options |
| Checklists | Checklists panel visibility |
| Patient Reports | Patient report panel visibility |
| Follow Up | Follow-up panel visibility |
| Feedback | Patient feedback form — configurable questions and response options |
Panels showing only a visibility toggle (no sub-fields) simply control whether that section appears in the patient record at all.
Custom Fields
Several panels include custom fields — slots reserved for team-specific data that don't map to a standard IndieBase field. These are hidden by default and must be enabled in the template editor.
Custom fields are available in Job Details, Patient Details, and Motorsport PPE:
| Field type | What it stores |
|---|---|
custom_string_1 – custom_string_4 |
Short text (up to 255 characters), optionally converted to a dropdown |
custom_integer_1 – custom_integer_2 |
Whole numbers, with optional min/max constraints |
custom_boolean_1 – custom_boolean_2 |
Yes/No checkbox |
custom_datetime_1 – custom_datetime_2 |
Date, time, or date-and-time |
To use a custom field:
- Toggle the field on using its visibility switch.
- Enter a meaningful Label — this is what your team members will see in the patient record.
- Optionally mark it as Required.
- For string fields, optionally enable Options to turn it into a dropdown.
Managing Custom Panels
Custom panels are separate from templates — you create and configure them independently, then attach them to one or more templates via the Custom Panels tab in the template editor.
Navigate to Configuration > Custom Panels in the sidebar to manage them.
Creating a Custom Panel
- Enter a name in the New panel name field.
- Optionally enter a description in the Panel description (optional) field.
- Click Create Panel.
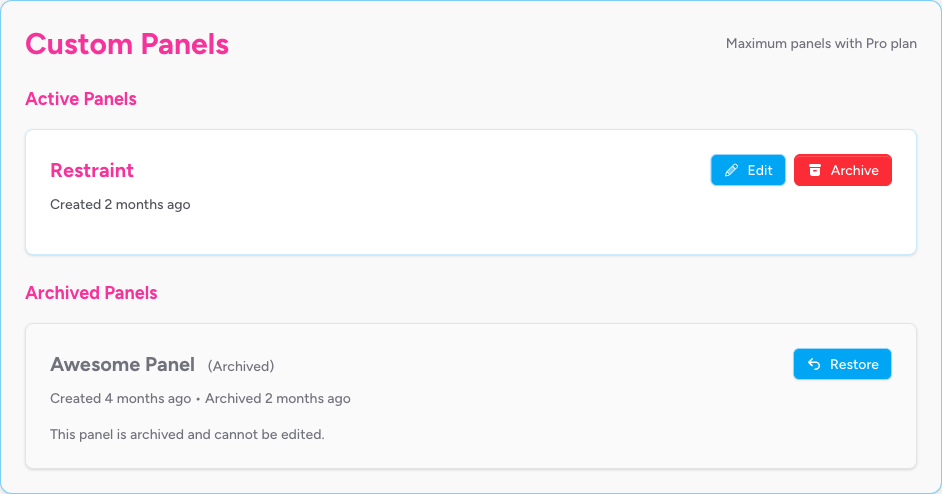
The new panel appears in the Active Panels list. Click Edit to configure it.
The number of custom panels you can create depends on your subscription plan. The current count is shown next to the create button.
Configuring a Custom Panel
The custom panel editor works similarly to the template editor's field configuration, with a few differences:
Panel title and description At the top of the editor, you can update the panel's display title (the name shown in the patient record) and its description. The title is saved as you leave the field.
Position Use the Position dropdown to place the panel at the Top or Bottom of the patient record's panel list.
Available fields Each custom panel has a fixed set of typed field slots:
| Field type | Slots available | What it stores |
|---|---|---|
| String | 6 (string_1 to string_6) |
Single-line text (up to 255 chars), optionally a dropdown |
| Integer | 6 (integer_1 to integer_6) |
Whole number, with optional min/max |
| Text | 3 (text_1 to text_3) |
Multi-line free text |
| Boolean | 3 (boolean_1 to boolean_3) |
Yes/No checkbox |
| Date/Time | 3 (datetime_1 to datetime_3) |
Date, time, or both |
All fields are hidden by default. Toggle on the ones you need, give them clear labels, and optionally mark them as required.
Reordering fields Use the Move to top, Move up, Move down, and Move to bottom buttons on each field card to set the order in which fields appear in the patient record.
Options on string fields Tick the Options checkbox on any string field to turn it into a dropdown. An options list appears — add, reorder, and remove options as needed.
Datetime fields Tick Date, Time, or both to control what component of a date/time value the field captures.
Integer fields Set Min and Max values to constrain acceptable input.
Archiving and Restoring Custom Panels
The process is identical to templates:
- Click Archive on the panel card to archive it (confirmed by a prompt).
- Archived panels appear in the Archived Panels section. Click Restore to reinstate them.
Archiving a custom panel does not automatically remove it from templates that include it — but it will no longer appear in patient records for new jobs, as the panel is no longer active.
Tips and Best Practices
- Use descriptive template names. If you run different types of events (road events, music festivals, motorsport circuits), create a template per event type with a clear name. This makes it easy for event administrators to select the right one.
- Enable custom fields sparingly. Only expose the fields your team will actually complete — a cluttered form slows documentation at the point of care.
- Protect the Outcome panel's top-level options. IndieBase uses the protected outcome values to calculate patient disposition statistics. Add detail through the Sub-Result field rather than modifying the protected options.
- Don't hide mandatory panels. Panels marked as mandatory (currently Job Details) are required for IndieBase's reporting engine to function correctly.
- Test before deploying to an event. After editing a template, create a test job against that template to verify the fields, options, and custom panels appear as expected before going live.
Troubleshooting
I can't see the Configuration or Custom Panels menu items. These are only available to teams with an active subscription (paid plan, trial, or custom billing). Check your team's subscription under Billing Portal in the Configuration section of the sidebar. If you're on the free plan, you'll need to subscribe to access template management.
The "Create Template" button isn't showing. You've reached your plan's template limit. The current usage is shown below the button area (e.g. 3 / 3 templates used). Archive an existing template to free up a slot, or upgrade your plan.
I edited a template but team members aren't seeing the changes. Configuration is synced to devices when the app loads or refreshes its data. Ask team members to refresh the app. If they're offline, the update will apply when connectivity is restored.
A dropdown option is greyed out and I can't edit or delete it. This option is protected — IndieBase locks certain values because it relies on them for data consistency and reporting calculations. You can add new options alongside the protected ones, but cannot modify the protected values themselves.
I accidentally cleared a field label and now it's showing the wrong name. Click Restore Default Label on the field card, or clear the label input and tab away — IndieBase will automatically revert to the default label when the value is empty.
I archived a custom panel but it's still referenced in a template's Custom Panels tab. The panel will no longer appear in patient records (it's archived), but it may still appear as a selected (but inactive) entry in the template's Custom Panels tab. Edit the template and deselect the archived panel to keep things tidy.
- Team Checklists — add structured checklists to patient records and events.
- Patient Records — understand how team config shapes what clinicians see when documenting.