Table of Contents
Team Checklists
How to create and manage custom checklists for standardised procedures
Team Checklists
Team Checklists let you define reusable procedural checklists that clinicians can complete against individual patient records — ensuring nothing gets missed during critical interventions.
Overview
Checklists are fully customisable question lists built by your team administrators. Once created, they become available to all clinicians on the team, who can select and complete them directly from the patient record during an event. Each completed checklist is time-stamped, attributed to a named clinician, and included in the patient's PDF report.
Common uses include intubation safety checks, sedation protocols, equipment verification, discharge readiness, and any procedure where a standardised step-by-step approach matters.
This feature requires a Pro or higher subscription. Teams on a trial account can create up to 10 checklists.
Before You Start
- You must be a team administrator to create or manage checklists.
- The Checklists panel in patient records is only visible to teams with an active subscription.
- Your team's subscription determines how many checklists you can create. The current count is displayed on the Checklist Config page next to your plan limit.
Managing Checklists (Team Settings)
Getting to Checklist Config
Expand the Configuration section in the sidebar and click Checklists.
You'll see a grid of all your team's existing checklists, along with a count showing how many you've used against your plan limit. If you've reached your limit, the New Checklist button will be disabled and your current plan limit will be shown beneath it.
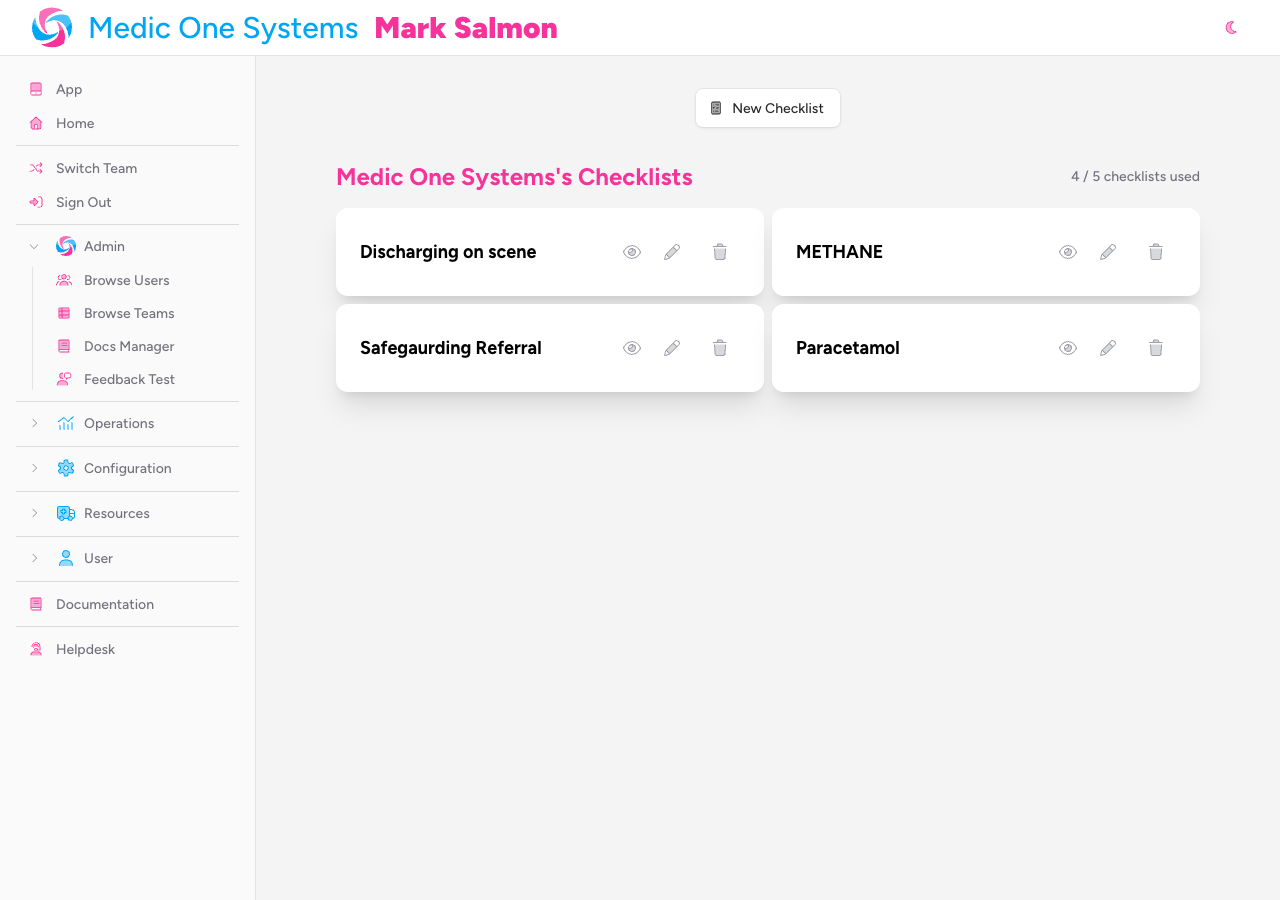
Creating a New Checklist
-
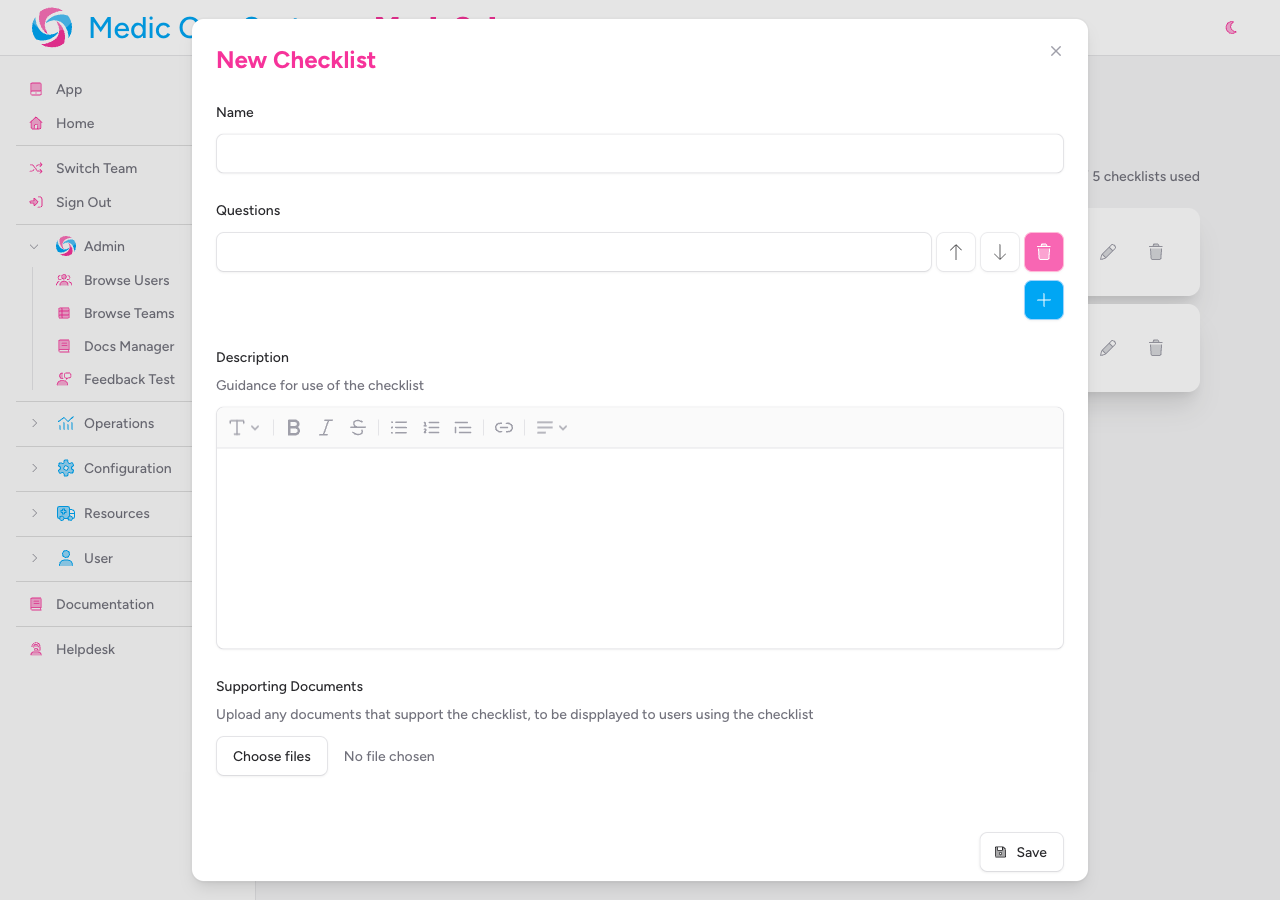
Click New Checklist. A modal will open.
-
Enter a Name for the checklist. This is what clinicians will see when selecting a checklist in the patient record, so make it clear and specific (e.g. "RSI Safety Checklist" rather than "Intubation").
-
Add your Questions. Each question is a single text item that clinicians will tick off as they work through the procedure. A checklist must have at least one question, and no question can be blank.
- Click the + button at the bottom of the questions list to add a new question.
- Use the up and down arrow buttons next to each question to reorder them.
- Use the trash button to remove a question. You can't delete a question if it's the last one remaining.

Questions appear to clinicians in the exact order you set here, so arrange them in the logical sequence the procedure should follow.
-
Optionally, add a Description. This is a rich-text field where you can include guidance on how and when to use the checklist — context, contraindications, references to protocols, and so on. Clinicians can expand a Supporting Information section when completing the checklist to read this guidance.
-
Optionally, upload Supporting Documents. You can attach any number of files (images, PDFs, Word documents, videos) that clinicians can reference while completing the checklist. Images display as thumbnail previews; other file types show as file icons. These are displayed alongside the description in the Supporting Information section.

-
Click Save. The checklist is immediately available for use in patient records.
Previewing a Checklist
On the Checklist Config page, each checklist card has three action buttons. Click the eye icon to open a read-only preview of the checklist, showing all questions, the description, and any attached documents.

Editing a Checklist
Click the pencil icon on any checklist card. The same modal used for creation will open, pre-populated with the checklist's current settings. Make your changes and click Save.
Editing a checklist affects future uses only. Checklists already completed in patient records retain the questions and answers as they were recorded at the time.
Removing an Attachment
When editing a checklist, any previously uploaded attachments appear as thumbnails beneath the file upload field. Click the trash button on an attachment thumbnail to remove it immediately.
Deleting a Checklist
Click the trash icon on a checklist card. A confirmation dialogue will appear — click Delete to confirm, or Cancel to go back.
This action cannot be undone. The checklist will no longer be available to clinicians in the patient record. Completed checklist records already saved within patient records are not affected.
Using Checklists in Patient Records
Once your team has created checklists, clinicians can complete them from within the patient record.
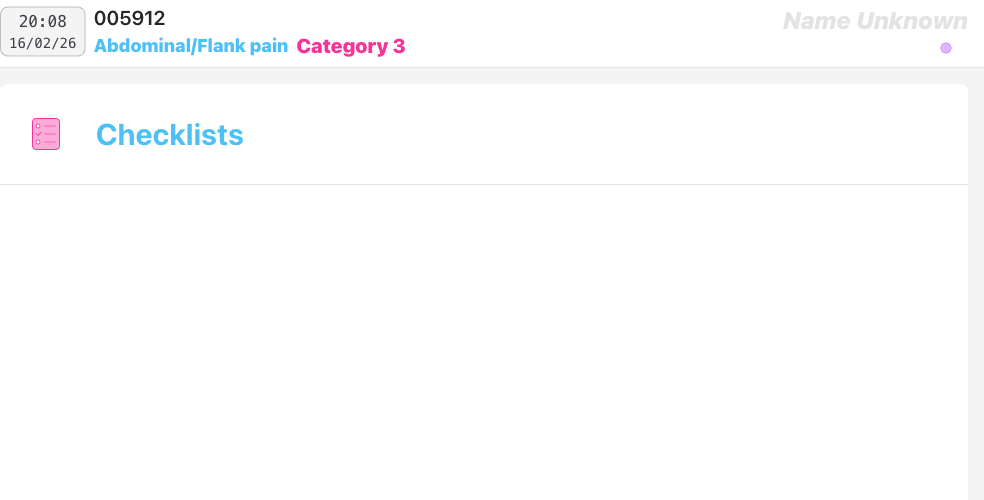
Opening the Checklists Panel
In the patient record, navigate to the Checklists panel. If any checklists have been completed for this patient, a count badge is shown on the panel header.
Completing a Checklist
-
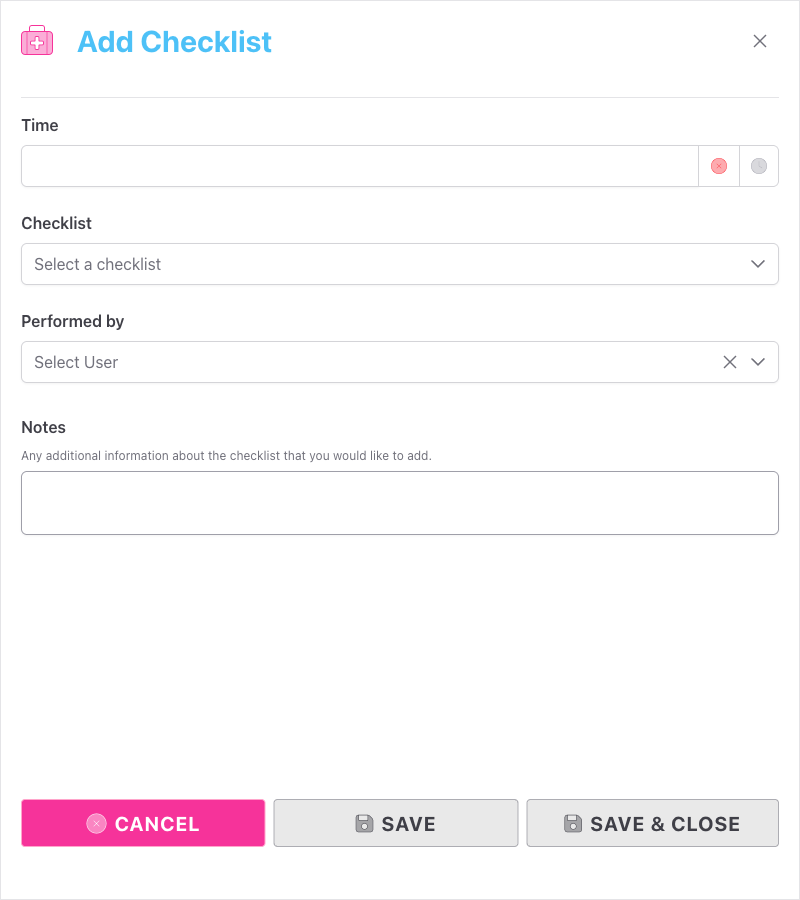
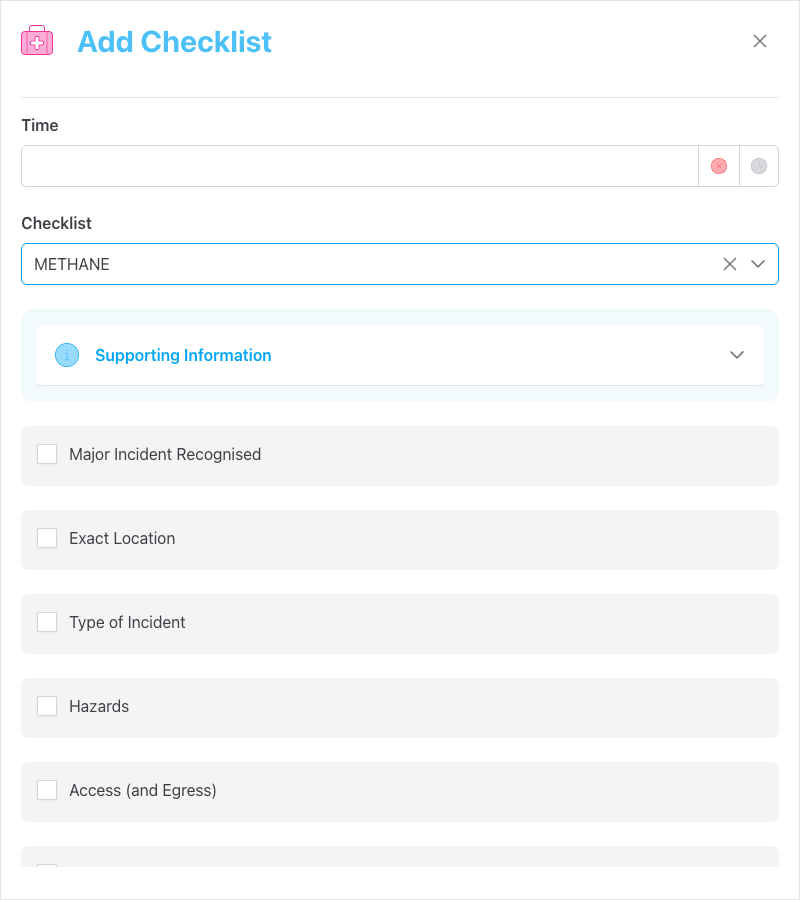
Click Add Checklist. A slide-out drawer will open on the right.
-
Set the Time the checklist was completed. You can type a time directly, use the clock button to set it to the current time, or use the date picker. The time picker uses sequential time logic — the time will default sensibly relative to other events already recorded on the job.
-
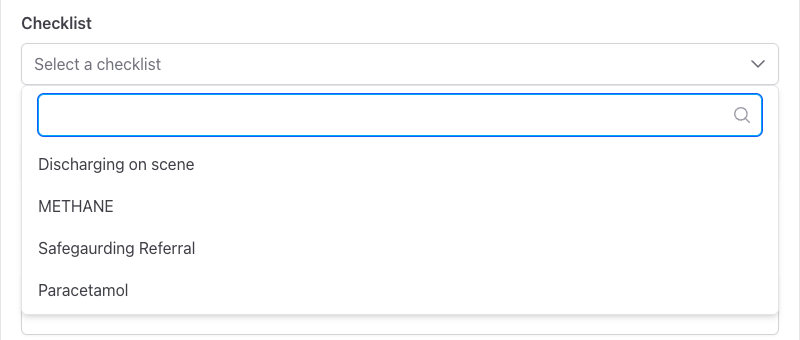
Select the Checklist you want to complete from the dropdown. This lists all checklists your team has configured. You can filter the list by typing.
-
Once you select a checklist, the questions appear as tick-boxes. Work through each item and tick the ones that have been completed or confirmed. Items you do not tick will be recorded as not completed.
If the checklist has a description or supporting documents, a Supporting Information section appears above the questions — click to expand it and read the guidance.
-
Select the team member who performed the checklist from the Performed by dropdown. This defaults to the currently logged-in user.
-
Optionally, add any free-text Notes — for example, to record context, exceptions, or observations relevant to this particular completion of the checklist.
-
Click Save to save the checklist and keep the drawer open (to add another), or Save & Close to save and dismiss the drawer.
Reviewing Completed Checklists
Each completed checklist appears in the Checklists panel as an accordion row, showing:
- The time it was completed
- The name of the clinician who performed it
- The name of the checklist
- A row of green tick or red cross icons — a quick visual summary of which items passed and which didn't
Click a row to expand it and see each question alongside its pass/fail status. Any notes recorded are shown beneath the questions.

Deleting a Completed Checklist
Expand the checklist row and click the delete button (trash icon) in the bottom-right corner. A confirmation prompt will appear before the record is removed.
Patient Report
Completed checklists are included in the patient's PDF report. Each checklist is listed under a Checklists section, showing the checklist name, completion time, performing clinician, and each question with its pass/fail result. Notes are included where recorded.
Plan Limits
| Plan | Checklists Available |
|---|---|
| Trial | Up to 10 |
| Subscription | Determined by your plan — shown on the Checklist Config page |
When you reach your limit, the New Checklist button is disabled and your plan limit is displayed beneath it. Contact your subscription administrator or upgrade your plan to create more checklists.
Troubleshooting
The New Checklist button is greyed out. Your team has reached the maximum number of checklists for your current plan. The limit is shown beneath the disabled button. Upgrade your subscription to create more.
I can't see the Checklists panel in the patient record. The Checklists panel is only available to teams with an active subscription. If your team's subscription has lapsed, the panel will be hidden. Contact your team administrator or check your subscription.
I saved a checklist but the questions are in the wrong order. Open the checklist for editing (pencil icon), use the up/down arrow buttons to reorder the questions, and save again. Order changes take effect immediately for new completions.
A question I added is blank — I can't save the checklist. Every question must have at least two characters of text. Fill in or remove any blank question fields before saving.
I need to remove an attachment but I can't find the option. Open the checklist for editing. Attachment thumbnails appear beneath the file upload field. Each thumbnail has a trash button in its top-right corner — click that to remove the attachment.
- Custom Panels — Add custom data panels to patient records
- Template Config — Other team configuration options
- Patient Records — Overview of the patient record