Table of Contents
The Home Page
Your team's operational dashboard — see live events, standalone jobs, and crew activity at a glance, and manage the day's work from one central view.
The Home Page
Your home page is the operational control centre for the day. It shows you every live event and standalone job your team has active right now, auto-refreshing every 30 seconds so the picture stays current without you lifting a finger.
Overview
The home page at /web is where you land after signing in. It gives you a real-time snapshot of your team's operational activity: which events are live, what jobs are in progress, which crews are deployed, and where things stand. From here, team administrators can create jobs and crews, assign resources, record crew times, and manage notes — all without leaving the dashboard.
Team members who are not administrators get a read-only view of the same data.
The page refreshes automatically every 30 seconds while it's visible in your browser.
The Operational Day
IndieBase doesn't use midnight as the start of a day. Instead, it uses an operational day — a 24-hour window that starts and ends at a configurable hour. By default, the operational day runs from 06:00 to 05:59 the following morning, but your team administrator can change that start hour to suit your team's operations (for example, 20:00 for a predominantly night-shift team).
This means that if you're working a shift that crosses midnight, everything is still grouped under the same operational day — no split records, no confusion.
The heading at the top of the home page shows the start date of the current operational day, so you always know exactly which window you're looking at.
The operational day start hour is configured by your team owner or administrator under Team Settings > Information Governance > Data Access Settings. See Information Governance for details.

Live Events
If your team has an active subscription, the top section of the home page shows any events that are currently live (i.e. happening right now according to their scheduled dates).
Each live event appears as a card containing:
- Event title and venue — click the title to go straight to the full event management page
- Jobs and Patients badges — a count of all jobs and all jobs with a patient for that event
- Status breakdown — colour-coded badges showing how many jobs are in each status (Waiting, Allocated, Mobile, Scene, Patient, Left Scene, Hospital, Done)
- Crew badges — a badge for each crew assigned to the event, showing the callsign, vehicle name, and crew member count
- Incidents badge — if the event has any active M/ETHANE incident command records, an amber Incidents badge appears showing the count

Click the event title to go to the event page, where you can see the full incident details.
If there are no live events today, the section shows a No live events today placeholder.
The Live Events section only appears for teams with an active subscription. If you don't see it, check your team's subscription status.
Creating a new event (admins only)
If you're a team administrator, a New Event button appears above the live events section. Click it to go to the event creation page.

Team Jobs
Below the live events section is the Team Jobs panel. This shows all standalone jobs for the current operational day — jobs that are not attached to any event, used for day-to-day team operations such as 999 calls, transfers, and standby work.
The panel header shows:
- A count of total Jobs for the operational day
- A count of Patients (jobs that have a patient record attached)

Crew badges
If any standalone crews have been created today, a row of crew callsign badges appears just below the panel header. These give you a quick overview of which resources are deployed and available.
The jobs table
Standalone jobs are listed in a table with the following columns:
| Column | Description |
|---|---|
| Time | The call time for the job (HH:MM, 24-hour UK time) |
| Type | The job type (e.g. Medical, Trauma) |
| Priority | The priority level |
| Location | The incident location |
| Status | A colour-coded status badge (see Job Statuses below) |
| Crews | Badges for each crew assigned to the job |
Jobs that are marked as Done appear faded in the table to distinguish them from active jobs.

Job statuses
Each job's status is derived automatically from the crew times that have been filled in. You don't set the status manually — it updates as you record times:
| Status | What it means |
|---|---|
| Waiting | No crew times recorded yet |
| Allocated | A crew has a Dispatch time |
| Mobile | A crew has a Mobile time |
| Scene | A crew has a Scene time |
| Patient | A crew has a Patient time |
| Left Scene | The patient record has a departure time |
| Hospital | The patient record has a hospital arrival time |
| Done | The job has been marked as done |
Expanding a job (admins only)
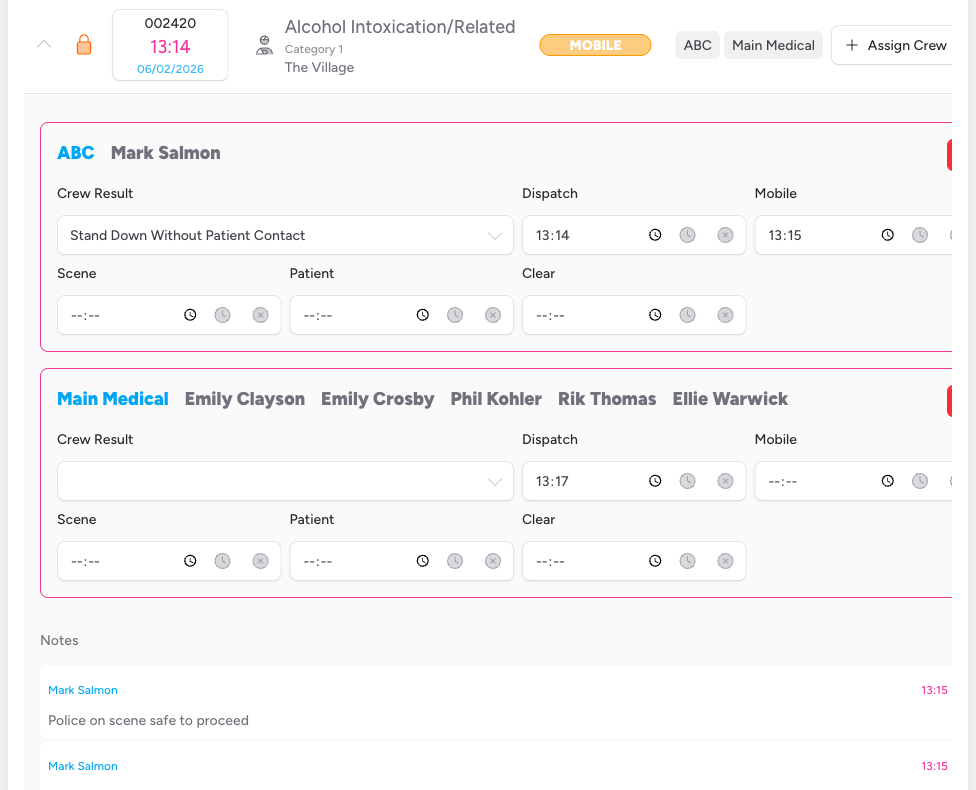
Click the chevron button on the left of any job row to expand the detail panel for that job. The panel shows:
- A card for each crew assigned to the job, with time fields and crew result
- A Notes section for operational communication
Click the chevron again to collapse the panel. Only one job's detail panel can be open at a time.
The chevron button is only visible to team administrators. Team members cannot expand job rows or access the detail panel.
Crew Details and Time Tracking
Inside an expanded job row, each assigned crew appears in its own bordered card showing the callsign and crew member names.
Time fields
Five time fields let you track a crew's progression through the job:
| Field | What it records |
|---|---|
| Dispatch | When the crew was dispatched |
| Mobile | When the crew went mobile (en route) |
| Scene | When the crew arrived on scene |
| Patient | When the crew made patient contact |
| Clear | When the crew cleared the job |
Times are in 24-hour format and are interpreted as UK local time (Europe/London). If a shift crosses midnight, IndieBase handles the date rollover automatically.
Crew result
Each crew card also has a Crew Result field showing the outcome of the crew's attendance. The available options are:
- Stand Down Before Mobile
- Stand Down Before Scene
- Stand Down Without Patient Contact
- Patient Treated
- Patient Conveyed

Notes
The Notes section appears inside every expanded job row, below the crew cards. Notes are a lightweight way for team administrators to share operational information against a job — handover details, context, reminders.
Each note shows the author's name (highlighted in your team's colour if it's yours) and the time it was posted.
Adding a note (admins only)
Only team administrators can add notes. The note input is not visible to team members.
- Expand the job row by clicking the chevron.
- Click the text input in the Notes section and type your note.
- Click Add Note or press Cmd+Enter (Mac) / Ctrl+Enter (Windows) to save it.
The note appears immediately in the list.
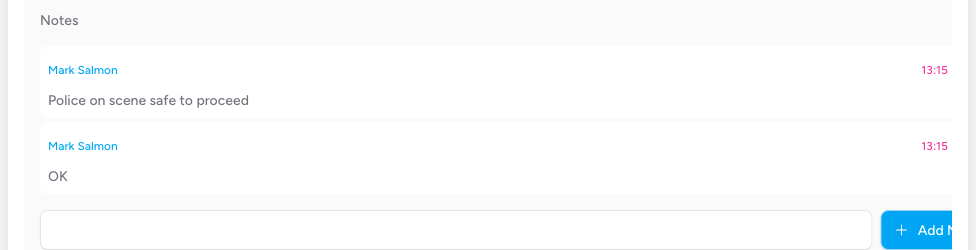
Deleting a note (admins only)
Team administrators can delete any note using the red trash icon next to the note.
There is no confirmation prompt when deleting a note, so take care.
Active Incidents
The Active Incidents panel appears below the Team Jobs section when your team has M/ETHANE incident command records that are not attached to any event. These are standalone incidents — typically created from the app by a crew operating without an event context.
The Active Incidents panel only appears when there are active standalone incidents. If there are none, the panel is hidden entirely.
Each incident card shows:
- Type — the incident type (shown as "M/ETHANE" if no type has been set)
- Location — the incident location (shown as "Location TBC" if not yet set)
- Date and time — when the incident was called
- Crew badges — any crews currently assigned to the incident
- Triage count — the number of triage records attached to the incident
Incidents declared as major are highlighted with a red border and background, and carry a MAJOR badge next to the type. All other incidents use amber.
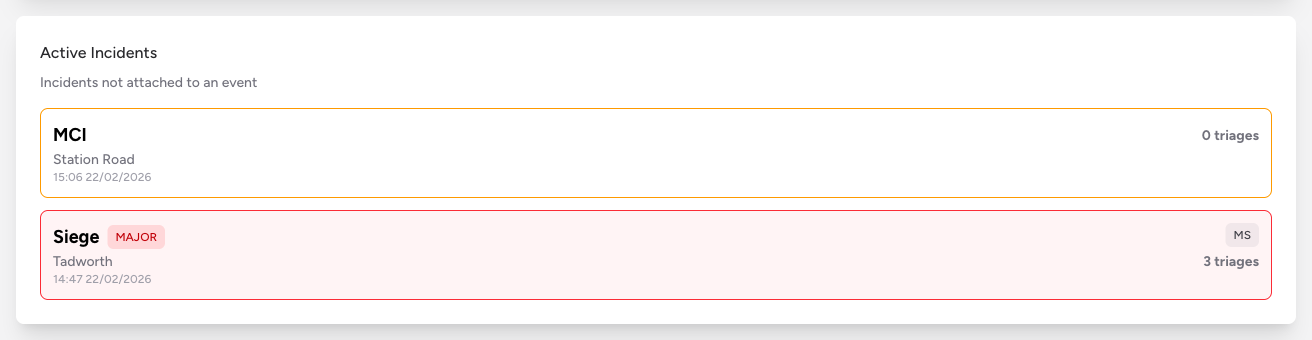
Incidents that are attached to a specific event do not appear here. They appear on the event card (as an amber Incidents badge) and on the event's own page. See Managing an Event for details.
Role-Based Access
What you can do on the home page depends on your role within the team.
Team administrators
Administrators have full control over the Team Jobs panel:
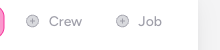
- Create jobs — the Job button appears in the Team Jobs header, opening a modal to create a new standalone job
- Create crews — the Crew button appears in the Team Jobs header, opening a modal to create a new crew
- Assign crews to jobs — an Assign dropdown appears in the Crews column of each job row, letting you assign any available crew to that job
- Remove crews from jobs — a trash icon appears on each crew card inside the expanded detail panel
- Update crew times — the Dispatch, Mobile, Scene, Patient, and Clear time fields are interactive inputs with set and clear buttons
- Set crew result — the Crew Result field is a dropdown selector
- Delete any note — trash icons appear on all notes, not just your own
Team members (read-only view)
If you are a team member without admin rights, a View only banner appears at the top of the page. You can see the job table data (time, type, priority, location, status, and crew badges), but your interactions are limited:
- The Job and Crew buttons are not visible
- The Assign dropdown is not visible in the Crews column
- The chevron button is not visible — you cannot expand job rows or access the detail panel
- Because the detail panel is not accessible, you cannot see crew time fields, crew results, or notes
The View only state is automatic — it reflects your role within the current team. If you need administrative access, ask your team owner to update your role.
Creating a Standalone Job (Admins Only)
-
Click the Job button in the Team Jobs header.
-
The New Team Job modal opens.
-
Fill in the following fields:
- Date / Time — the date and time of the origin of the job. Use the date picker for the date and the time input for the time. This is important: enter the actual call time, not the time you're creating the record.
- Type — select the job type from your team's configured options.
- Priority — select the priority level from your team's configured options.
- Location — a free-text field for the incident location.
-
Click Save Job.
The job appears immediately in the Team Jobs table.
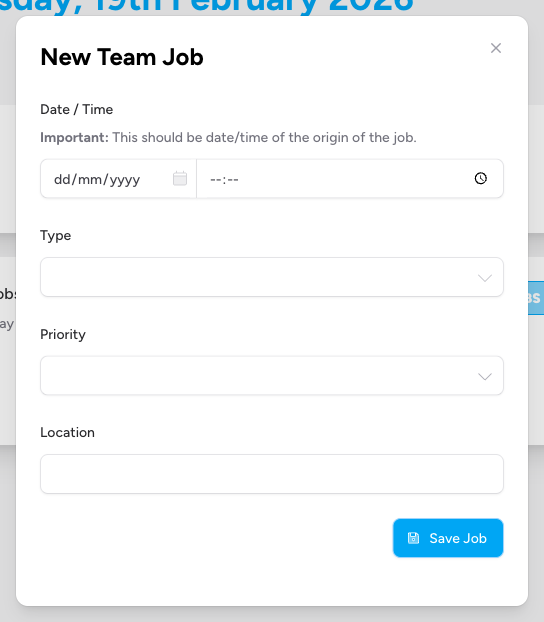
The Date/Time fields are pre-filled with the current date and time as a convenience — but always check and correct them to reflect the actual time of the job, not the time you're entering it.
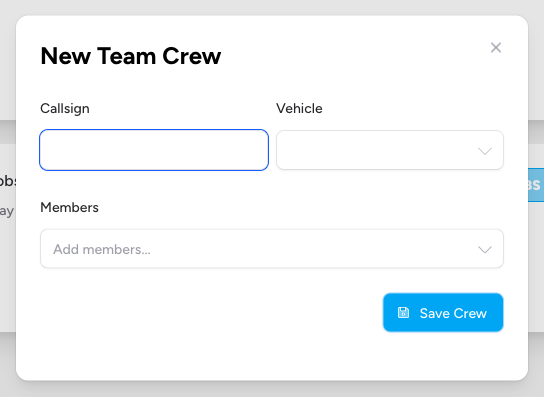
Creating a Standalone Crew (Admins Only)
-
Click the Crew button in the Team Jobs header.
-
The New Team Crew modal opens.
-
Fill in the following fields:
- Callsign — the crew's identifier (e.g.
MED1,ALPHA-2). - Vehicle — select a vehicle from your team's configured vehicles. This field is optional.
- Members — use the searchable multi-select dropdown to add team members to the crew. Selected members appear as tags above the dropdown.
- Callsign — the crew's identifier (e.g.
-
Click Save Crew.
The new crew appears as a badge in the crew badge row beneath the Team Jobs header, and becomes available to assign to jobs via the Assign dropdown.
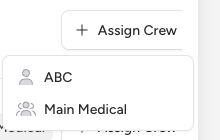
Assigning a Crew to a Job (Admins Only)
- Find the job in the Team Jobs table.
- In the Crews column, click the Assign button (plus icon).
- A dropdown list appears showing all available standalone crews created today.
- Click the crew you want to assign.
The crew is immediately attached to the job and a crew badge appears in the Crews column. Expand the job row to see the crew's time fields and set the dispatch time.
The Assign button is disabled when a job's status is Done.
Tips and Best Practices
- Record times as they happen. The crew time fields on the dashboard are designed for real-time use. Entering times accurately as events occur keeps job statuses correct and makes your KPI data reliable.
- Use notes for anything that doesn't fit the structured fields (admins). Scene updates, handover information, and contextual details are all good candidates for notes. Notes travel with the job and are visible to the whole team, but only administrators can add them.
- The page auto-refreshes every 30 seconds. You don't need to reload manually — changes made by other team members will appear within half a minute.
- Create the crew before the job. The Assign dropdown only lists crews that already exist. If you create the job first and then create the crew, you can assign it immediately after.
- Done jobs fade in the table. This is a visual cue only — administrators can still expand a done job to view its detail, check crew times, or add notes.
Troubleshooting
I can't see the Job or Crew buttons. These buttons are only visible to team administrators. If you need to create jobs or crews and cannot see the buttons, ask your team owner to update your role to administrator.
The Live Events section is not showing. The Live Events section requires an active subscription. If your team's subscription has lapsed, the section will not appear on the home page.
A job I just created isn't appearing in the table. Check that the job's call time falls within the current operational day. The operational day window is set by your team administrator and defaults to 06:00 today through to 05:59 tomorrow, but may differ for your team. If the date or time was set incorrectly when the job was created, it may appear under a different operational day.
The Assign button is greyed out. The Assign button is disabled when a job is marked as Done. If the job has been closed in error, it will need to be reopened from within the full job record.
Times I entered are not saving. Times save when focus leaves the field (on blur). Make sure you've clicked away from the field or pressed Tab after typing the time. The page also requires an active internet connection to save changes — check your connection if times are not persisting after a page refresh.
I can see the home page but I cannot expand jobs or see any controls. Your account has the Member role on this team. The View only banner at the top of the page confirms this. Members can view the job table but cannot expand job rows, access crew detail panels, or manage notes. Contact your team owner if you need administrative access.
The status badge on a job isn't updating. Job status is derived from crew time fields and updates automatically on the next page poll (every 30 seconds). If a status seems stuck, try waiting for the next auto-refresh. Administrators can also try collapsing and re-expanding the job row.