Table of Contents
Checking In or Handing Over a Job
How to check in a job or hand over a patient to hospital or another service
Checking In or Handing Over a Job
How to close out a job — whether your patient went to hospital, was handed over to another service, or was discharged at scene.
Overview
Every job in IndieBase follows a lifecycle from dispatch through to completion. "Checking in" is the act of returning a job to control — releasing it from your device and syncing it back to the server. Before you can check in, you'll typically need to record the patient outcome in the Outcome panel: where the patient went, when you left the scene, and (if applicable) the handover details.
These two things — recording the outcome and then checking in — are distinct steps, and it helps to understand the difference before you crack on.
Checking In vs Marking a Job Done
There are two concepts worth keeping straight:
| Action | What it does |
|---|---|
| Job Done | Marks the job as complete on your device and returns you to the home screen. The job is locked for editing until re-opened. |
| Check-In | Syncs the job from your device back to the server and releases the checkout lock, making it available to other crew members and supervisors. |
In practice, you'll usually mark Job Done first (from the job editing screen), and then Check-In from the job view or jobs list when you're ready to hand the record back to control.
Before You Start
- You must have the job checked out to your device to edit and close it. If the job shows as locked by someone else, you'll need to request access first.
- If your patient was treated and released, discharged, or taken to hospital, you should complete the Outcome panel before marking the job done.
- Some fields in the Outcome panel may be required by your team's configuration — the app will tell you if anything is missing when you tap Job Done.
Part 1: Recording the Patient Outcome
Step 1: Open the Outcome Panel
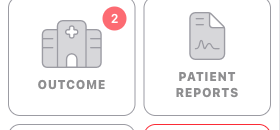
With the job open for editing, find the Outcome panel in the left-hand navigation sidebar. It's identified by the hospital icon. Tap it to open the panel.
If the Outcome panel doesn't appear in the sidebar, your team's configuration may have it hidden. Check with your clinical lead or team admin.
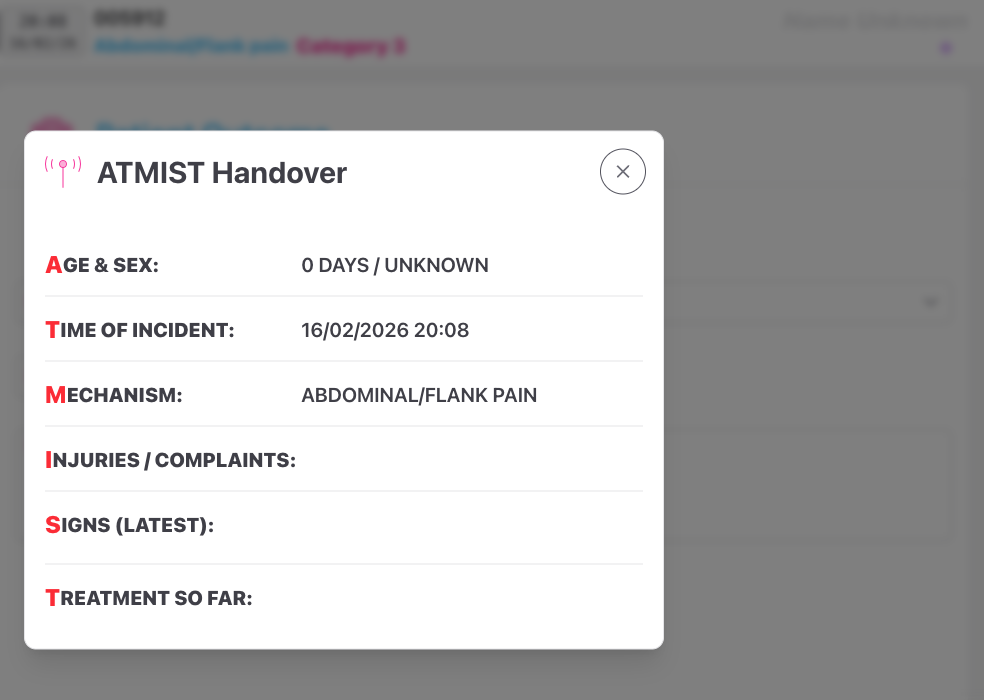
Step 2: Review the ATMIST Handover (optional)
At the top of the Patient Outcome panel, there's an ATMIST button. Tapping this opens a formatted ATMIST handover summary — Age & Sex, Time of incident, Mechanism, Injuries/Complaints, Signs (latest obs), and Treatment so far — pulled automatically from the data you've already recorded.
Use this before handover to make sure you've got your verbal handover details straight.
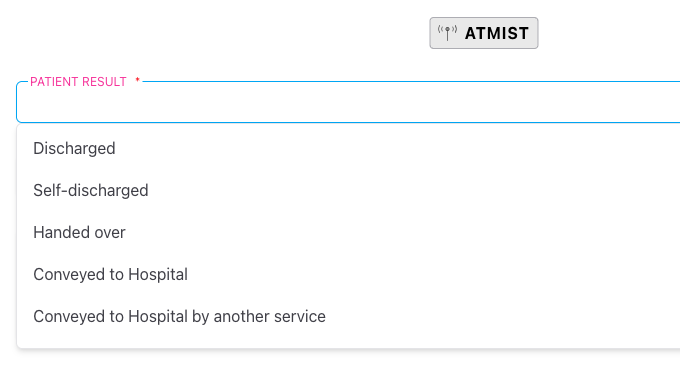
Step 3: Select the Patient Result
The Patient Result field is a dropdown that determines what additional fields appear in the panel. Select the option that best describes the outcome for your patient.
The standard options are:
- Discharged — patient treated and discharged at scene by your crew
- Self-discharged — patient declined further care and left of their own accord
- Handed over — patient handed over to another service (e.g. ambulance service, other clinical team) without going to hospital
- Conveyed to Hospital — your crew conveyed the patient to hospital
- Conveyed to Hospital by another service — patient went to hospital via a different service (e.g. NHS ambulance)
- Deceased — patient was confirmed deceased
Your team may have additional custom options configured, or a Patient Sub Result field for more granular recording. These are set by your team admin.
Step 4: Complete the Additional Fields
The fields that appear next depend on your Patient Result selection:
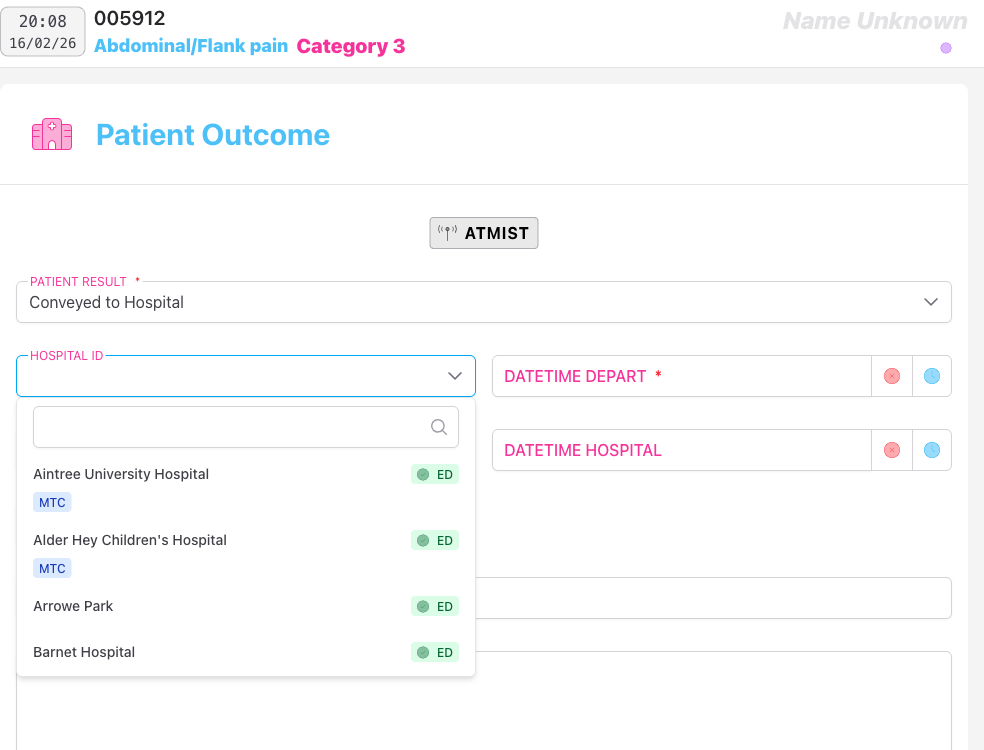
If you selected any outcome involving hospital (Conveyed to Hospital or Conveyed to Hospital by another service):
- Hospital — select the destination hospital from the dropdown. Each hospital in the list shows whether it has an Emergency Department (ED) and which specialist services it covers (MTC, Neuro, Cardio, Vascular, MaxFax, ENT, Burns, PPCI, Stroke). This helps you choose the most appropriate receiving unit.
- Leave Scene Time — the time you left the scene with the patient
- Pre-Alert Time — the time you pre-alerted the hospital
- Hospital Arrival Time — the time you arrived at the receiving hospital
- Handover Time — the time you handed over to hospital staff
- Handover To — the name or role of the person you handed over to
- Notes — any additional handover notes
If you selected Handed over:
- Leave Scene Time — the time you left scene
- Handover Time — the time of handover
- Handover To — who you handed over to
- Notes — any additional notes
If you selected Discharged or Self-discharged:
- Leave Scene Time — the time you cleared scene
If you selected Deceased:
- PLE/ROLE Time — time of Presumption of Life Extinct / Recognition of Life Extinct. Tap the clock icon to stamp the current time, or use the clear button to remove a time you've set by mistake.
- PLE/ROLE By — the name of the clinician who confirmed death
- An option to Create ROLE Form — see below.
Time fields use 24-hour format. Tap the clock icon to stamp the current time instantly, or type directly into the field. Tap the red X to clear a time if you've set it in error.

Step 5: Complete the ROLE Form (Deceased patients only)
If your patient is recorded as Deceased, you can tap Create Role Form to add a Recognition of Life Extinct (ROLE) form to the record.
The ROLE form follows the clinical criteria structure and includes three sections — you complete the section that applies:
-
Condition unequivocally associated with death — select one from: Massive cranial or cerebral injury, Hemicorporectomy, Massive truncal injury, Decomposition or putrefaction, Incineration, Hypostasis, Rigor mortis.
-
Patient pulseless and apnoeic — tick one or more of: DNAR or Validated Advanced Directive, Expected death due to terminal illness, Asystole with no CPR in past 15 minutes and no signs of drowning/hypothermia/poisoning/pregnancy, Asystole AND prolonged submersion (>1.5 hours).
-
Following 20 minutes of Advanced Life Support (ALS) — tick to confirm all criteria are met: no palpable pulses, no heart sounds, no respiratory sounds, pupils fixed and dilated, asystole on ECG for 30 seconds.
To delete the ROLE form, tap the trash icon in the top-right corner of the ROLE form section and confirm when prompted.

Part 2: Marking the Job Done
Once you've completed the Outcome panel (and any other required panels), you're ready to close the job on your device.
Step 6: Tap Job Done
In the top-left of the sidebar, tap the Job Done button (orange, with a tick icon).
The app will validate all required fields across every panel before proceeding. If anything mandatory is missing, it will take you to the relevant panel and highlight the fields that need attention.
If validation passes, the job is marked as done, done_at is recorded, and you're taken back to the home screen. The job is now locked for editing.
If you realise you've marked a job done in error, you can re-open it from the job view screen — tap Re-open from the status banner at the top of the page (if you have permission to do so).

Part 3: Checking In
Checking in syncs the completed job from your device to the server and releases the checkout lock. You can do this from two places.
Option A: Check In from the Job View Screen
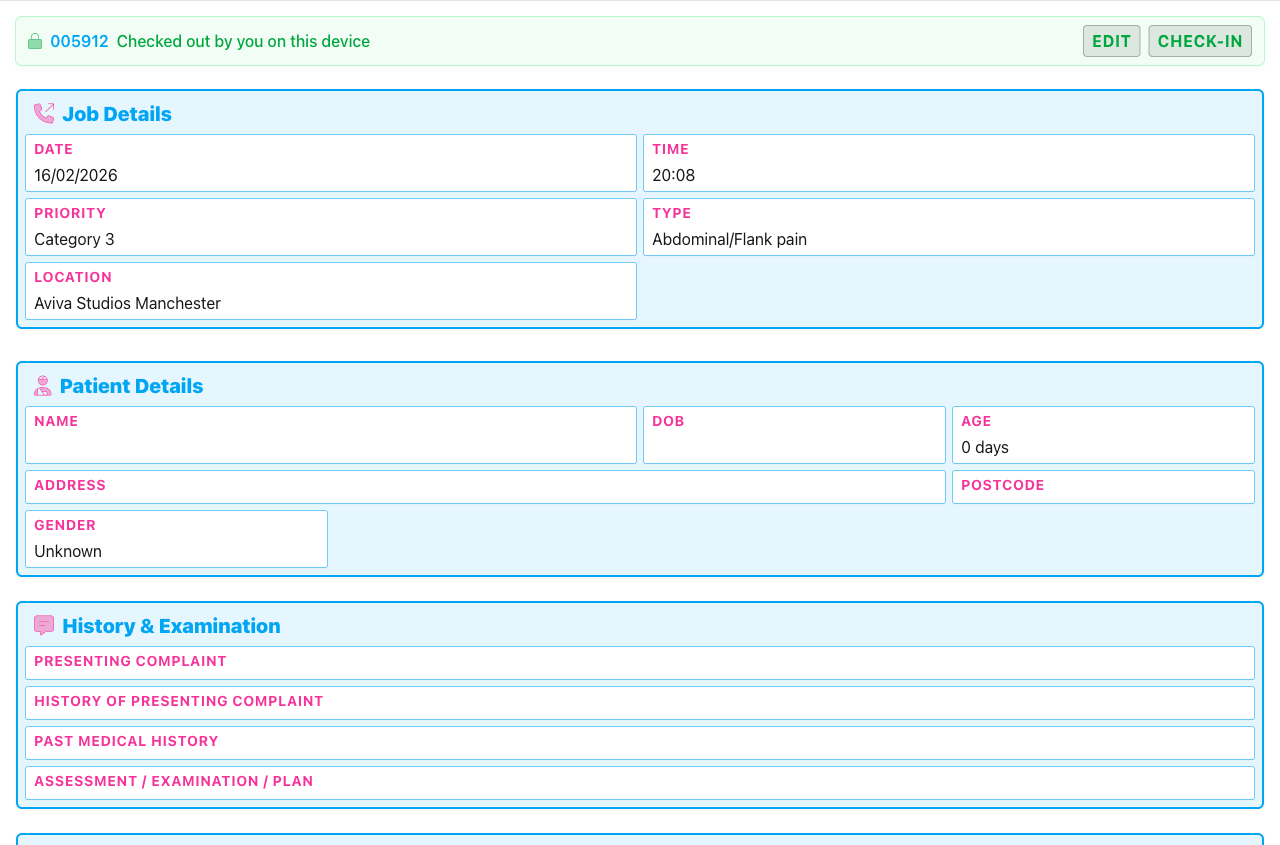
Navigate to the job via the jobs list and tap View. If the job is checked out to you on this device, you'll see a green status banner at the top of the page reading "Checked out by you on this device".
Tap the Check-In button in that banner.
The job is synced, the lock is released, and the job becomes available for others to view.
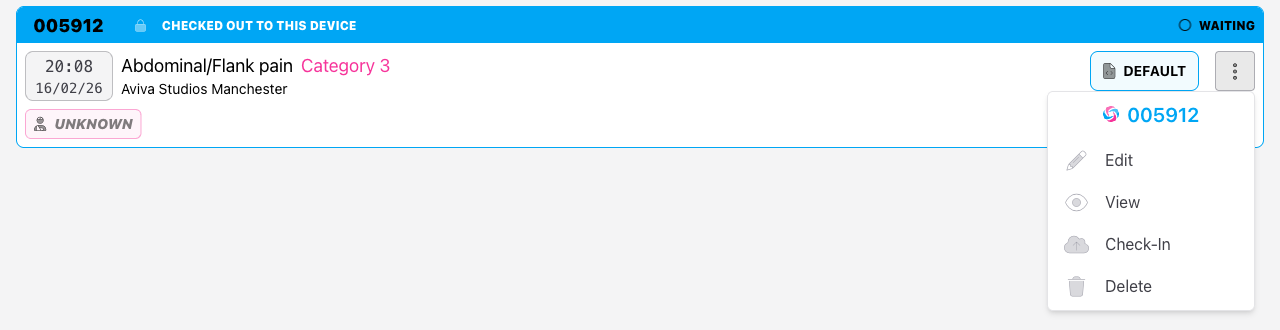
Option B: Check In from the Jobs List
From the home screen, find the job in the list. Tap the menu icon on the job card and select Check-In from the options.
What Happens After Check-In
Once checked in:
- The job is removed from your local device storage
- The lock is released — the job is no longer "checked out" to you
- The job becomes visible to supervisors, admin users, and anyone with access to the team's job records
- The patient outcome and all recorded data are available for reporting
If the job was marked as Job Done before check-in, it will appear in the system with its completed status. If it was not marked done (e.g. you're checking it in mid-job so another crew member can take over), it remains open for editing by whoever checks it out next.
Tips & Best Practices
- Complete the Outcome panel before tapping Job Done. The outcome fields are what drive the job's status in the system — jobs without a recorded patient result may not appear correctly in reports.
- Use the ATMIST button before verbal handover. It gives you a clean summary of the key clinical information without you having to scroll through the record.
- Stamp times as they happen. The clock icon in each time field stamps the current time instantly. If you're recording retrospectively, type the time directly rather than using the stamp, so the record is accurate.
- Check in as soon as practical. Holding a job checked out on your device means it's locked for everyone else. If you're finished with it, check it in so control and supervisors can see the complete record.
- If you're offline, the job will sync automatically when you're back in range. You can still mark it done and navigate away — the check-in will complete in the background.
Troubleshooting
The Outcome panel isn't visible in the sidebar. Your team configuration may have the outcome panel hidden. Check with your team admin or clinical lead.
The Job Done button won't complete — it keeps taking me back to a panel. One or more required fields are incomplete. The app will navigate you to the panel with missing information and highlight the relevant fields in red. Fill them in and try again.
The Check-In button isn't showing in the job view. The Check-In option only appears when the job is checked out to you on the current device. If you checked it out on a different device, you'll see a warning banner instead — you can use Force Checkout to take it back if you have the necessary permissions.
I need to edit the job after marking it done.
Tap Re-open from the status banner at the top of the job view page. This removes the done_at timestamp and allows you to edit again. You'll need appropriate permissions — if the button isn't visible, speak to your team admin.
I selected the wrong patient result. As long as the job hasn't been checked in and locked by your team admin, you can go back to the Outcome panel and change the selection. The additional fields (hospital, handover times, etc.) will update automatically based on your new selection.
- Adding a Job — creating a job and setting up crew times from the start
- Filling In the Patient Record — recording patient details, observations, and outcome before checking in
- Marking a Job as Done — the validation step that precedes check-in