 IndieBase

Table of Contents
Sending a PRF to Patient
How to email a Patient Report Form directly to the patient from the Patient Reports panel.
Sending a PRF to Patient
Email a copy of a completed Patient Report Form to the patient's own email address — directly from the Patient Reports panel.
Overview
When the patient email feature is enabled for your team, the Patient Reports panel includes a Send PRF to Patient button. You select which generated report to send, confirm the patient's email address, and the system queues the email immediately.
For the patient's privacy, the attached PDF is password-protected. The email itself never contains the password — instead, a one-time password is shown to you on screen after sending, which you give to the patient separately (read it aloud, or text it to their mobile). They need this password to open the PDF.
The send is recorded in the Sharing history table in the same panel, alongside hospital emails and portal links, with live delivery status.
If your team has set a contact email in Information Governance, patient replies reach the team directly. If only a phone number is configured, the email asks the patient not to reply and to use that number instead.
Before You Start
- The Email PRF to patient switch must be enabled by a team admin in Team Settings > Information Governance > PRF Distribution. See PRF Distribution Setup.
- The patient must have an email address recorded in the Patient Details panel. When the switch is on, an Email field appears in the Patient Details panel (in the PID section) — fill it in before attempting to send.
- At least one report must have been generated for this patient. The button is disabled until a report exists.
- (Optional) If the patient has a mobile number recorded in Patient Details, you can text them the password with one tap after sending. Without a mobile number, you simply read the password aloud instead.
If your team also uses the Patient Feedback feature, the patient email field is already visible in Patient Details regardless of this switch — the same field is shared between both features.
Sending the PRF
Step 1: Record the patient's email address
Open the job in the app and go to the Patient Details panel. In the PID section, enter the patient's email address in the Email field.
Save the record — the email address needs to be saved before the Send PRF to Patient button becomes active.
Step 2: Open the Patient Reports panel and generate a report
Navigate to the Patient Reports panel using the panel navigation.
If no reports have been generated yet, click Generate Report and wait a few seconds for the report to appear in the grid. The send buttons are disabled until at least one report is present.
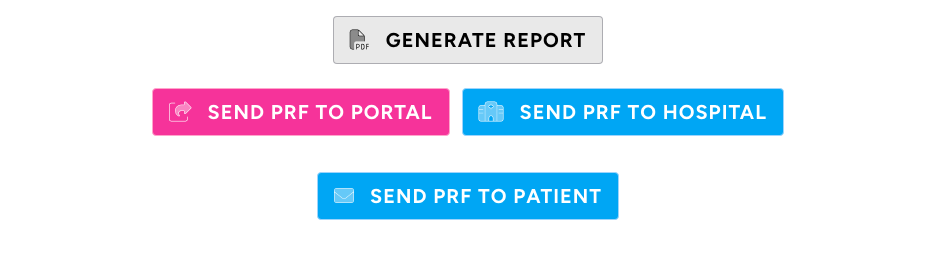
Step 3: Click Send PRF to Patient
Click Send PRF to Patient.
A confirmation dialog opens.
Step 4: Select the report and confirm
The Send PRF to Patient dialog shows:
- A Report to send dropdown — select which generated report to send. The most recent is pre-selected.
- A confirmation message showing the patient's email address — for example: "Are you sure you want to send this report to patient@example.com?"
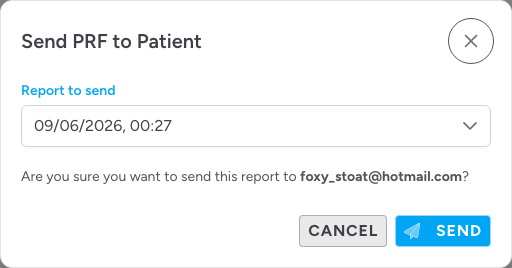
Confirm the address is correct, then click Send.
Step 5: Done - the PRF is queued
A success notification confirms the email has been queued. The dialog closes and a new row appears in the Sharing history table with a status of Queued.
Step 6: Give the patient the password
Because the attached PDF is password-protected, the Patient report password dialog opens automatically once the email is queued. It shows a one-time, eight-character password (for example, 3A7K9FQM) that the patient needs to open the PDF.
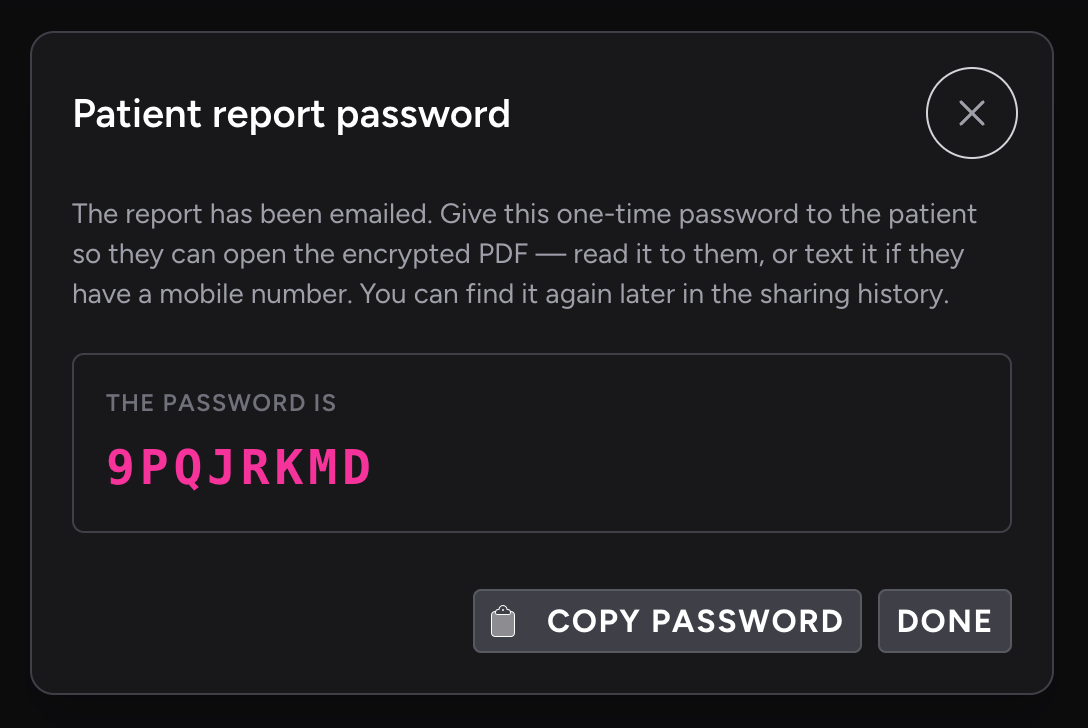
Give the password to the patient using whichever option suits the situation:
- Read it aloud — if the patient is with you or on the phone, simply read the password out.
- Copy password — copies the password to your clipboard so you can paste it into another channel.
- Send via SMS — texts the password straight to the patient's mobile. This button only appears when a mobile number is recorded in Patient Details. After you tap it, the dialog confirms Texted to the patient; if the text could not be sent, it shows a warning asking you to read the password to them instead.
Click Done to close the dialog.
The password is generated fresh for each send and is never included in the email. If you need it again later — for example if the patient calls back — you can reveal it from the Sharing history table without resending the report (see below).
Tracking Delivery
The Sharing history table at the bottom of the Patient Reports panel records every send — both email types and portal links — in one place.
Each row shows:
| Column | What it shows |
|---|---|
| When | Date and time the share was created |
| Method | "Email - Hospital", "Email - Patient", or "Portal" |
| Recipient | The email address the report was sent to |
| Report | Which generated report was sent (by creation date/time) |
| Status | Current delivery status (see below) |
| Password | For patient emails, a Reveal button that shows the one-time PDF password (see below) |
| Shared by | The team member who initiated the send |
Revealing the password later
Patient email rows include a Password column. The password is hidden by default to prevent it being seen over your shoulder — click Reveal to display it. Once revealed, you can copy it or tap SMS to text it to the patient's mobile again. This lets you give the patient their password at any time without resending the report. (Hospital emails and portal links are not password-protected, so this column is blank for them.)
Delivery status values
| Status | Meaning |
|---|---|
| Queued | The email is in the send queue |
| Sending | The email is being processed |
| Sent | The patient's mail server accepted the message |
| Bounced | The email could not be delivered — the address may be wrong |
| Failed | The send failed — contact your team administrator |
Status updates automatically as delivery events arrive. If a row shows Queued for more than a few minutes, try reloading the panel.
Tips & Best Practices
- Record the email address early. Fill in the patient's email address in Patient Details as soon as it is available — ideally at the same time as other contact details — so it is ready when you want to send the report.
- Check the address before sending. The confirmation dialog shows the full address. Double-check it matches what the patient provided before clicking Send.
- Check the history before sending again. If you are unsure whether a previous send succeeded, check Sharing history before clicking again.
- Record a mobile number to enable texting. If the patient has a mobile number in Patient Details, you can send the PDF password by SMS instead of reading it out — handy when the patient is not with you.
- You can give the password again later. The password is stored against the send, so use Reveal in the Sharing history table if the patient needs it again — there is no need to resend the report.
- Each send has its own password. Sending the report again generates a new password, so make sure the patient uses the one from the matching send.
Troubleshooting
The Send PRF to Patient button is not visible.
The button only appears when all three conditions are met: the Email PRF to patient team toggle is on, the patient has an email address recorded in Patient Details, and a report has been generated. Check each condition. If the toggle needs enabling, contact your team administrator.
The button is visible but greyed out.
You need to generate a report first. Click Generate Report and wait for it to appear in the grid, then try again. The button also disables briefly while the app syncs pending changes before opening the dialog.
I can see the button but not the Email field in Patient Details.
The Email field in Patient Details only appears when the Email PRF to patient toggle is on for your team (or when Patient Feedback is active). If neither is the case, you will not see the field. Ask your team administrator to enable the toggle in Team Settings > Information Governance > PRF Distribution.
The status shows Bounced.
The email address entered for the patient is likely incorrect or the mailbox is unavailable. Update the email address in Patient Details and resend.
The patient says the PDF asks for a password.
That is expected — the attached PDF is password-protected. The patient needs the one-time password shown in the Patient report password dialog after sending. If you have closed that dialog, find the send in the Sharing history table and click Reveal in the Password column, then read or text the password to the patient.
The Send via SMS button is not shown.
The SMS option only appears when the patient has a mobile number recorded in Patient Details. Add a mobile number there, or read the password to the patient instead.
I tapped Send via SMS but the patient did not receive the text.
Texting is best-effort — if the message could not be sent, the dialog shows a warning. Check the mobile number in Patient Details is correct, then try again from the Sharing history table (Reveal > SMS), or simply read the password to the patient.
- PRF Distribution Setup — how admins enable the patient email feature
- Sending a PRF to Hospital — how to email a report to the receiving hospital
- Sharing a PRF via Portal — the secure link alternative for external recipients
- Filling In the Patient Record — completing the full clinical record